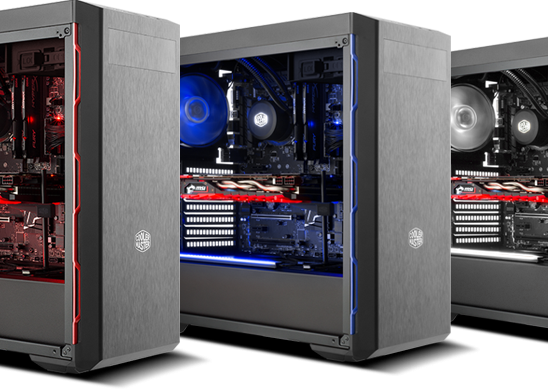
Introducing the MasterBox MB600L by Cooler Master (MCB-B600L-KA5N-S00). The MasterBox lineup features affordable mid-tower PC cases that are able to keep up with the demand of the typical gamer. In this review we will be looking at the MB600L which offers a very unique interior design and a sleek and simple exterior design. We will be taking a look at how the case is packaged, its many features, assembly and its overall design and functionality.
Functional mid tower cases appear to be making a come back in recent years. In the past, if you wanted to run at least a dual GPU setup, with liquid cooling options, a full tower ATX case was a must. However, now everyone wants the biggest and most spacious case out there. Some are limited by desk placement and storage, others prefer a smaller, more compact gaming tower that can fit all of their hardware comfortably while providing room to expand if needed. Lately manufacturers like Cooler Master have grown to fill this market by releasing functional mid-tower ATX cases that have more than enough internal space to fit all your GPUs in a much smaller size.
With that being said, continue onto the next page to head into the review!
Packaging & Features
The Cooler Master MB60L’s packaging was overall pretty standard. The case was shipped in a durable double-ply cardboard box. Inside the case was placed inside a plastic bag to prevent scuffing, and seated inside two custom Styrofoam shells on either side. Overall, the packaging was effective and the unit arrived damage free.


Out of the box, the first thing we notice was the overall simplistic design. The entire case is black inside and out with maroon colored accent designs around the outside of the front of the case giving the MB600L a slight splash of color. The structure of the case feel solid. No obvious flexing or bending where it shouldn’t be. Pop-riveted aluminum is used for most of the overall construction. The front of the case is a plastic/metal combination. All of the metal inside and out is power coated back with a paint that gives it a slightly rough, bumpy and durable feel. Overall, the case is very lightweight and quite solid.


The removable side panel consists of tinted acrylic held on by four removable thumb screws. Much different than the slide lock style we typically see in mid-tower cases. It is isolated by the screws and case by rubber grommets which should keep it from cracking if too much pressure is applied. Of course, our favorite part when unboxing anything shiny:


With the side panel removed, let’s take a look at the inside. The MB600L comes with a single rear facing 120mm fan. If needed the case is able to mount three additional fans in the front of the inside of the case as well. As far as motherboard support goes, the case appears to be able to comfortably mount any ATX, m-ATX, and E-ATX form factor. A nice large access area is provided for easy access behind the CPU for easy heatsink mounting without having to remove the motherboard from the case.


To the right of the CPU area, there’s a small mount for a 2.5″ SSD/HDD. The drive is mounted to the plate, and then secured to the case via a single thumb screw for easy installation and removal.
One of the most interesting features the MB600L offers is the isolated compartment for the PSU on the bottom of the case. This does make installation a bit awkward, but once complete, it really does a good job at hiding the cables and improving airflow to the rest of the case.
The PSU is installed by removing PSU mounting plate on the back of the case by removing the two thumb screws. Once removed, the plate is mounted to the back of the PSU and then re-inserted back into place along with the attached PSU. The compartment shroud cannot be removed which can make running cables a bit cumbersome.


Also inside the bottom PSU shroud there are two slide-lock 3.5″ HDD mounts for additional storage.


The front of the case is retained by pressure clips and is easily removed by giving it a firm tug. This will allow you to mount additional fans if needed. There is enough room behind the front cover to mount the fans on the inside if needed, however we recommend mounting them on the inside of the case for optimal airflow.

The top of the font panel is where you find your HDD/Power lights and Power and reset buttons. When the system is powered on, the power LED located on the power button itself glows white. There is an additional white LED for HDD activity located just to the right. The reset button is a bit awkward as it requires a tool such as a pen to fully depress it. The front panel also includes two USB 3.0 ports.

Hardware Installation
The hardware used in this build was basically what we already had lying around. Overall pretty standard and pretty decent specs for a budget PC. We opted to use a full size GPU (AMD Radeon 7970 which is about as large (and as hot running) as they come. The motherboard is a standard ATX style motherboard for an AMD hexacore CPU. The CPU cooler is a Cooler Master Hyper 212+, also about as tall as they come.
We ended up installing a single SSD and HDD under the PSU shroud to make the build as clean as possible. The modular PSU is a bit overkill, Cooler Master V850 which we reviewed here.

As we mentioned on the previous page, the shrouded PSU cover makes installation a bit awkward when mounting the PSU and running wires. If you’re the type of person who likes to take their time and ensure that every wire is carefully hidden and manged, then you will absolutely love this feature. If not, then you may find that the case gets in the way at times and can slow you down.
That being said, installation is quite straightforward. Upon powering up the system, we noticed that the rear facing fan does spin rather slowly, so at least in the case for this build, additional fans will be required.
Final Thoughts and Awards

The Cooler Master MasterBox MB600L is an overall fantastic case and was overall a lot of fun to work with. At the time of writing this review, the case can be purchased on Newegg for $44.99. Considering the amount of features, and quality you get from this case we consider it an absolute bargain. The overall quality is excellent and we had no issues installing over-sized hardware such as large graphics cards or CPU coolers.
Some of the drawbacks to this case are first, due to the unremovable PSU shroud, hardware instalation does take extra time. However, it is obvious that Cooler Master made cable managment a top priority when designing this case, therefore this case is geared more twards those that take their time with their builds. Second, Cooler Master only includes a single rear-facing 120mm fan. If you are running any mid to high end hardware, you will definitely require additional cooling.


[…] edition to its mid-tower lineup, the MasterBox MB520. This particular case is very similar to the MasterBox MB600L we reviewed late last year, however this case features much larger front intakes and is able to support three 120mm fans (or a […]