Intel has recently released Coffee Lake, which includes the 8th gen Core i3/i5/i7 processors and the Z370 motherboard platform. Supplies are still low, so not everyone has theirs yet. Luckily a couple of us here at GND-Tech managed to buy a Core i7 8700k early for retail price, allowing us to bring you this article!
Overclocking Coffee Lake is hardly any different than Kaby Lake/Skylake or Haswell and the related HEDT models. You will want a decent Z370 motherboard, as lower end motherboards often lack overclocking ability or proper VRM cooling. The hardware used for this guide is listed below:
- Motherboard: ASUS Maximus X Hero Z370 Wi-Fi AC
- RAM: G.SKILL TridentZ RGB 32GB (4 x 8GB) DDR4 3200 CL16
- Processor: Intel Core i7 8700k delidded
- Processor Cooling: EK Phoenix MLC 360mm
As usual for Intel, only models ending in ‘K’ such as the Core i7 8700k are overclockable, and you will want to delid your CPU especially when overclocking. Intel uses cheap, low quality thermal paste between the IHS (Integrated Heat Spreader) and CPU die, and poor adhesive to glue them together, resulting in poor thermal contact and potentially uncontrollable temperatures when overclocking. “Delidding” is the process of removing the IHS and cheap thermal paste, applying higher quality thermal paste (liquid metal is ideal), then optionally sealing the IHS back in place for protection using better adhesive. This improves temperatures MASSIVELY, it is a must for overclocking Intel processors.
To overclock, go to your motherboard’s BIOS section that allows it. For my ASUS Z370, that is under Extreme Tweaker. Overclocking is disabled by default, controlled by the Ai Overclock Tuner setting, but this won’t be the same on other brands. I use XMP, which loads manufacturer default RAM speed, timing, and voltages. It is essentially guaranteed to work, unless your RAM is faster than your board can handle, but unlike AMD any recent Intel motherboard can handle DDR4 3200 MHz (even with all DIMM slots filled with 8GB modules).
The downside to XMP is potentially higher than needed CPU VCCIO and System Agent (SA) voltages, but more on voltages later.
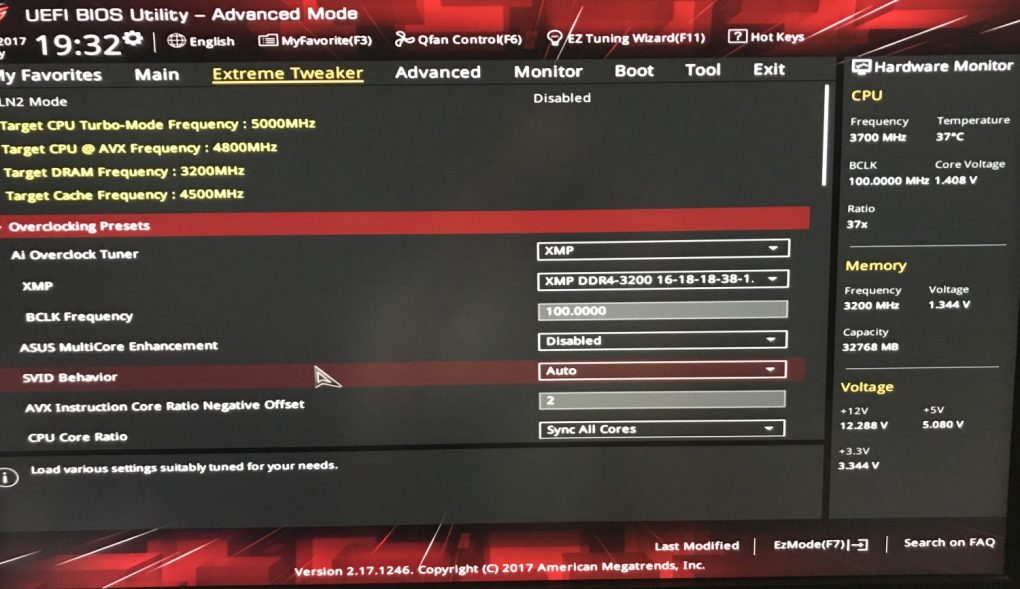
Other important settings in the photo above include:
- BCLK Frequency: The core operating frequency of the CPU, tied to PCI-E bus speed. Just leave this at 100 for stability’s sake.
- Multicore Enhancement: Enable to sync all CPU cores at the maximum turbo speed when [b[NOT[/b] manually overclocking. If manually overclocking, disable.
- SVID Behavior: Set to Best Case if available. It should help with temperatures.
- AVX Offfset: Or, as shown in the photo above, AVX Instruction Core Ratio Negative Offset. Multiply this value by 100, then subtract it from your target core clock to get the CPU operating frequency when running AVX applications. This feature is present on Coffee Lake because Intel CPUs can safely run higher frequencies in applications using other instruction sets than AVX. A setting of 0 means your CPU always runs at the same speed under load, while the photo above shows a setting of 2. Since the CPU is also set to 5 GHz, that means the CPU frequency during AVX applications will be 4.8 GHz (5000 – (2 * 100)).
- CPU Core Ratio: Sync all cores so that they run at the same frequency. Therefore you only change the core ratio of one core, and it affects all the others. Multiply this value by the BCLK frequency to get the effective CPU frequency. I use 50 here, so 100 * 50 = 5000 MHz or 5 GHz.
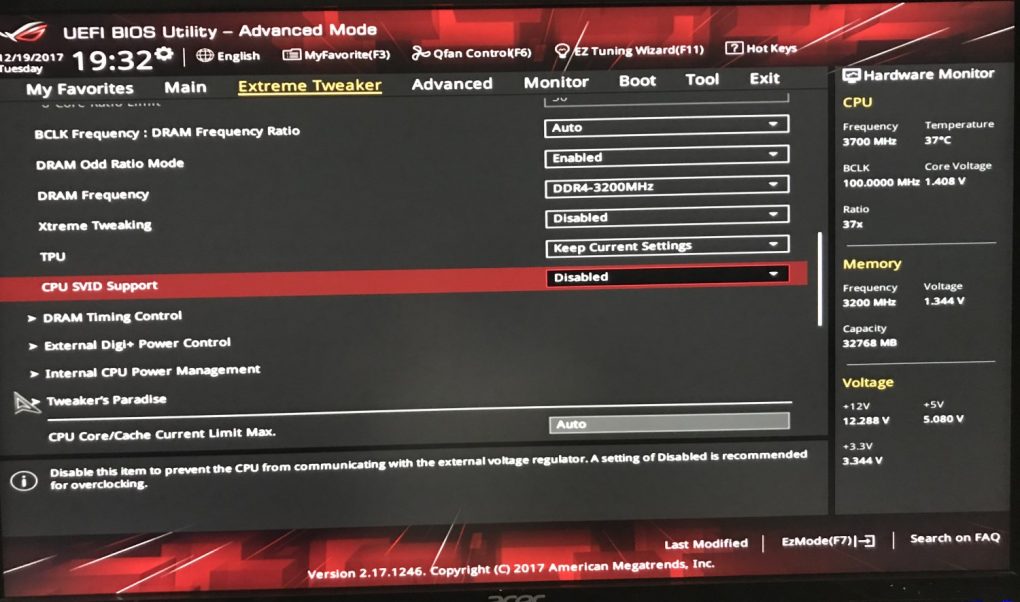
- BCLK Frequency : DRAM Frequency Ratio: Leave this on Auto, the motherboard can handle this for you.
- DRAM Odd Ratio Mode: Same as above.
- DRAM Frequency: A dropdown list letting you choose your RAM speed. So this is where you would overclock RAM. I don’t even bother overclocking RAM, not worth it on Intel platforms (negligible performance difference in every real world scenario) since you usually can’t get far.
- CPU SVID Support: Disable to stabilize vCore and vCore readings.
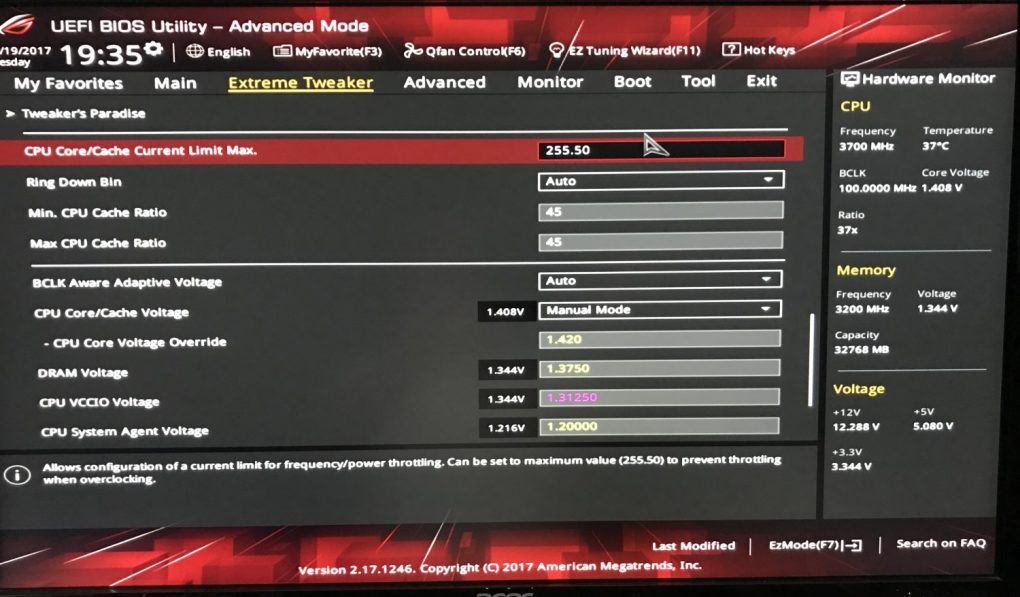
- CPU Core/Cache Current Limit Max: Max this out to disable power throttling when overclocking.
- Min/Max CPU Cache Ratio: This is multiplied by your BCLK frequency to determine the cache frequency. Cache frequency is very important as it affects the speed of core communication. Not as important as the equivalent with AMD Ryzen processors (Infinity Fabric speed) but still very important and sadly always limited to lower frequencies than the CPU cores can achieve. I personally run my cache at 4.5 GHz (100 * 45).
- BCLK Aware Adaptive Voltage: Do yourself a favor and disable this setting and manually control vCore so there are no surprises.
- CPU Core/Cache Voltage: Voltage of the CPU cores and cache. Set to Manual so that you can have as much control over it as possible. For a 5 GHz overclock on the i7 8700k (and I suppose 8600k), 1.375v is a good starting point. Temperatures will determine your upper limit here. But your setting here won’t be exact due to load line calibration (LLC) and other factors. It is approximate so take it with a grain of salt. Understand your motherboard’s LLC so that you will know if your CPU ends up using more or less than the Core/Cache Voltage setting.
- DRAM Voltage: Self-explanatory. DDR4 RAM kits are usually rated for 1.35v or sometimes 1.4v, which Coffee Lake should be able to handle as well. I wouldn’t go far beyond 1.4v ever and it usually isn’t necessary unless going far beyond 4266 MHz. Again, the setting here is approximate. I have mine set to 1.375v but in practice it runs beneath that. I do need a bit more than 1.35v due to my higher quantity of RAM, so expect the same if populating all DIMM slots.
- CPU VCCIO Voltage: Leaving it on Auto will usually work but then it will typically run at higher than needed, so I would try to manually set it as low as possible. Running XMP potentially increases VCCIO requirement. Be weary around 1.4v.
- CPU System Agent Voltage (SA): Leaving it on Auto will usually work but then it will typically run at higher than needed, so I would try to manually set it as low as possible. Running XMP potentially increases SA requirement. I’d keep this below 1.2v.
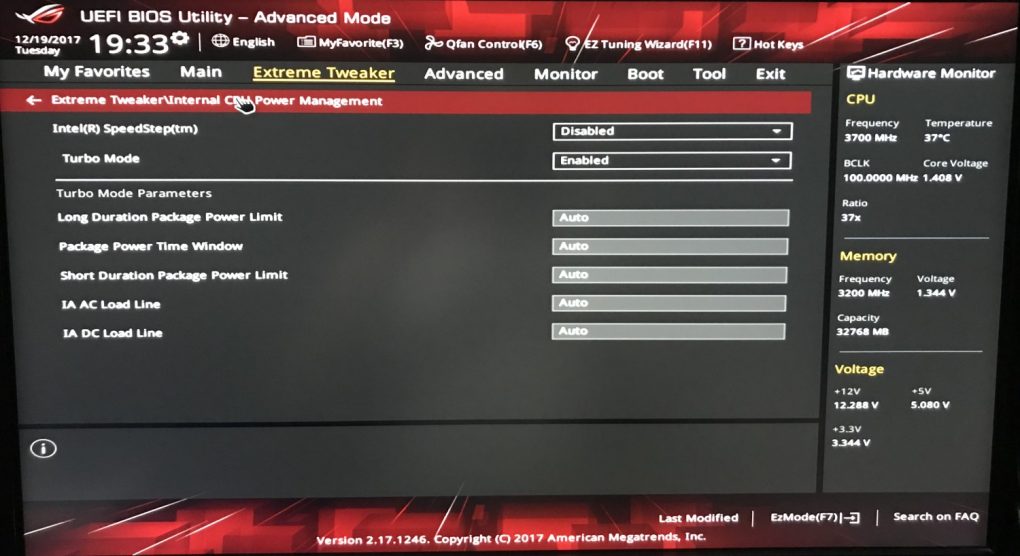
Disable Intel SpeedStep when overclocking. It can be found in CPU configuration setting. Disabling it will prevent the CPU from downclocking when idle, since you don’t want it to downclock at the wrong time.
Turbo mode has to be enabled to overclock, otherwise nothing happens.
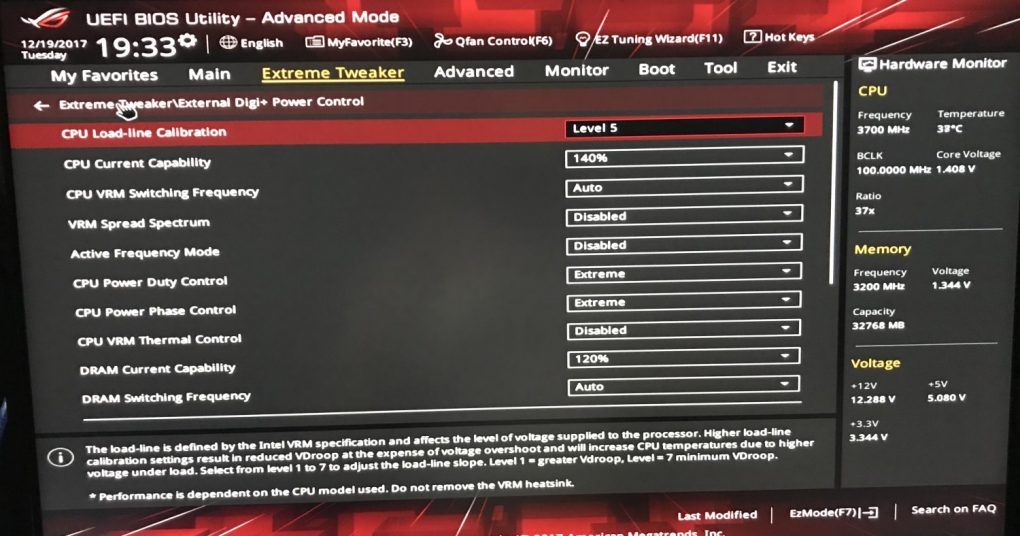
- CPU Load Line Calibration (LLC): This controls voltage (vCore) behavior of the CPU. Different motherboard brands have different settings and performance here. On one end of the spectrum, LLC increases the amount of vDroop which is the lowering of vCore when booted (making the CPU use less voltage than the BIOS vCore setting). The opposite end of the spectrum causes the CPU to use more vCore than what is set in the BIOS. Try to find a balance that makes the vCore run as close to the BIOS setting as possible when booted into an operating system, just so you have more control over the vCore and so there is less guessing. Level 5 is always a great choice for ASUS it seems.
- CPU Current Capability: Increase this to allow the CPU to draw more power.
- CPU VRM Switching Frequency: Leave this on Auto unless your motherboard’s VRMs are water cooled. If they are water cooled, you can possibly configure this to achieve a greater overclock.
- VRM Spread Spectrum: Disable it, which improves power delivery.
- Active Frequency Mode: Same as above, disable.
- CPU Power Duty/Phase Control: More power related settings. Set to Extreme to ensure the CPU gets all the power it needs and so that all VRM phases are used to their fullest.
- CPU VRM Thermal Control: This allows throttling based on VRM temperatures. If VRM switching frequency is on Auto then you don’t need this if your motherboard has adequate VRM cooling and your case has adequate airflow. Otherwise this setting can come in handy for safety reasons.
Most of the above settings have DRAM versions as well. The same logic and settings apply.
Stress Testing
Stress testing or stability testing is necessary in order to validate whether or not the CPU and RAM are stable. If either of these are unstable, the system will crash and unstable RAM can lead to data loss.
HWiNFO64, for examining CPU, motherboard, RAM, and all other hardware settings within Windows.
Required software:
- HWiNFO64 – For monitoring CPU speeds and… everything else. Except it doesn’t actually tell you vCore; note that CPU SVID is not vCore, it is what the external voltage regulator thinks the CPU needs, not what the CPU is actually using.
- CPUID CPU-Z – Monitors vCore, also provides general information like HWiNFO64 but less of it. But vCore monitoring on Coffee Lake is often inaccurate in any software. To accurately measure vCore when booted into an operating system, you must utilize a voltmeter/multimeter connected to voltage read points on your motherboard.
- Prime95 – The best CPU stress testing application there is.
- Software to read CPU temperatures, such as CPUID HWMonitor, Real Temp, or MSI Afterburner. You don’t want your CPU consistently operating above 80 degrees Celsius.
The stress testing procedure is very simple. First run Prime95 Large FFT for at least 8 hours, the more the merrier. Large FFT is best for stability testing. Monitor temperatures early on, if they stay within the safe range (not consistently over 80 degrees Celsius) after the first 10 minutes then there shouldn’t be a problem. If your system crashes during this test, go back and adjust your settings as needed. Either your voltage is too low or your speeds are just too high. Always remember the importance of AVX offset and how you will have to use one most likely (my 8700k cannot run AVX applications above 4.8 GHz) and cache speed limitations (4.5 GHz is the maximum for my 8700k).
After passing Large FFT with a satisfactory oevrclock, then run a custom Prime95 test for a similar duration using the Blend settings but test 80-85% of your RAM instead (or even 90% if using 32GB). Be sure to close all other applications and unneeded processes and services.
Better memory stability testers include HCI Memtest which is run from Windows (launch one instance per CPU thread, and don’t test more than 80-85% of total RAM), and the best being stressapptest which requires either Linux or bash terminal installed on Windows 10. Of course there is also MemTest86+. Feel free to use all of these tools.
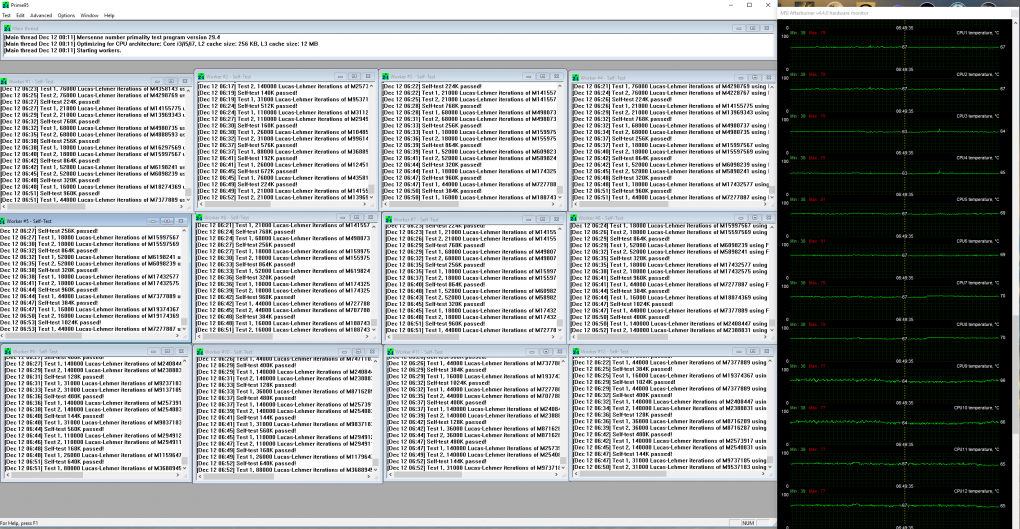
Prime95 after an over night session.
But that brings up one last thing; the instruction sets utilized by the stress tester you are using. Prime95 defaults to AVX or AVX2. So go ahead and test Prime95 Large FFT and Blend using default Prime95 settings, to verify AVX stability. Once you pass, you will want to disable AVX instruction sets to test the full CPU frequency (which is most important as most applications do not use AVX). To disable AVX in Prime95, edit its local.txt file with the following:
CpuSupportsAVX=0

CpuSupportsAVX2=0

CpuSupportsAVX512F=0
So there is a basic overview of the important settings for Coffee Lake overclocking. Let us know if you have any other suggestions by posting a comment below, and feel free to share your overclock achievements!




[…] the WS C246 PRO is geared more towards high powered workstations and servers so likely not a lot of overclocking support. In addition to the 4x PCIe slots, the new motherboard features two M.2 slots for […]
[…] Intel Coffee Lake Overclocking Guide […]
[…] will come with a host of features gamers, overclockers and extreme system builders demand such as Coffee Lake overclocking support, RGB lighting, and robust CPU […]
[…] under the AORUS platform, Gigabyte’s high end gaming lineup. Expect these boards to be packed overclocking features, and other features gamers demand. The Z390 AORUS EXTREME appears to be the new flagship […]