NVIDIA Profile Inspector is a tool for editing driver settings on NVIDIA GPUs (as well as monitoring and overclocking, like RivaTuner and its derivatives). Like an expanded version of that section of NVIDIA Control Panel. Many people aren’t aware that Inspector has a plethora of options for tweaking image quality. The tweaks I’m going over in this thread are forcing ambient occlusion and supersampling into games.
This methods of forcing anti-aliasing are infinitely more effective than ReShade, GeDoSaTo, SweetFX, and whatever other shader injectors exist. This is at the driver level; it is much more precise, and supersampling is technically by far and large the most effective anti-aliasing method and it just cannot be beaten as it gets right to the root cause of aliasing and eliminates it with absolutely no performance-saving metrics. The downsampling used by NVIDIA DSR, AMD VSR, and GeDoSaTo is less effective than these supersampling methods, as those use much less effective rescaling filters even when set to the best ones.
However, forcing ambient occlusion through drivers/NVIDIA Inspector is inferior to ReShade MXAO. Only use this if ReShade somehow doesn’t work in said game.
Preface
Without ambient occlusion (or full global illumination which is even better), games look so much less realistic as light no longer seems to have much of an effect on the environment. And aliasing? It can make an otherwise great looking game look horrible. Many games today are heavily aliased even with their anti-aliasing setting maxed out, because they only have highly ineffective, overly simple AA such as MLAA, FXAA, or SMAA. These games, even at 2560 x 1440 and sometimes even at 4k, are so aliased that all objects will appear like distorted raw polygons with moving, white jaggy edges. Some of the biggest offenders include The Witcher 3, Assassin’s Creed: Unity, all the modern Tomb Raider games, and numerous others. Unfortunately, nothing in this article can help those games.
Supersampling is the ultimate anti-aliasing method, and also the most demanding. You see, if we could play games at a large enough resolution (5k or higher from my experience) then aliasing wouldn’t be an issue. This is the principle behind downsampling, supersampling’s infant brother; simulate a larger resolution by rendering the image at a larger resolution and then scaling it back down with a rescaling filter (Lanczos being the best I know of, used by GeDoSaTo).
But supersampling doesn’t just use a simple rescaling filters. The filters it applies are far more complex and effective at eliminating aliasing, and it gets rid of all kinds of aliasing whether it’s geometry, shader, aliasing on transparent textures, temporal, you name it. Whereas MSAA is only good for removing aliasing on geometry, MLAA/SMAA/FXAA targets only shader aliasing but they’re pretty much good for nothing at 3440 x 1440 and below, TAA is a good all around method but still not on supersampling’s level (though it’s often not demanding at all so there is no good reason for MLAA/SMAA/FXAA to exist anymore).
Unfortunately these tweaks only work in pre-DX10 games, the ambient occlusion probably only working in DX9 (and maybe a few OpenGL titles). There are very few exceptions; it is possible to force ambient occlusion into Metro Redux using this method (a DX11 game), and it does improve image quality ever so slightly. Nonetheless, these tweaks are a primary reason as to why I stick with NVIDIA graphics cards; many of the best games ever made are DX9, and I like to make them look as good as possible. Plus I hate aliasing more than almost anything else.
Why don’t these tweaks work in newer games? I suppose NVIDIA decided that compatibility isn’t needed. Modern games always have their own ambient occlusion implementation, although they could really use the supersampling because modern games are more aliased than ever before. But then again, supersampling is very hard to run.
Speaking of performance, I can’t speak for the performance impact of forcing ambient occlusion. The last time I felt an actual impact was in Skyrim using a GTX 680. Nowadays, it’s just negligible.
As for supersampling, see this quote:
In the situation where a game is bound by pixel shaders (usually the case in modern games) assuming no external bottlenecks the framerate after SSAA is applied will be 1/n of the framerate without SSAA where n is the number of samples. In other words 4xSSAA would give you 1/4th the performance of no SSAA, or a 75% drop in performance to put it another way.
So 2x supersampling will give you a 50% performance penalty, 4x will give you a 75% drop, 8x will give you an 87.5% drop.
dgVoodoo 2
Obviously this guide is exclusively for NVIDIA users. AMD users can’t force multisampling or supersampling into many games, so for those games the best option is usually dgVoodoo 2 if it’s a Direct3D game. dgVoodoo 2 can wrap older D3D versions into newer ones (including D3D12), and at the same time force enhancements such as MSAA, UI scaling and more, which makes it appealing to NVIDIA users as well.
It can interfere with forced anti-aliasing via NVIDIA drivers, so choose what you need most.
Special K
Not the cereal; Special K is another must-have tool for MOST games, not just old ones and regardless of what graphics card you have. This can force legitimate HDR into DX9-DX12 and OpenGL games, it can force on NVIDIA Reflex for NVIDIA users, and much more.
Procedure
1. Download NVIDIA Profile Inspector’s latest release.
2. Upon launching nvidiaProfileInspector, you are greeted with the global driver profile pictured below. It applies to all 3D applications, but anything you change in individual profiles will overwrite this global setting.
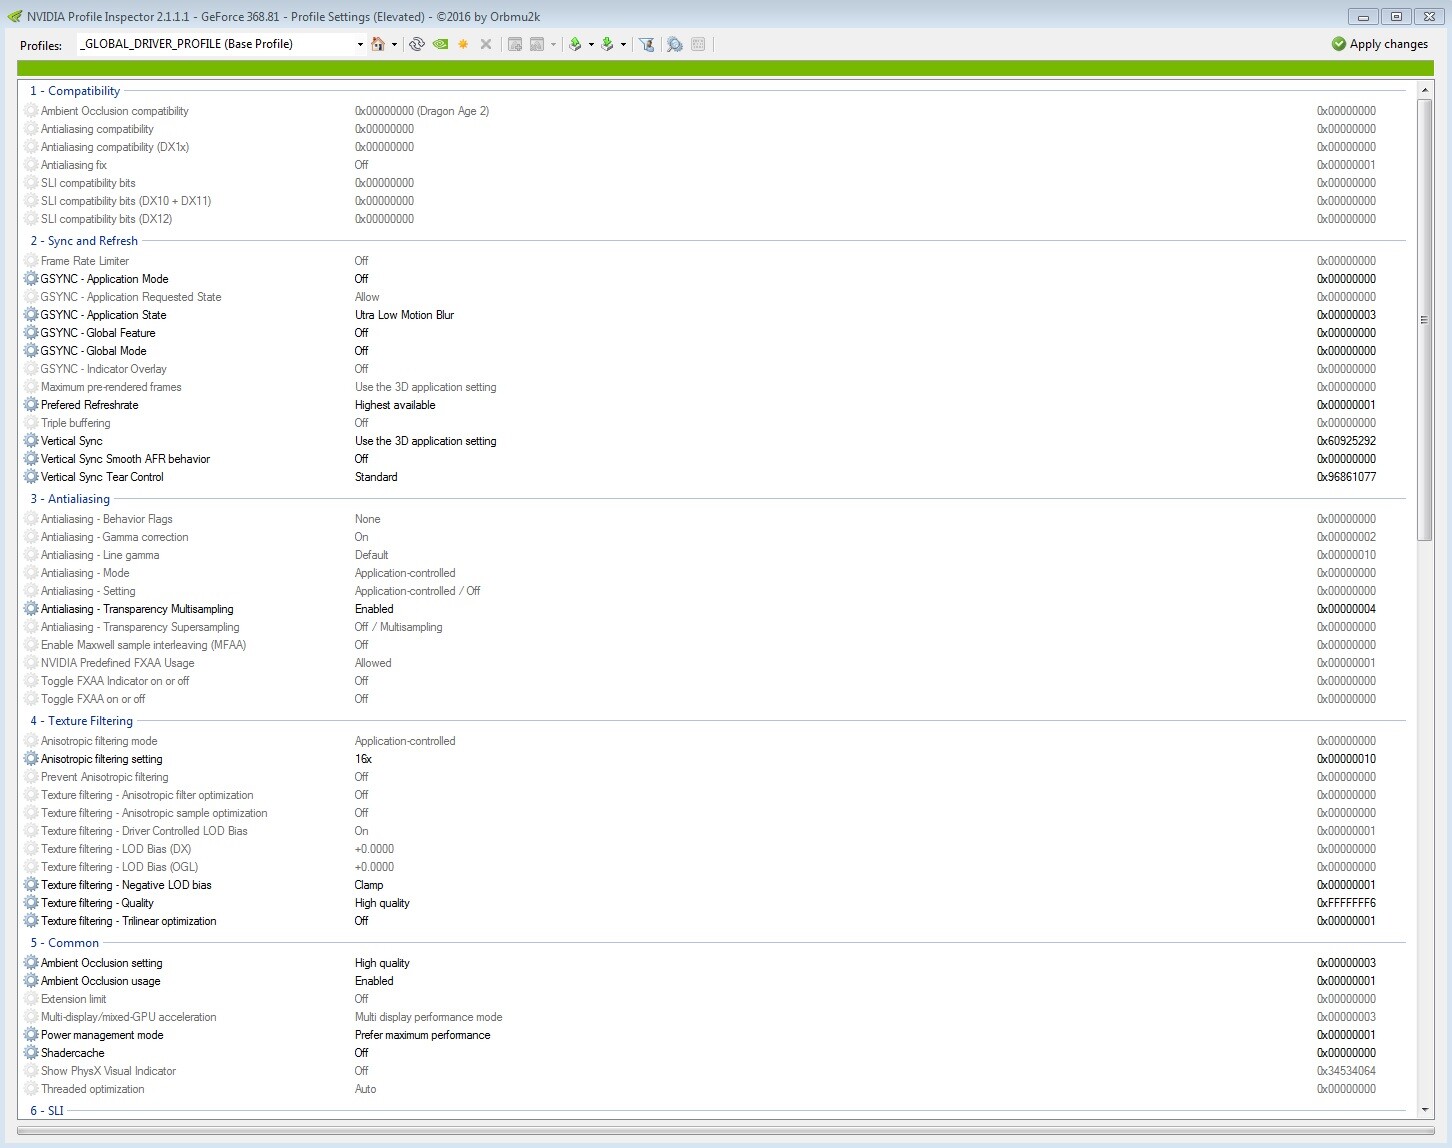
3. You should set these basic parameters in the global profile:
- Set texture filtering to High Quality, and just enable High Quality ambient occlusion.
- Set your desired Power management mode (I prefer “Prefer Maximum Performance” so that my GPU never downclocks when it shouldn’t).
- Disable Shadercache since it might cause stuttering in some games.
- Set “Texture filtering – Negative LOD bias” to Clamp, and leave LOD bias at 0. This will usually deliver the best image quality all things considered as you won’t get shimmering. I only recommend using Allow and a negative value when using supersampling, which we’ll go over later.
- Set Preferred Refresh Rate to Highest Available.
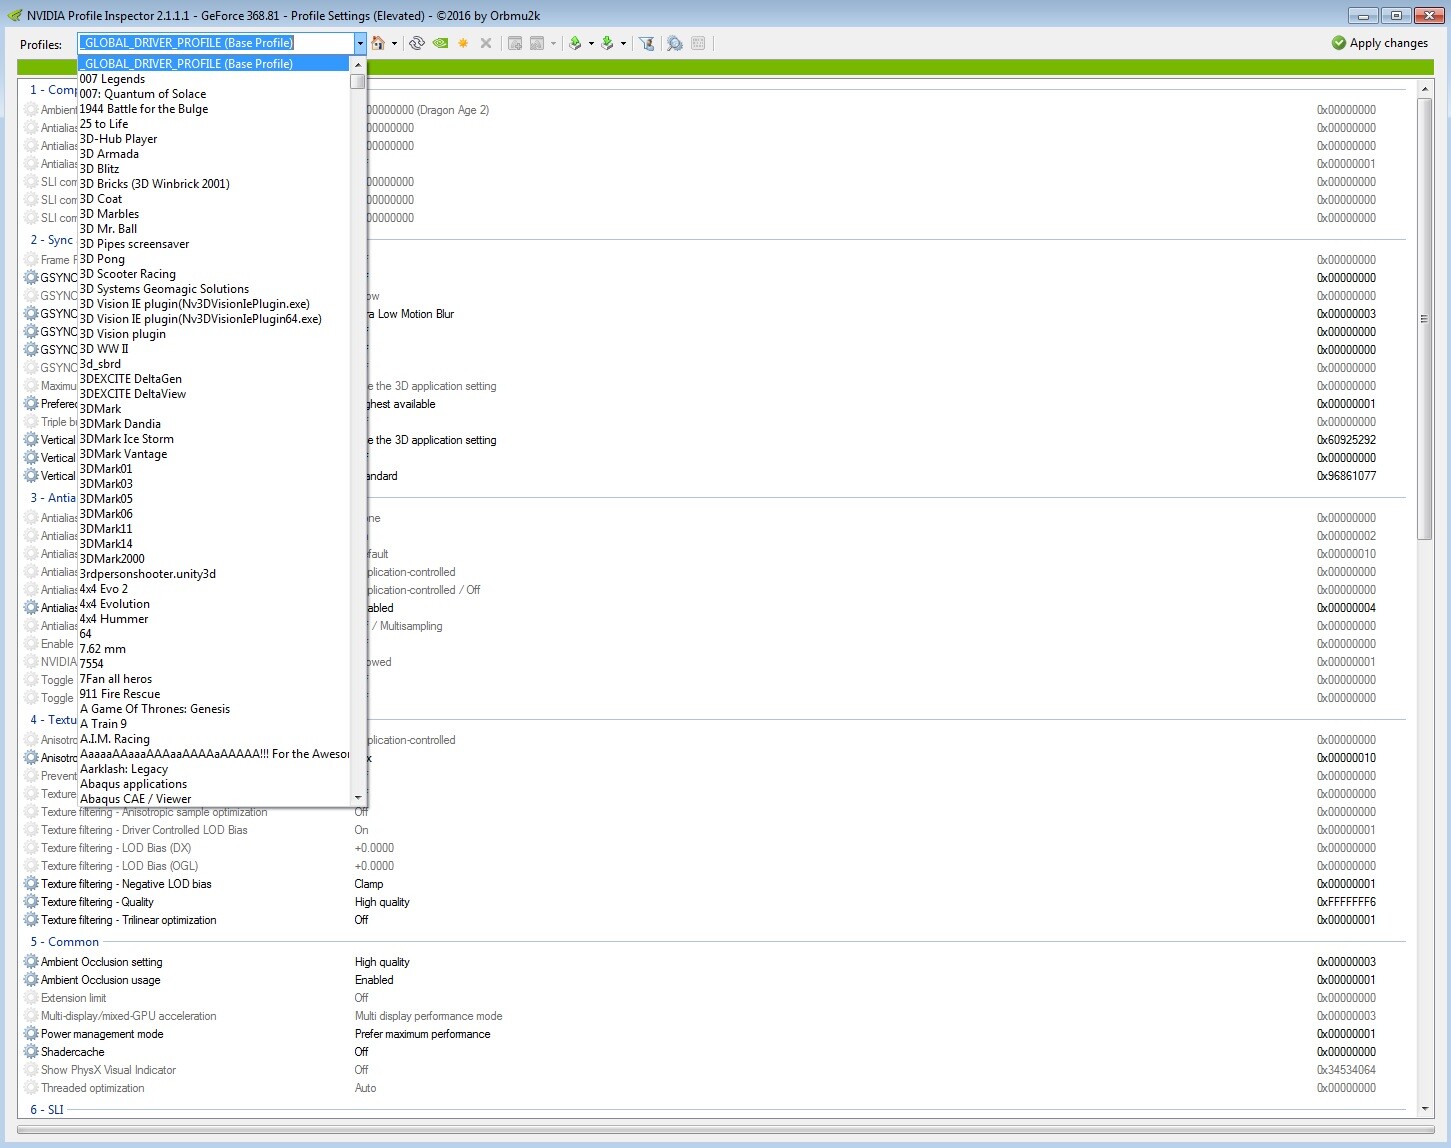
4. Now we can look at modifying individual game profiles. See the dropdown menu in the image below. You can also type out your own game, and create your own profiles for unsupported games. Although if said unsupported game uses a common engine, it might be better to just add its executable file to an existing profile for a game using that engine (by choosing that game’s profile and clicking one of the icons near the top that says “Add application to current profile”).
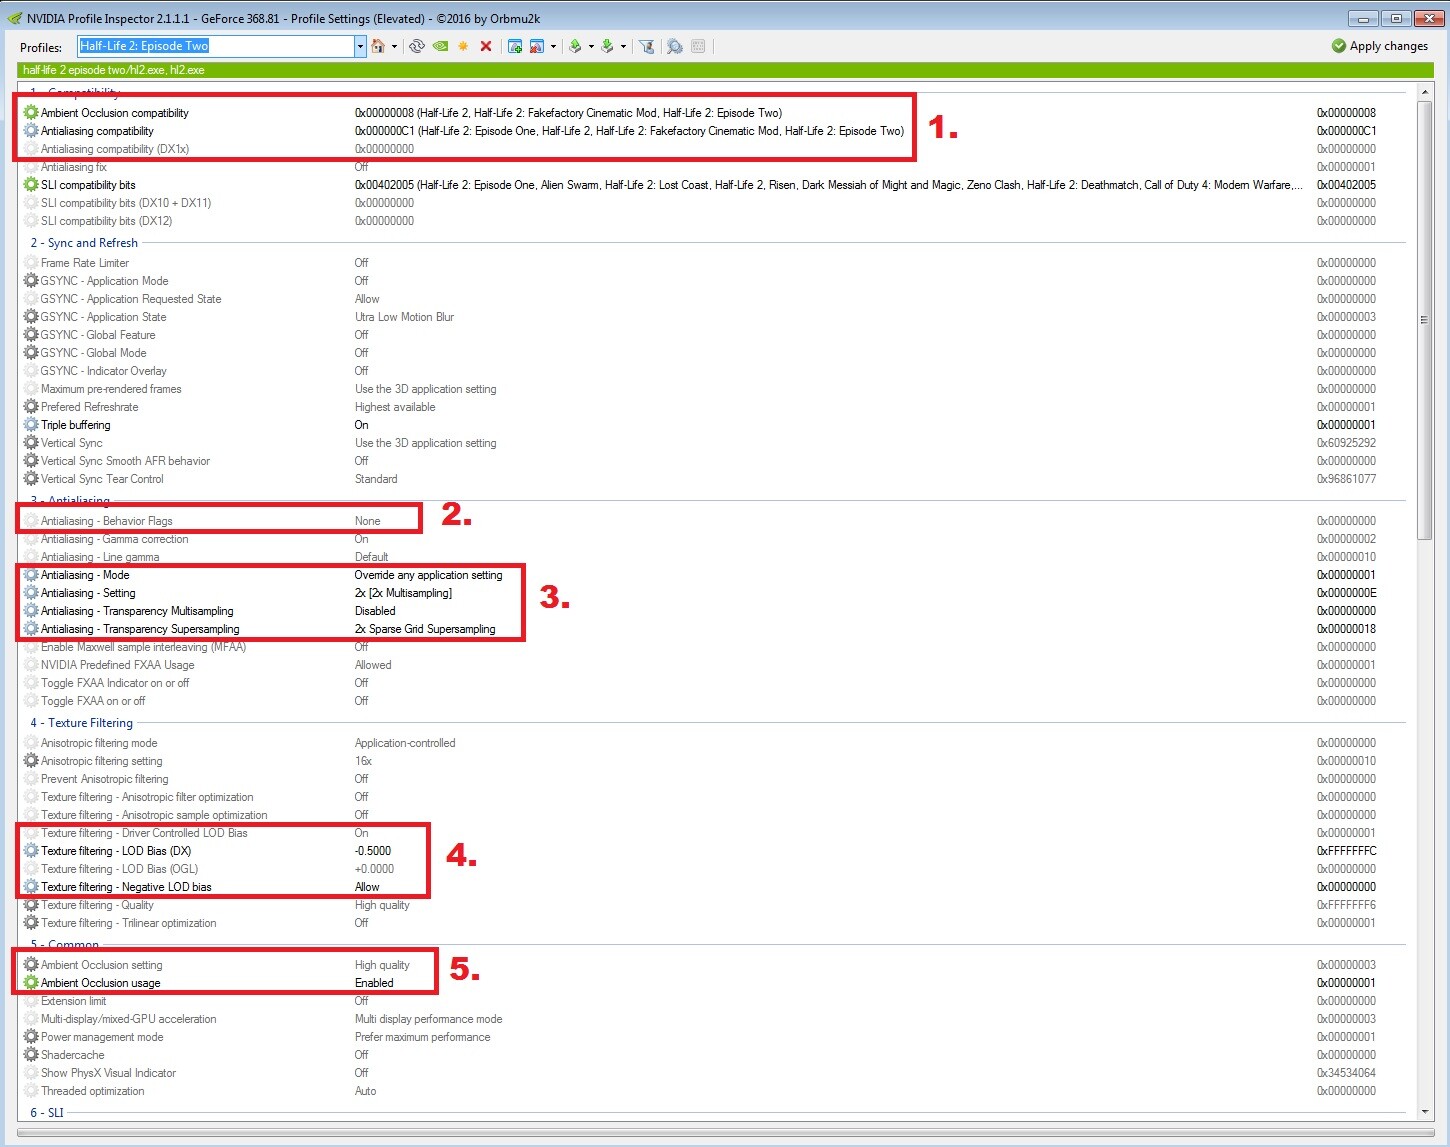
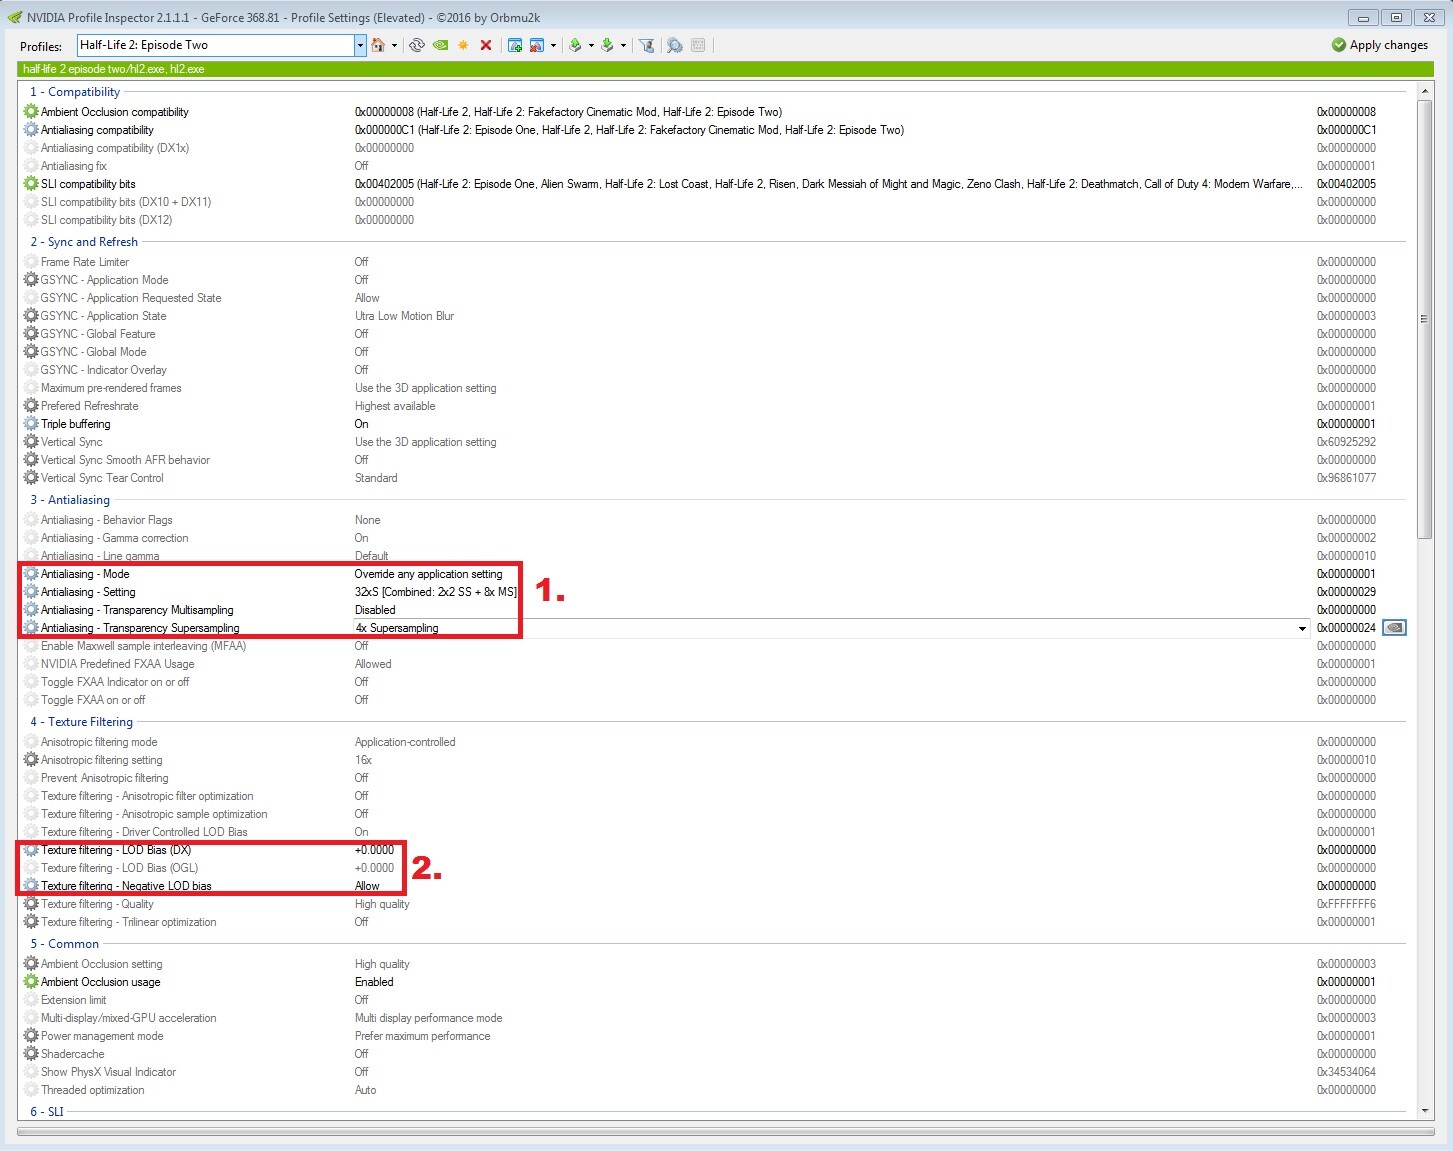
5. Since we’re focusing on forcing ambient occlusion and supersampling into games, you need to use compatibility bits (save for DX8 games which don’t need them). See the red box labeled 1. in the image below. Notice there is a separate field for anti-aliasing compatibility in DX1x games (DX10, DX11, DX12). Funny they put this because to my knowledge, there are no bits for any DX10/DX11/DX12 game.
6. To find proper compatibility bits, go here for anti-aliasing bits and here for ambient occlusion bits. If that Guru3D anti-aliasing thread says to either use or do not use “AA fix” then do as they say. If they say nothing (which is usually the case), do not use AA fix.
So let me go over the labeled red boxes in that image above. The numbers in the list below correspond to the image above.
- As I said earlier, these are the compatibility bits. Get them from those Guru3D threads, and if a game isn’t listed find out what engine it uses and see if there are any bits for other games on that engine.
- Antialiasing – Behavior Flags – Set this to None every time, so that it doesn’t screw with your AA.
- These are the actual anti-aliasing settings. Antialiasing – Mode allows for application-controlled (doesn’t make any changes), Enhance the application setting (enhances the game’s current AA), and Override the application setting (bypassing the game’s AA and forcing its own). You can force or enhance multisampling (full screen or just transparent), sparse grid supersampling aka SGSSAA (full screen or just transparent), ordered grid supersampling aka OGSSAA (full screen or just transparent), and hybridsampling aka HSAA (full screen only). Read all about these different AA forms here, under “Nvidia” but do read the others too since it’s good knowledge to have. Personally, I find that SGSSAA typically looks the best, when there is a bit that allows for all three. The image above showcases 2x full screen SGSSAA (aka FSSGSSAA). I rarely use Enhance, only using it if the game for some reason supports Enhance but not Override (e.g. KOTOR).
- “Texture filtering – Driver Controlled LOD Bias” should be set to On in the default profile, don’t touch this. The other three settings in this box control your LOD or Level Of Detail settings. Ideal settings here depend on what kind of AA you’re forcing. Unless it’s supersampling or hybridsampling, leave it at Clamp and 0. If hybridsampling, set it to Allow and 0 since hybridsampling has auto LOD adjustment.
- Ambient occlusion settings. Always leave it as Enabled unless you can’t run it at all, though the other setting does have three performance options: Performance, Quality, and High Quality (and Off, seems redundant given the other setting but whatever).
So those are the things you need to adjust, using the appropriate bits listed in those Guru3D threads. You might even discover working bits yourself, for a certain game.
SGSSAA
Here are some examples of settings you may find yourself using. The last image above shows me forcing 2x SGSSAA into Half-Life 2: Episode Two (and any Source mod built on Source SDK Base 2007). Below is another example of SGSSAA, this time 4x:
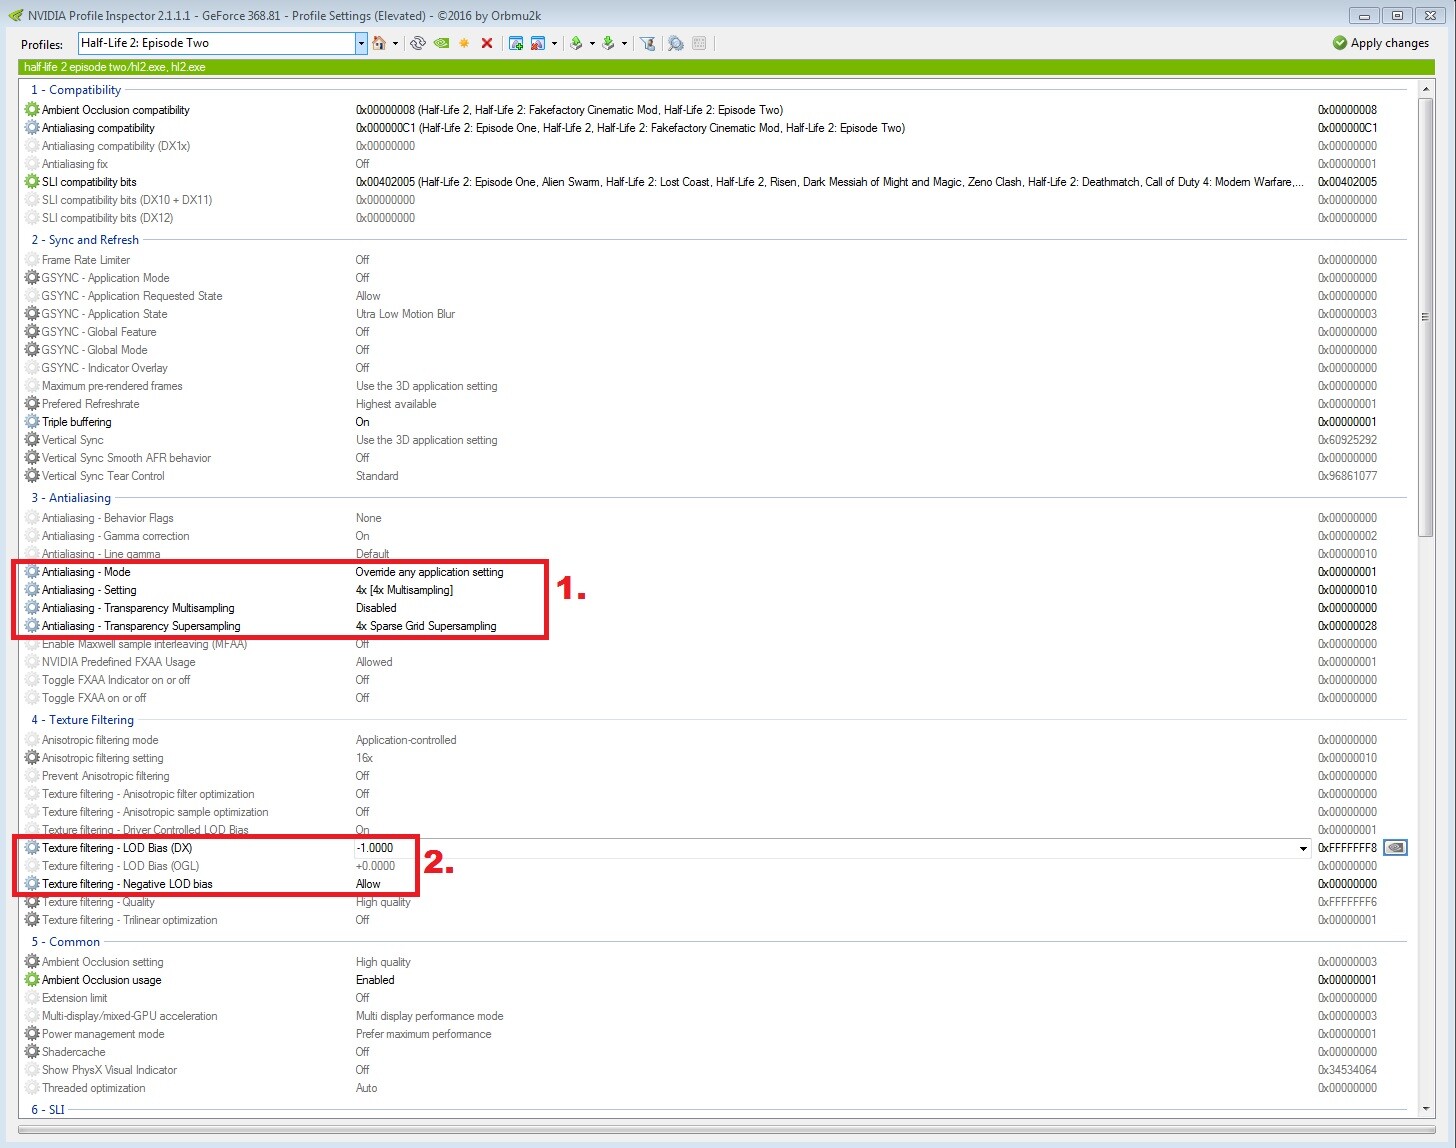
Notice the pattern? Below are the steps to apply full screen SGSSAA:
- Make sure AA Behavior Flags are set to None.
- Set Antialiasing – Mode to Override.
- Antialiasing – Setting must be set to either 2x multisampling, 4x multisampling, or 8xQ multisampling. I suppose 8x CSAA and 16xQ might work with 4x and 8x sparse grid supersampling respectively. The reason for this rule is, sparse grid supersampling gets its sample coordinates from the MSAA samples, thus they have to match numerically.
- Disable transparency multisampling.
- Set transparency supersampling to sparse grid and however many MSAA samples you chose in step #3 (e.g. if you’re using 4x multisampling, use 4x sparse grid supersampling).
- Set “Allow Negative LOD Bias” to Allow.
- Set the LOD Bias (the correct one; DX means DirectX, OGL means OpenGL) to -0.5 if using 2x SGSSAA, -1.0 if using 4x SGSSAA, or -1.5 if using 8x SGSSAA.
- Don’t forget to hit apply!
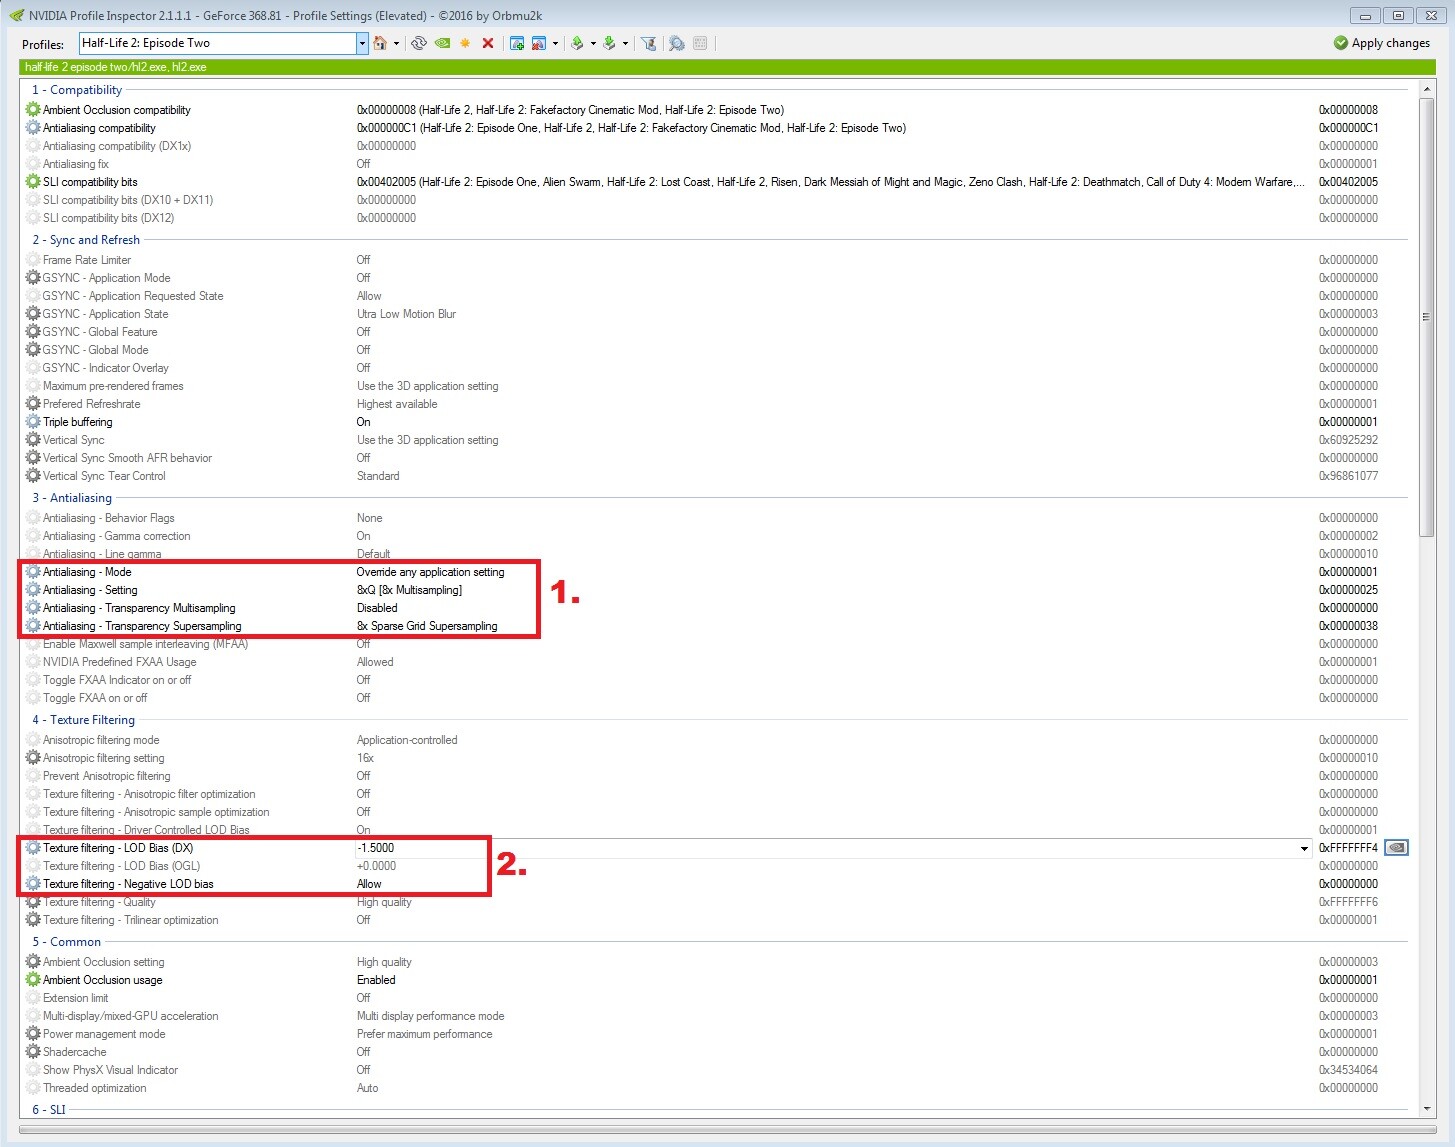
So, following the above steps, the image below shows the correct settings for 8x SGSSAA. Alternatively, 16xQ might work as the antialiasing setting as well.
OGSSAA
Now let’s look at OGSSAA in the image below.
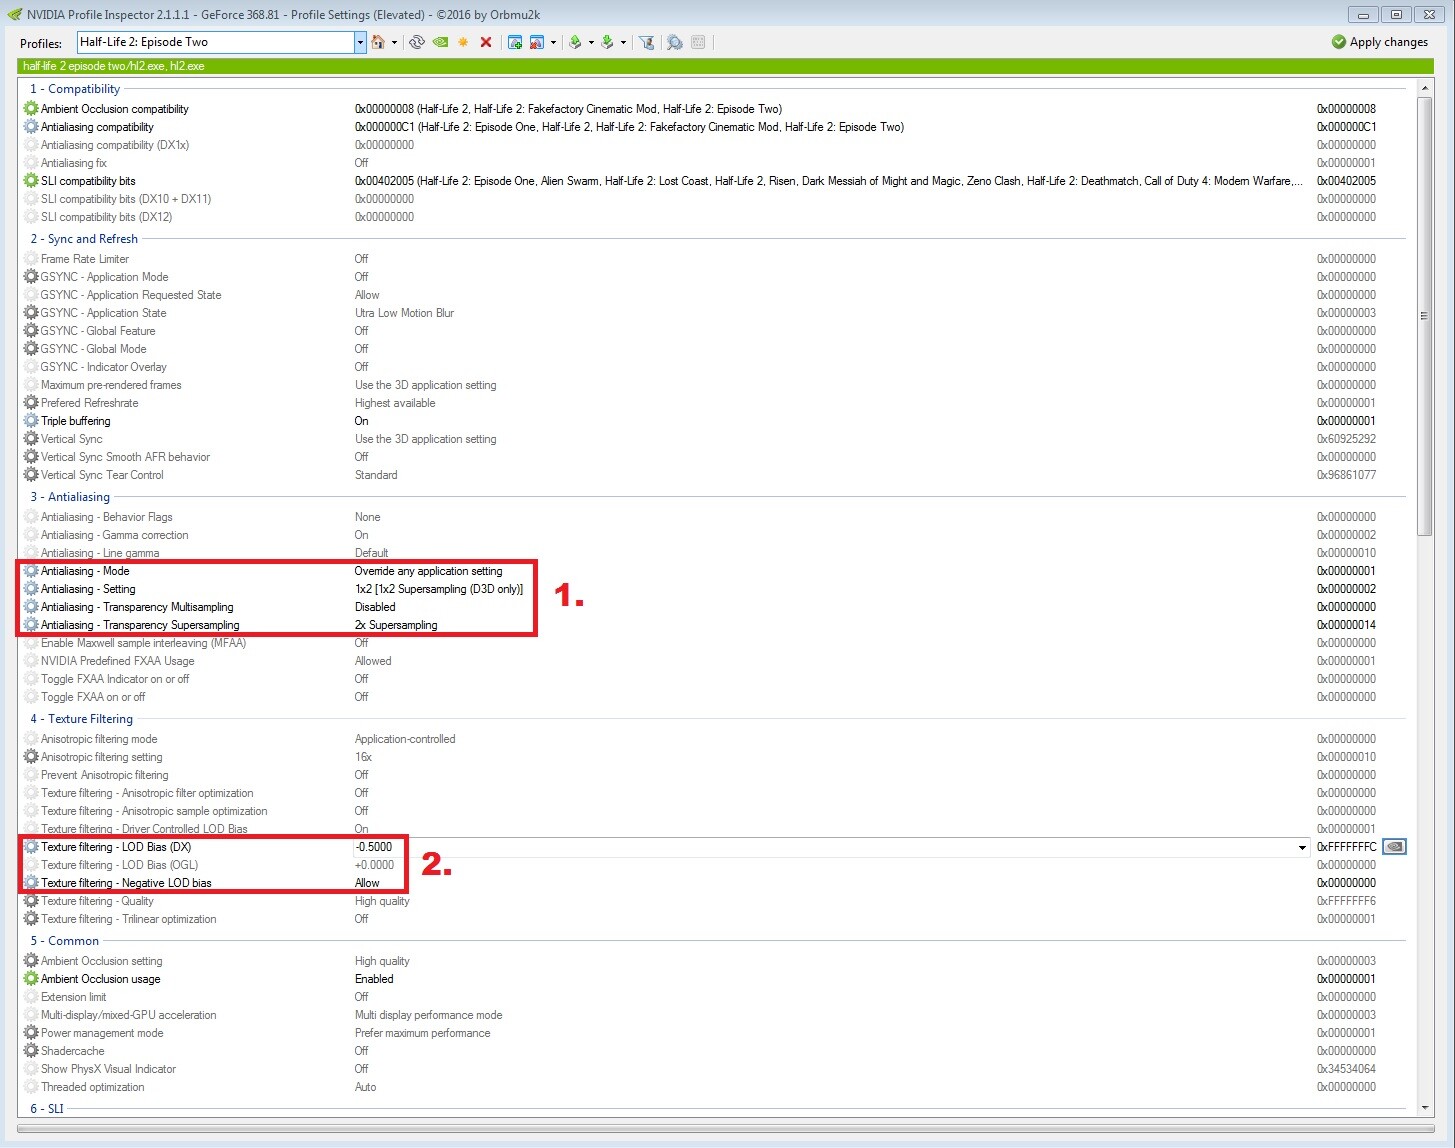
There are only a few differences on how to set this up over SGSSAA. The first being, multisampling is never used for the AA setting. Second, sparse grid is obviously not used for transparency supersampling; instead the regular supersampling is used (which is ordered grid). The LOD works the same way, I’ll just quote that blog again here:
Set negative lod to allow and set the lod bias as follows:
1×2 OGSSAA (2 samples): -0.5
2×1 OGSSAA (2 samples): -0.5
2xSGSSAA (2 samples): -0.5
2×2 OGSSAA (4 samples): -1.0
4xSGSSAA (4 samples): -1.0
8xSGSSAA (8 samples): -1.5
3×3 OGSSAA (9 samples): -1.58 (or as close as you can get)
4×4 OGSSAA (16 samples): -2.0The formula for determining the correct lod bias is “y = -0.5 * log, base 2, of (n)” where n is the number of samples and y is the correct lod bias. Of course since some of you may have forgotten how to use logarithms I went ahead and typed out the correct values for each SSAA mode above.
Expanding on this, if using 1×2 or 2×1 supersampling, transparency supersampling should be set to 2x (just do the math, 2 * 1 = 2 and 1 * 2 = 2 and the goal here is to apply full screen supersampling). 2×2 supersampling should use 4x transparency supersampling. Thus, you can’t apply full screen 8x or 9x OGSSAA, only 2x, 4x, and 16x!
It is of course possible to run into a scenario where your PC can handle 1×2 or 2×1 OGSSAA + 4x transparency supersampling. It’s not going to look worse than 2x FSOGSSAA (which is 1×2 or 2×1 + 2x transparency supersampling) though it’ll run much worse. In this case you might be better off running 2×2 OGSSAA and 2x transparency supersampling. Either way you are applying a different amount of supersampling to transparent edges compared to the rest of the image.
What is the difference between 1×2 and 2×1 you ask? 1×2 = 1 horizontal sample and 2 vertical, 2×1 is the opposite. Neither one is perfect, if 2x FSSGSSAA works instead it’s bound to look better.
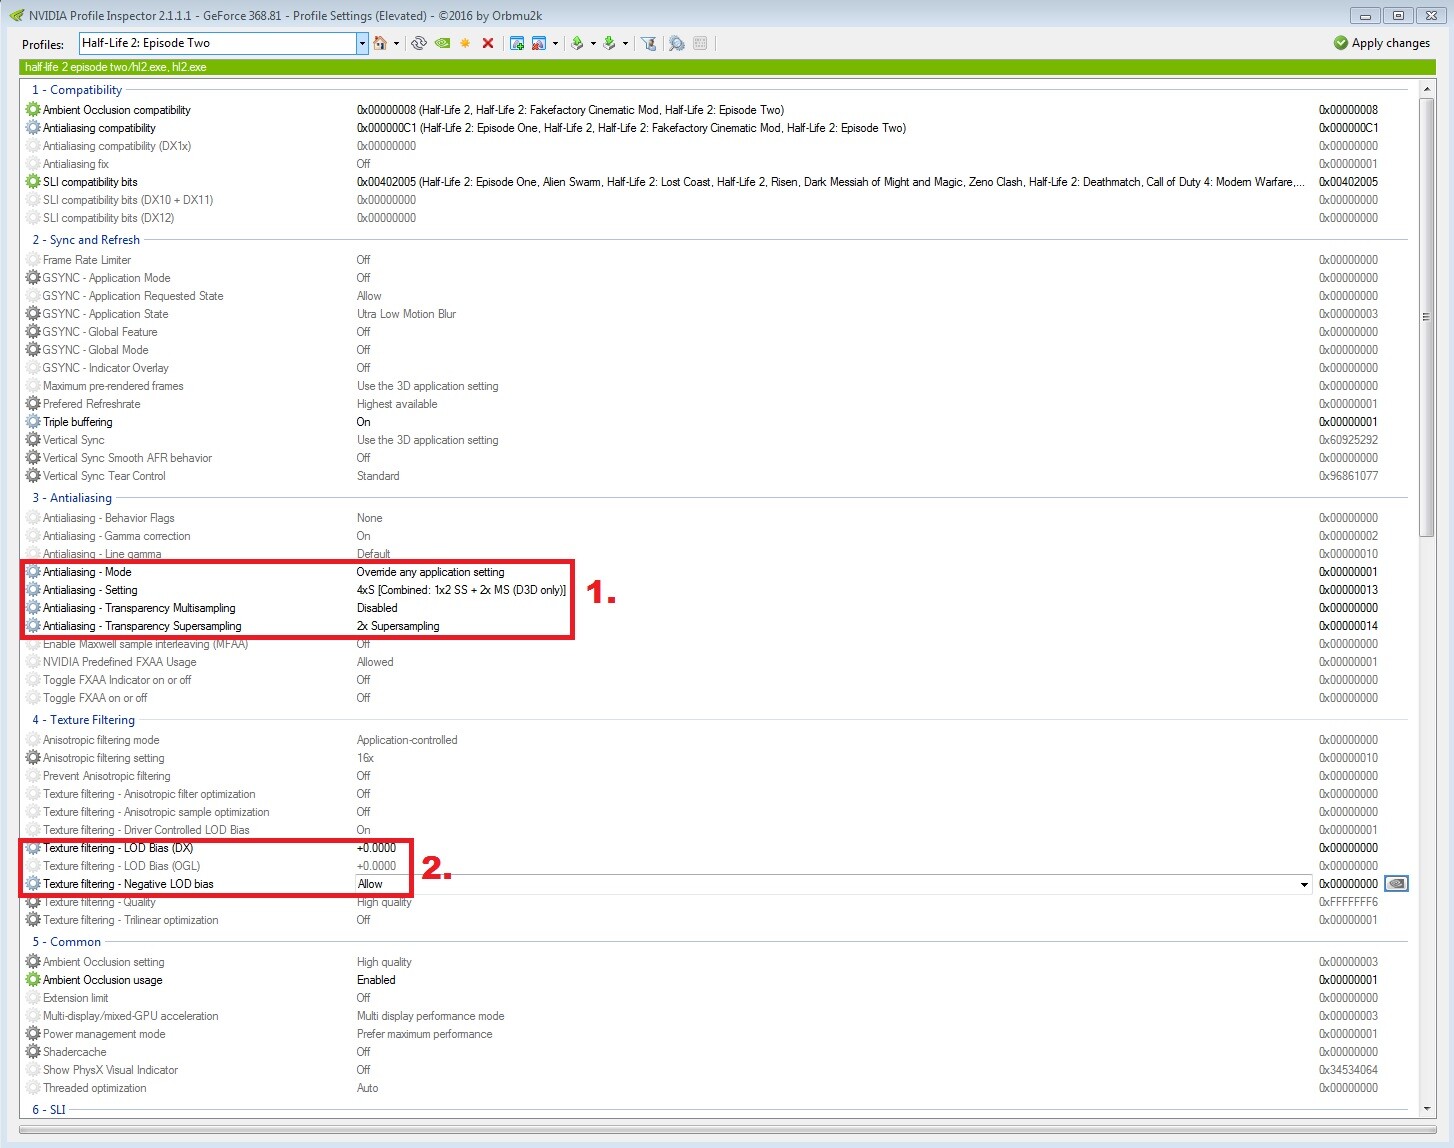
HSAA
To enable HSAA, which is OGSSAA + MSAA + auto LOD adjustment, follow these steps:
- Set AA behavior flags to None.
- Set AA mode to Override.
- Set Antialiasing – Setting to one of the settings that ends in “xS”. This indicates HSAA.
- Disable transparency multisampling.
- Set transparency supersampling to one of the regular supersampling options, matching the OGSSAA samples (NOT the multisamples) of your chosen “xS” option in step 3 (e.g. if you chose 4xS, use 2x supersampling, or if you chose 12xS use 4x supersampling, personally I don’t bother using any other HSAA settings than these).
- Set LOD bias to 0.
- Set Allow Negative LOD Bias to Allow. Remember, HSAA has auto LOD adjustment.
Examples of it in action; the image below shows 2x HSAA, since 4xS includes 1×2 OGSSAA and 2x MSAA thus 2x transparency supersampling is used.
The image below shows 4x HSAA. 32xS = 2×2 OGSSAA (4x) + 8x MSAA, so 4x transparency supersampling is used.
Recommended HBAO+ and SSAA bits for games NOT listed on the Guru3D lists
Many excellent games support forced HBAO+ and SSAA but aren’t featured on either of those lists (or I found better bits listed below). Here is a list I am making. Feel free to add! Note, I am not going above and beyond here. I don’t test every possible compatibility bit, I will stop once I find something that satisfies me, and I test SGSSAA first and then HSAA and then OGSSAA. I am hard to satisfy though so I will end up testing quite a bit.
| Game Title / Engine | HBAO+ bits | AA bits | Comments |
| Rainbow Six 3: Gold (Unreal Engine 2) | 0x00000002 (Mirror’s Edge) | 0x080000C1 | Only tested SGSSAA. There is probably a better SSAA bit, perhaps 0x080022C1, but this game already has performance issues. This is a light HBAO+ flag but it is the only one I’ve tested that doesn’t bleed through your character model. |
| SWAT 4 (Unreal Engine 2.5) | 0x00000002 (Mirror’s Edge) | 0x000012C1 | Only tested SGSSAA and it’s perfect. This is the only HBAO+ bit I have tested that doesn’t flicker on and off. It is overall a light HBAO+ implementation, though it bleeds through smoke/fog and light a bit. |
| Unreal Tournament 2004 (Unreal Engine 2.5) | 0x00000030 (Aliens: Colonial Marines) | No bits needed for SGSSAA | SGSSAA works flawlessly without bits. This AO bit looks great but might glitch occasionally. Make sure you disable “Reduce mouse lag” in game options since that butchers performance on modern PCs. |
| Painkiller: Black Edition and Painkiller: Overdose (custom in-house engine) | 0x00000270 | 0x00000041 (Warmonger, Sid Meier’s Civilization V, QQ Xi You) | Only tested with SGSSAA. HBAO+ is flawless for me. |
Also, 0x00000045 and adjacent bits work in many games, so if nothing else works give them a try.
Lastly, for DirectX 8 games you will always want to use this. This isn’t related to NVIDIA Inspector directly but it’ll help with performance and stability.
Screenshot Comparisons
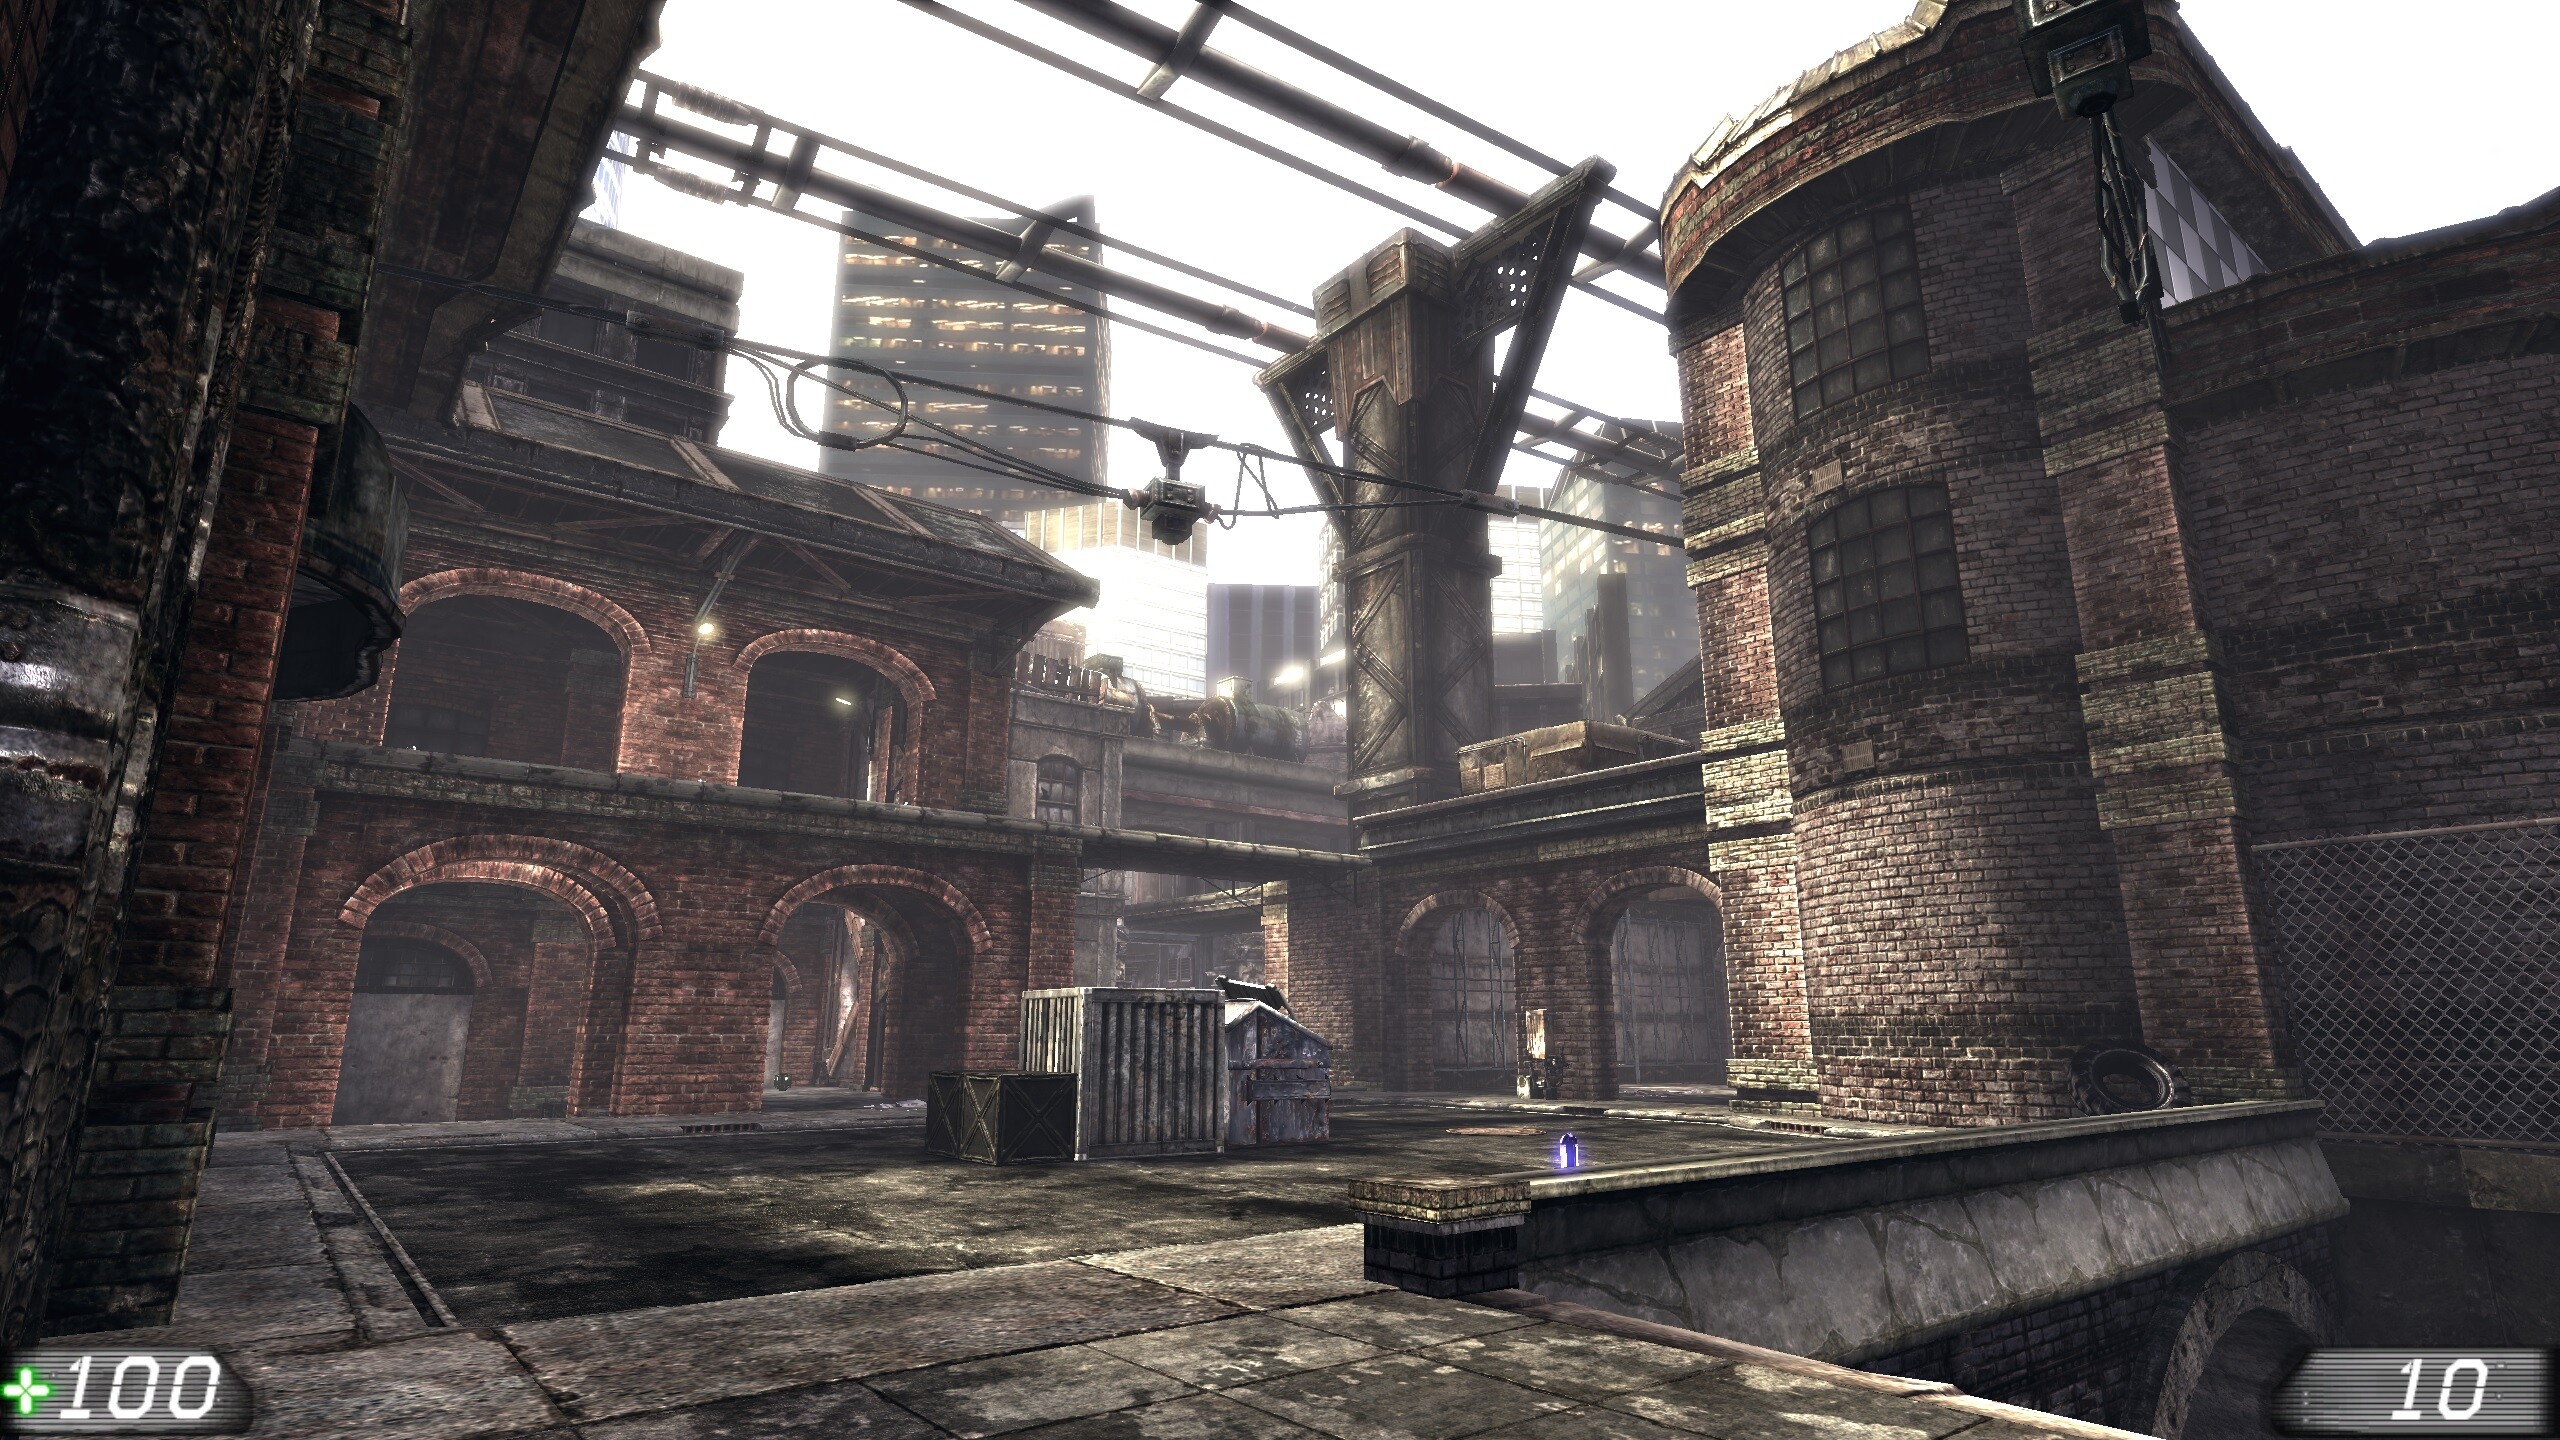
Unreal Engine 3 games
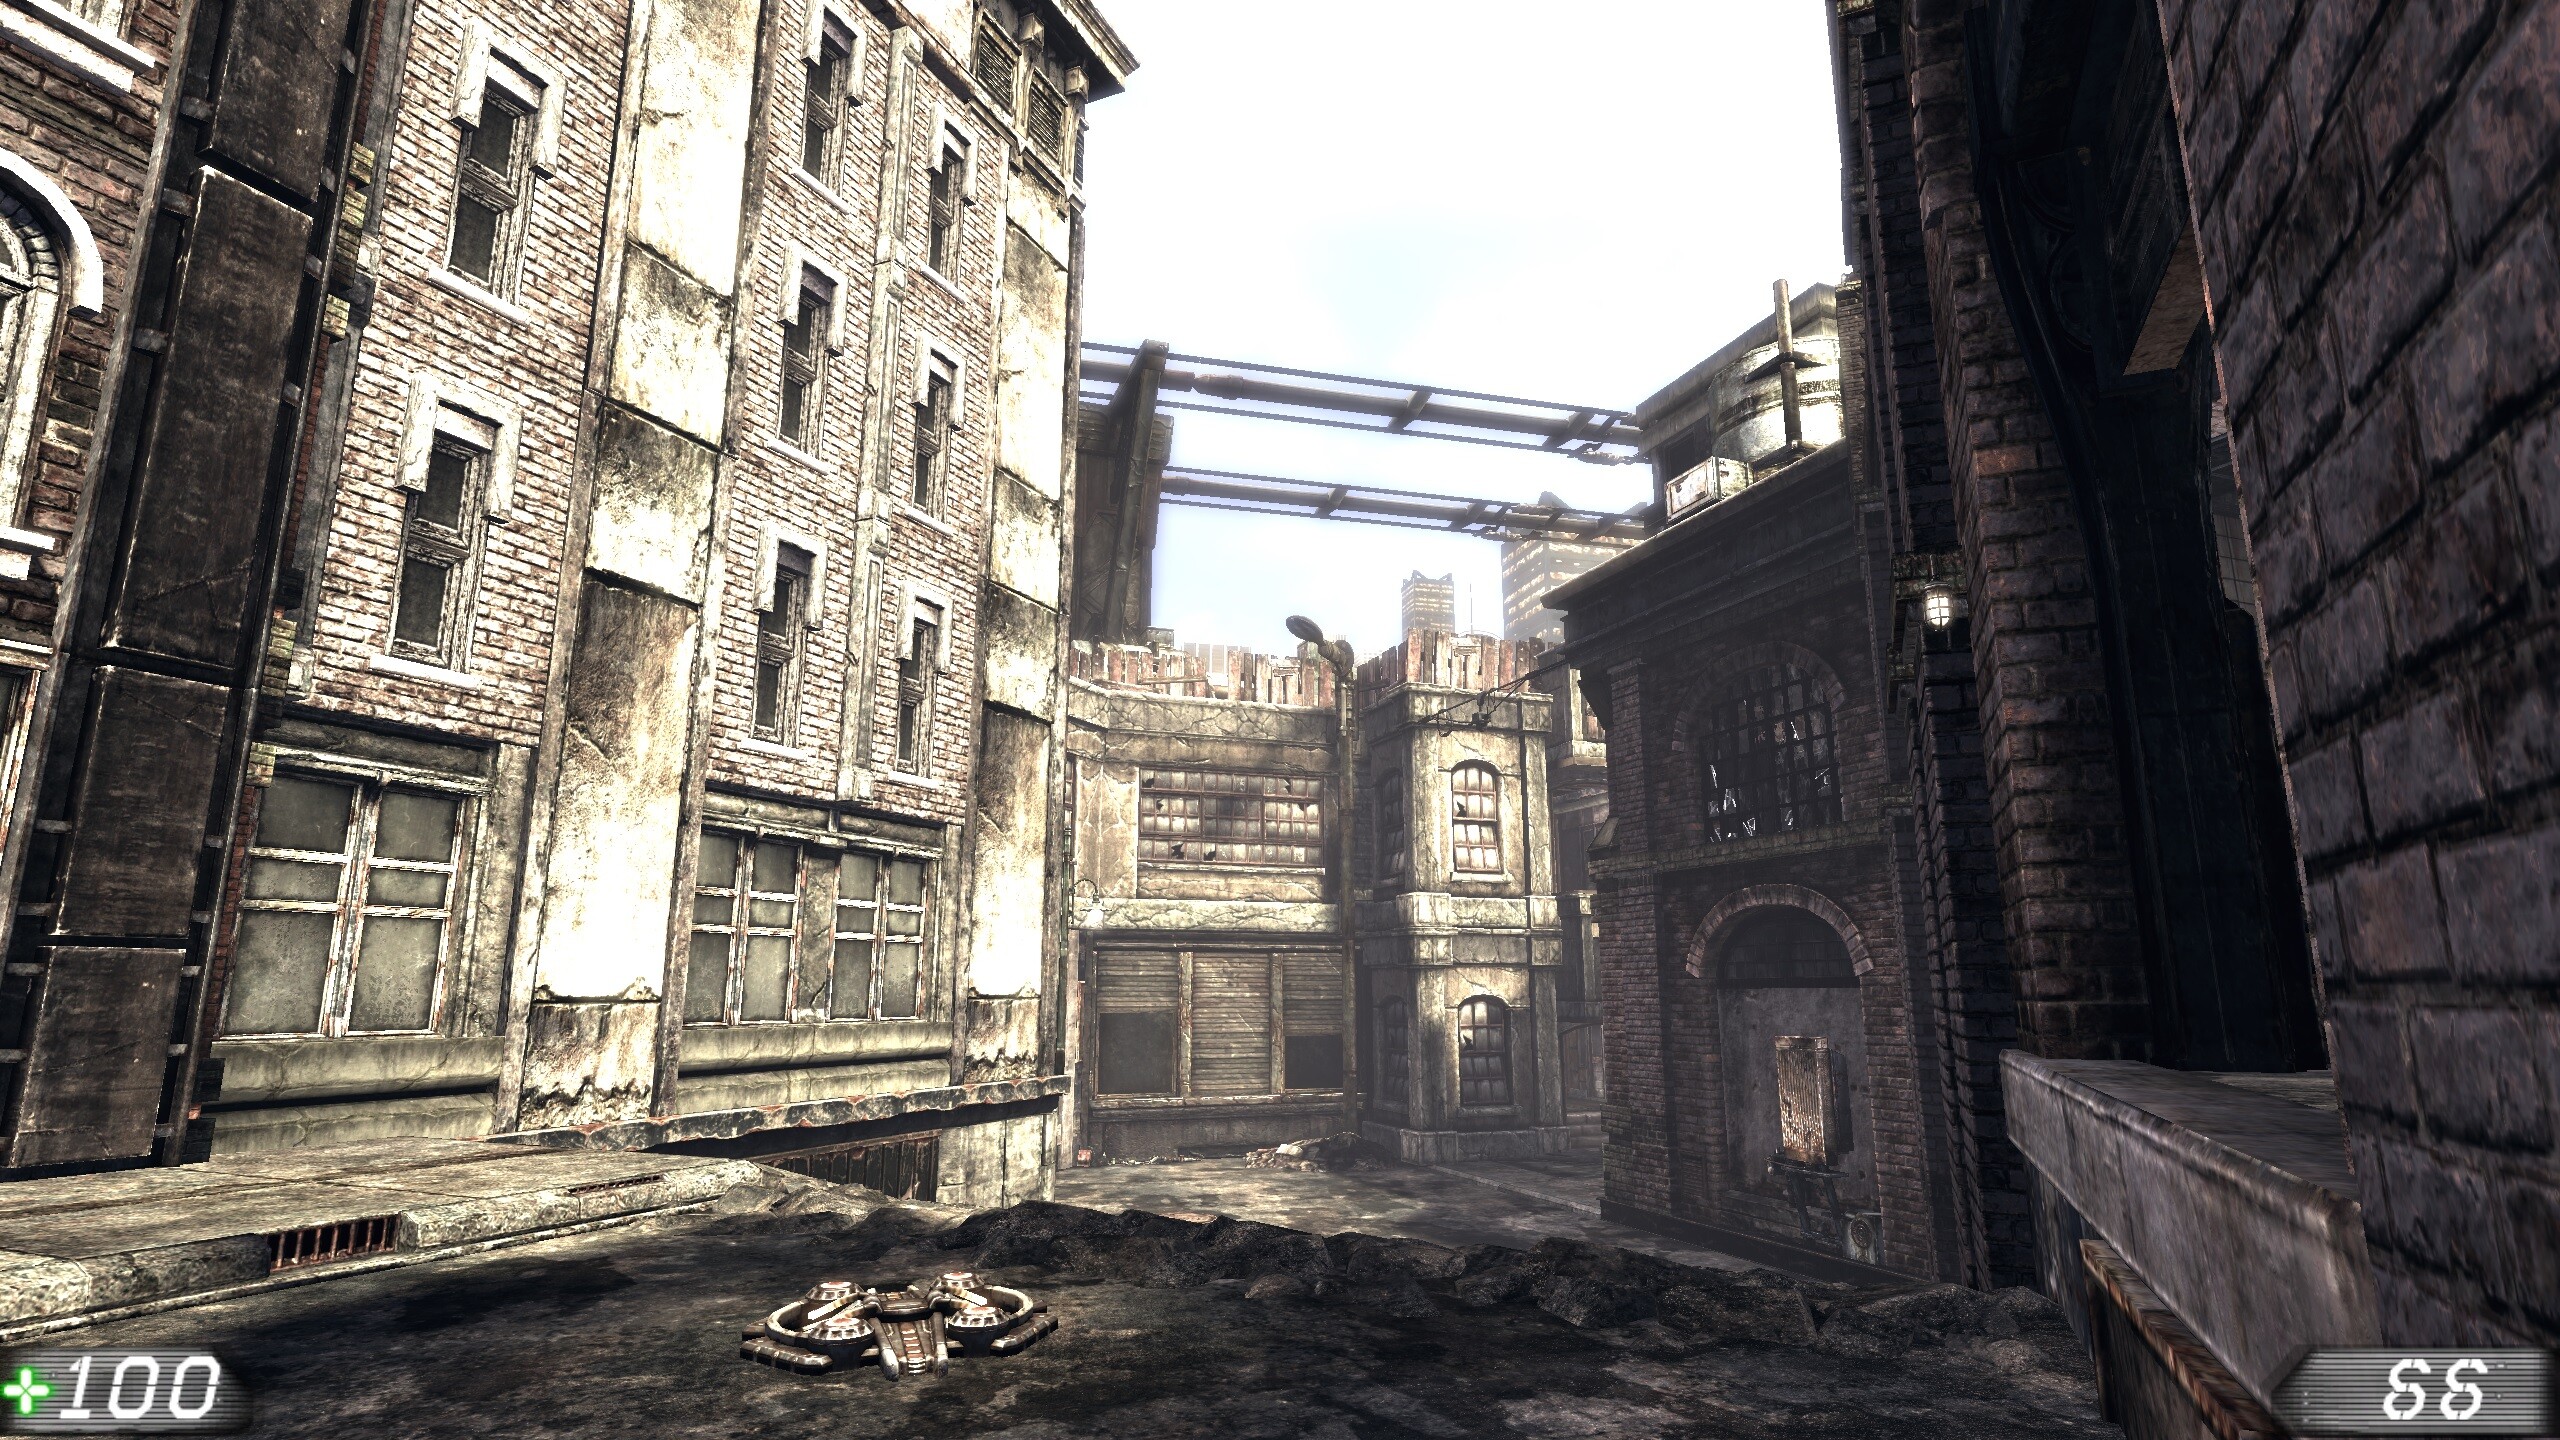
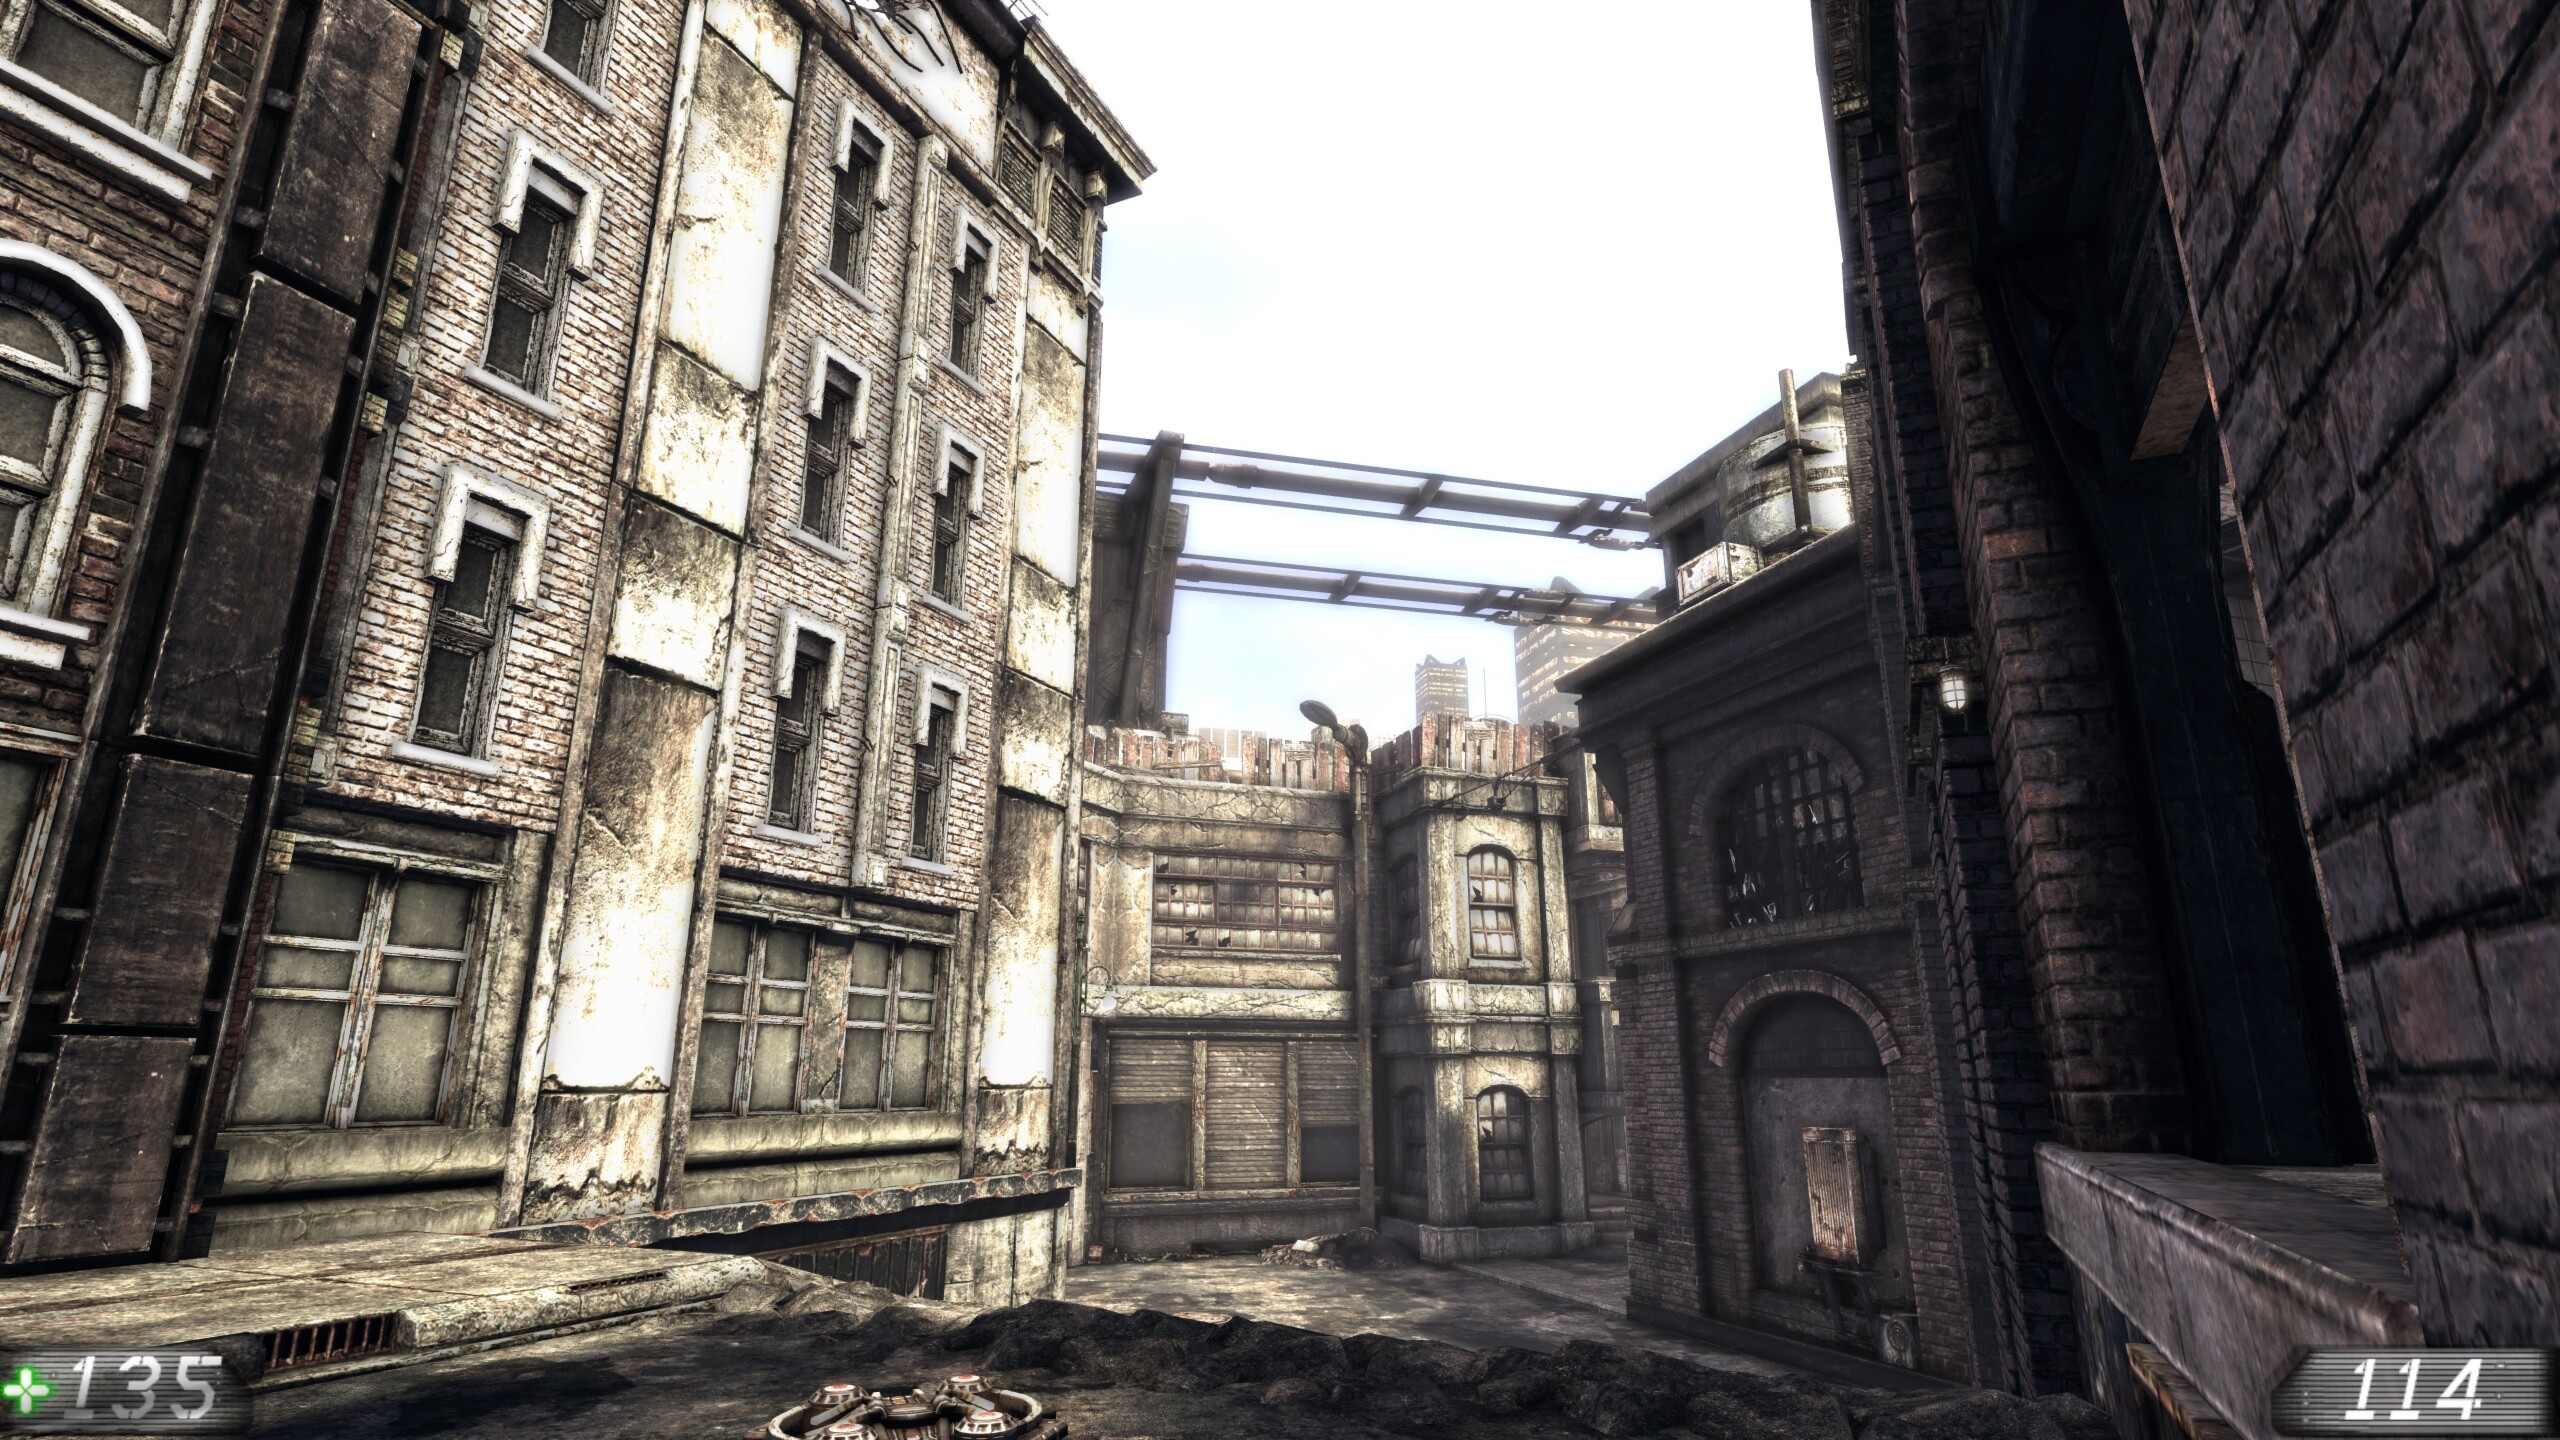
Unreal Tournament 3 (2007). Before = no driver tweaks, After = 4x SGSSAA and high quality ambient occlusion using the UT3 AO bits. Be sure to open the images in a new tab and magnify them by clicking on them.


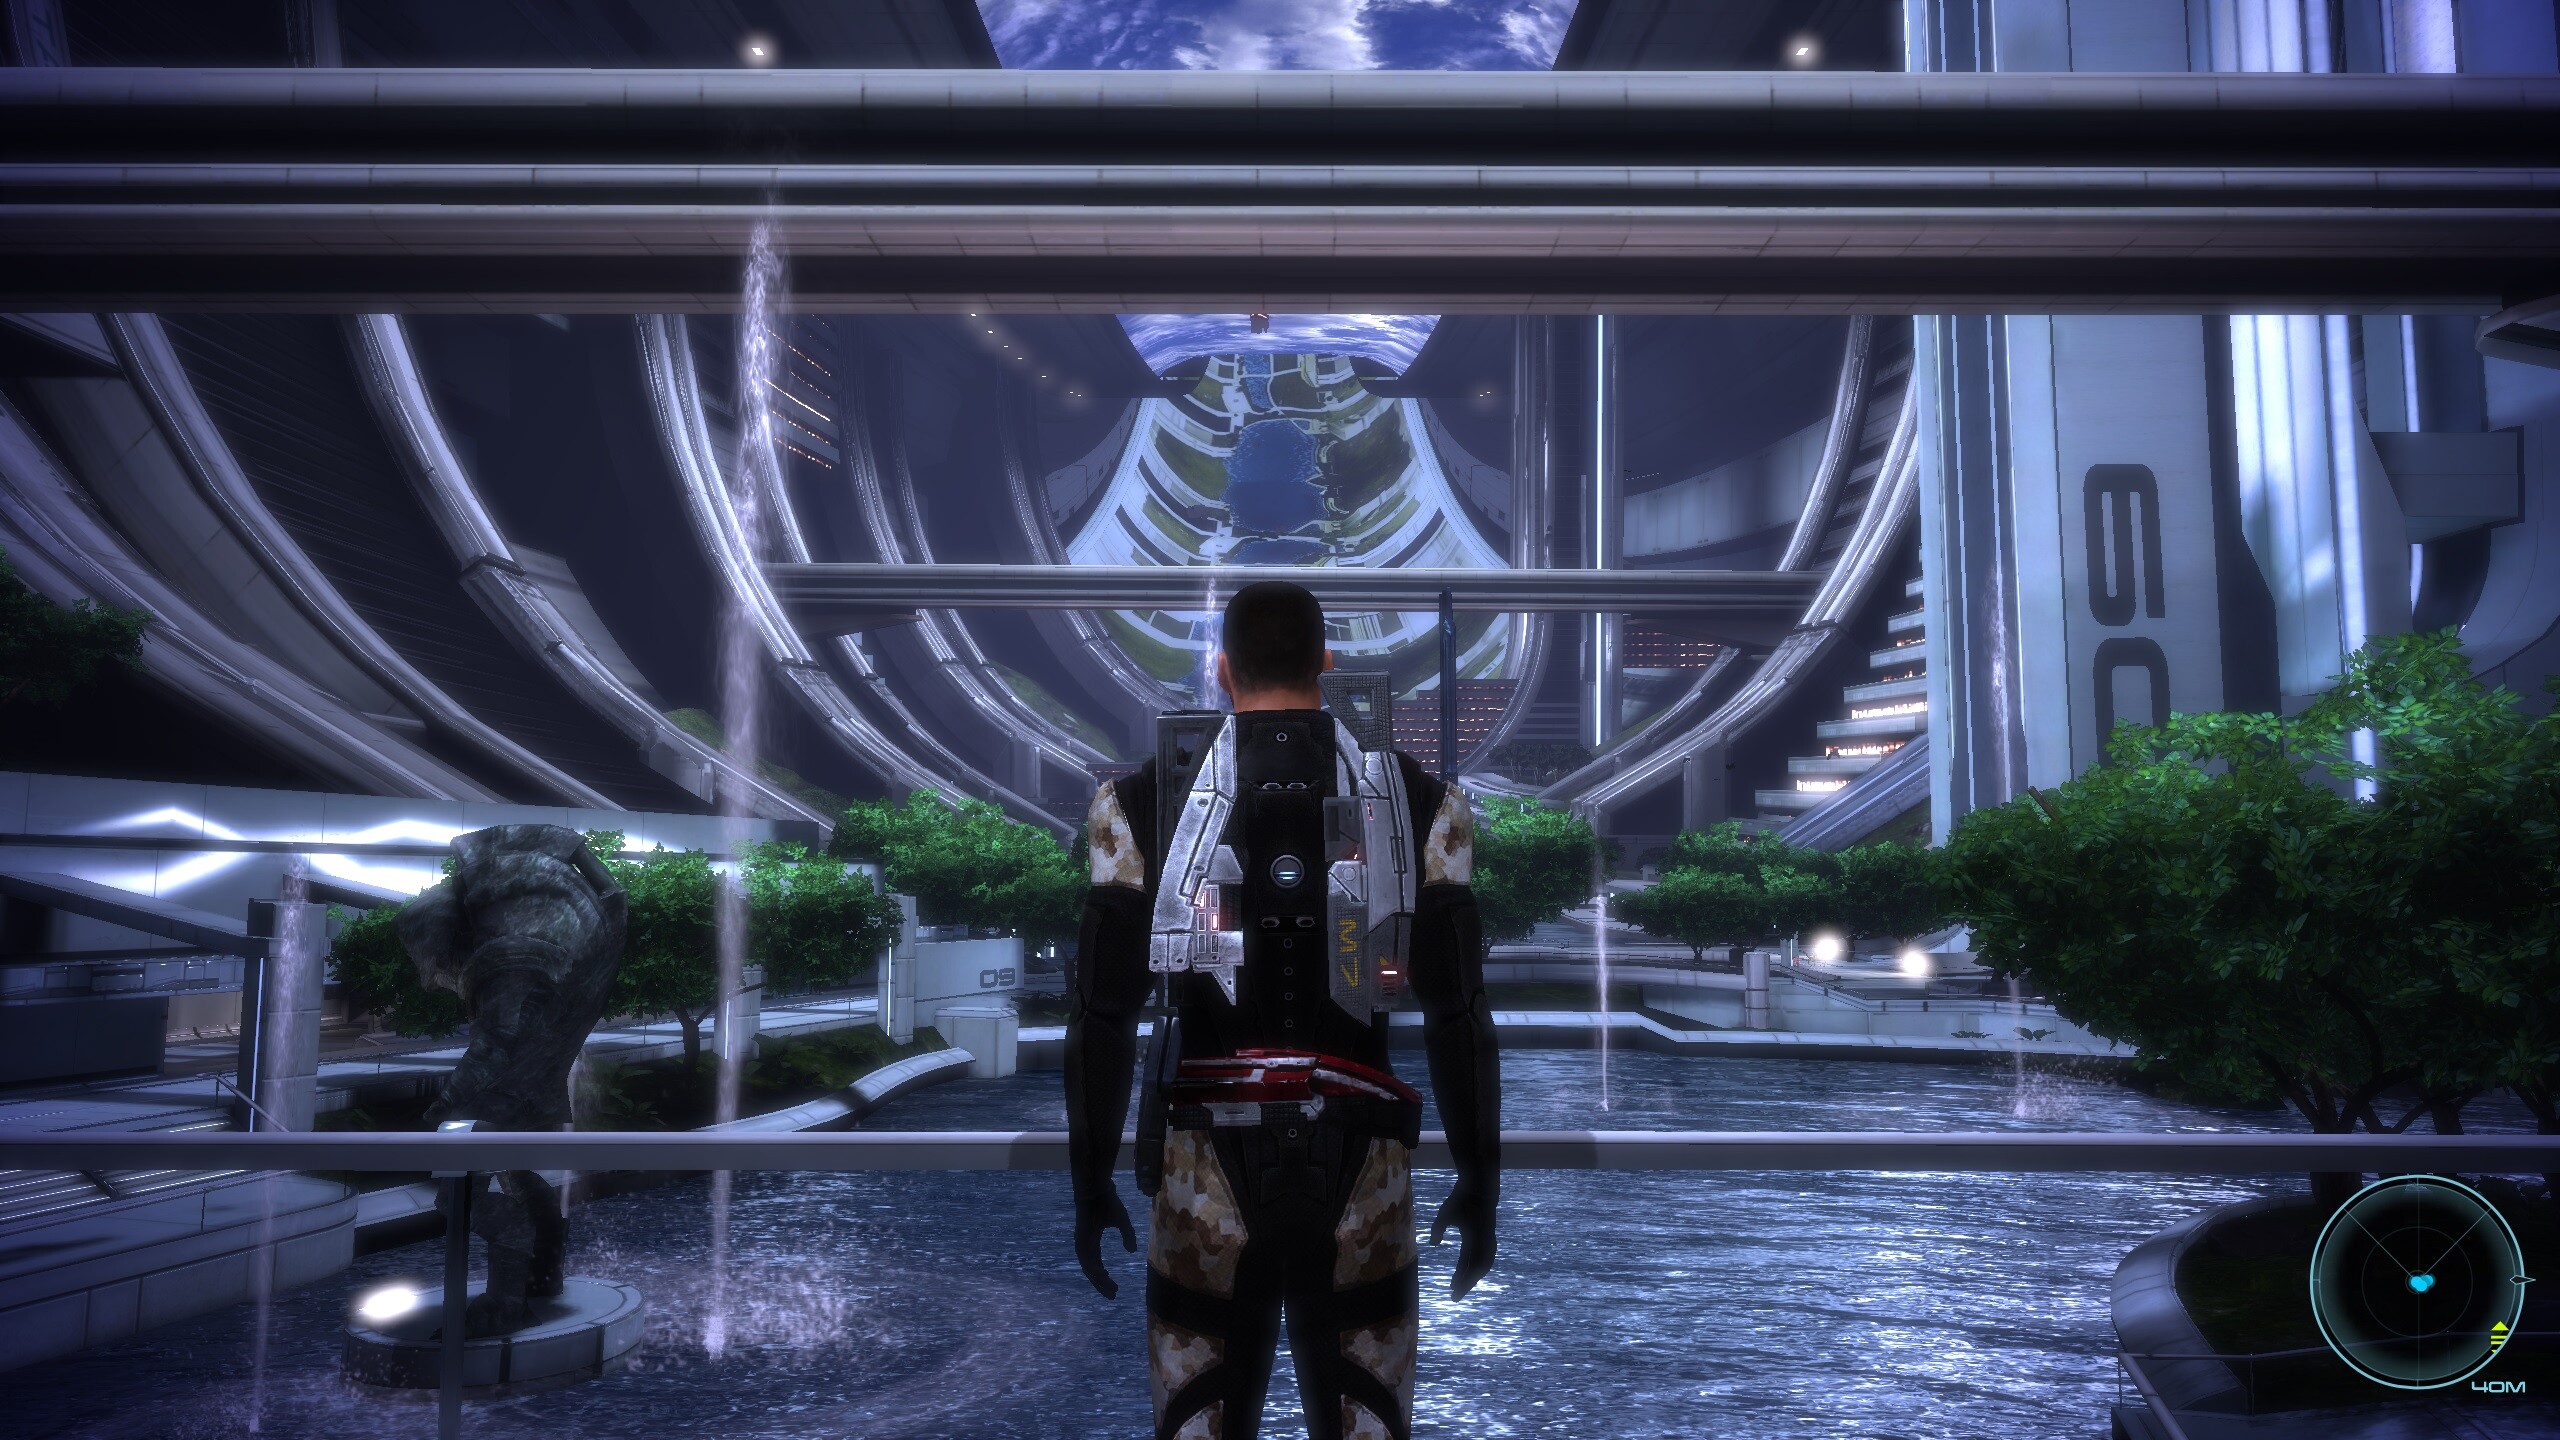
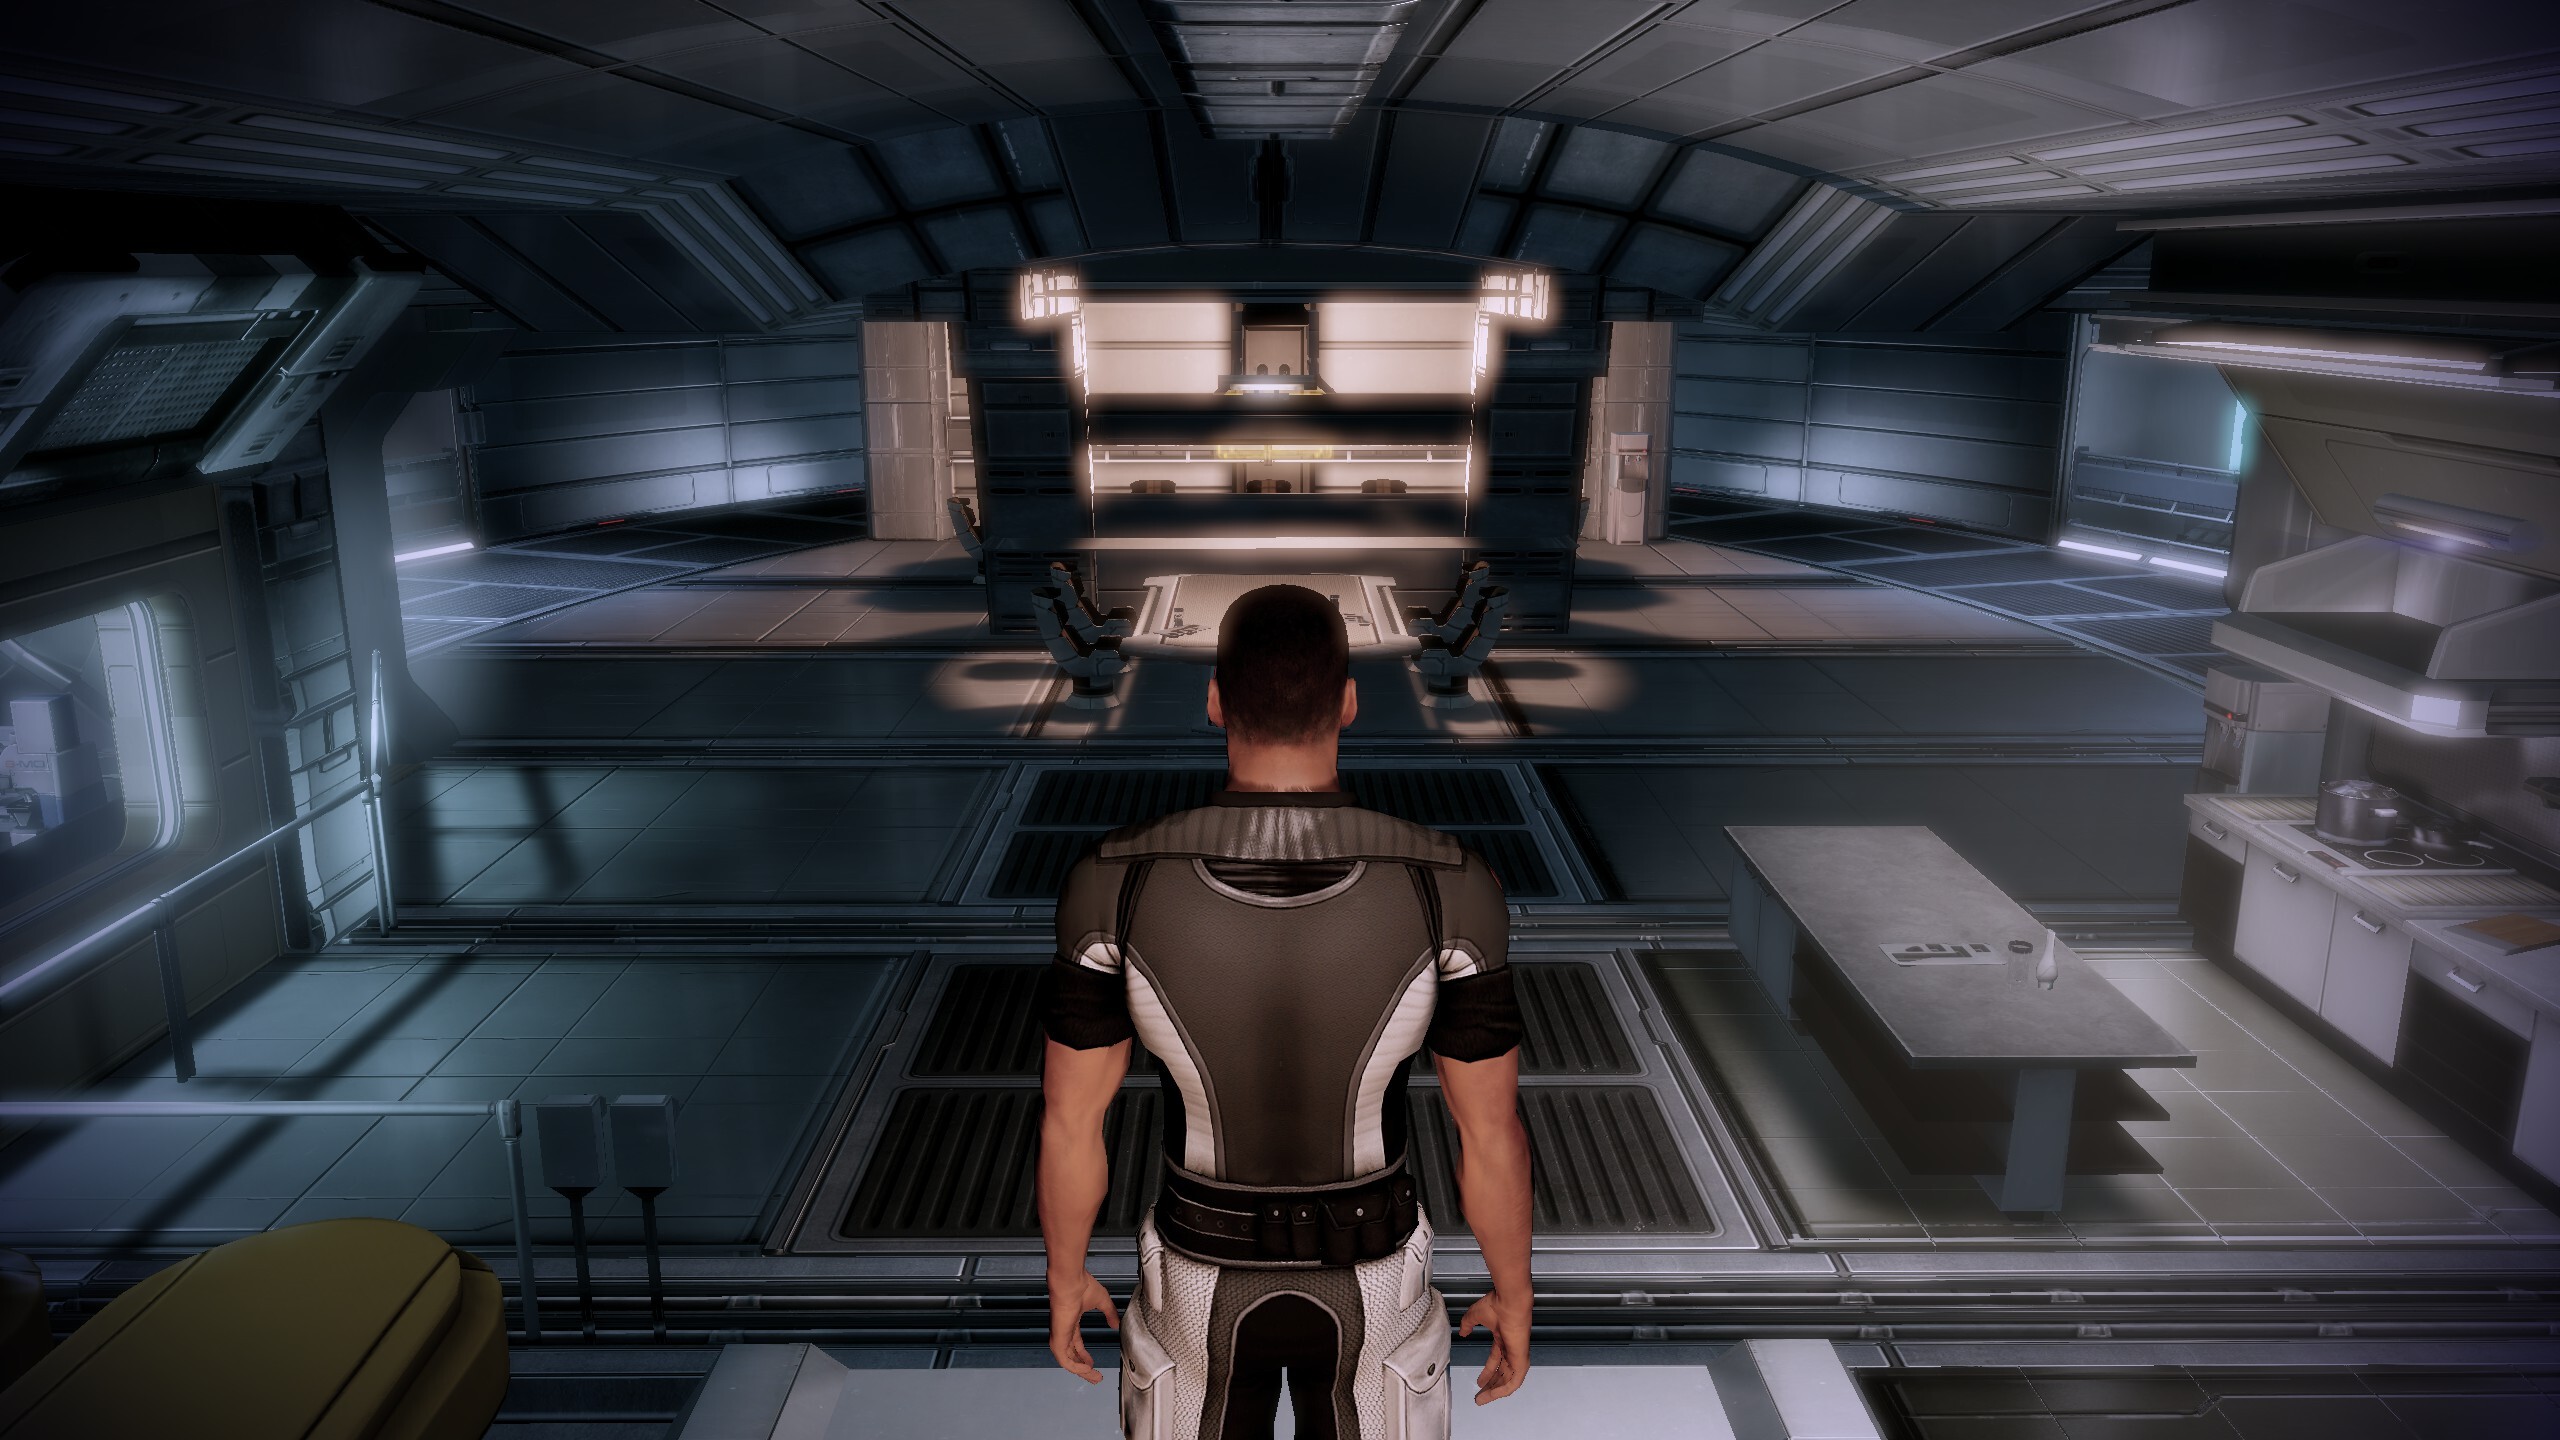
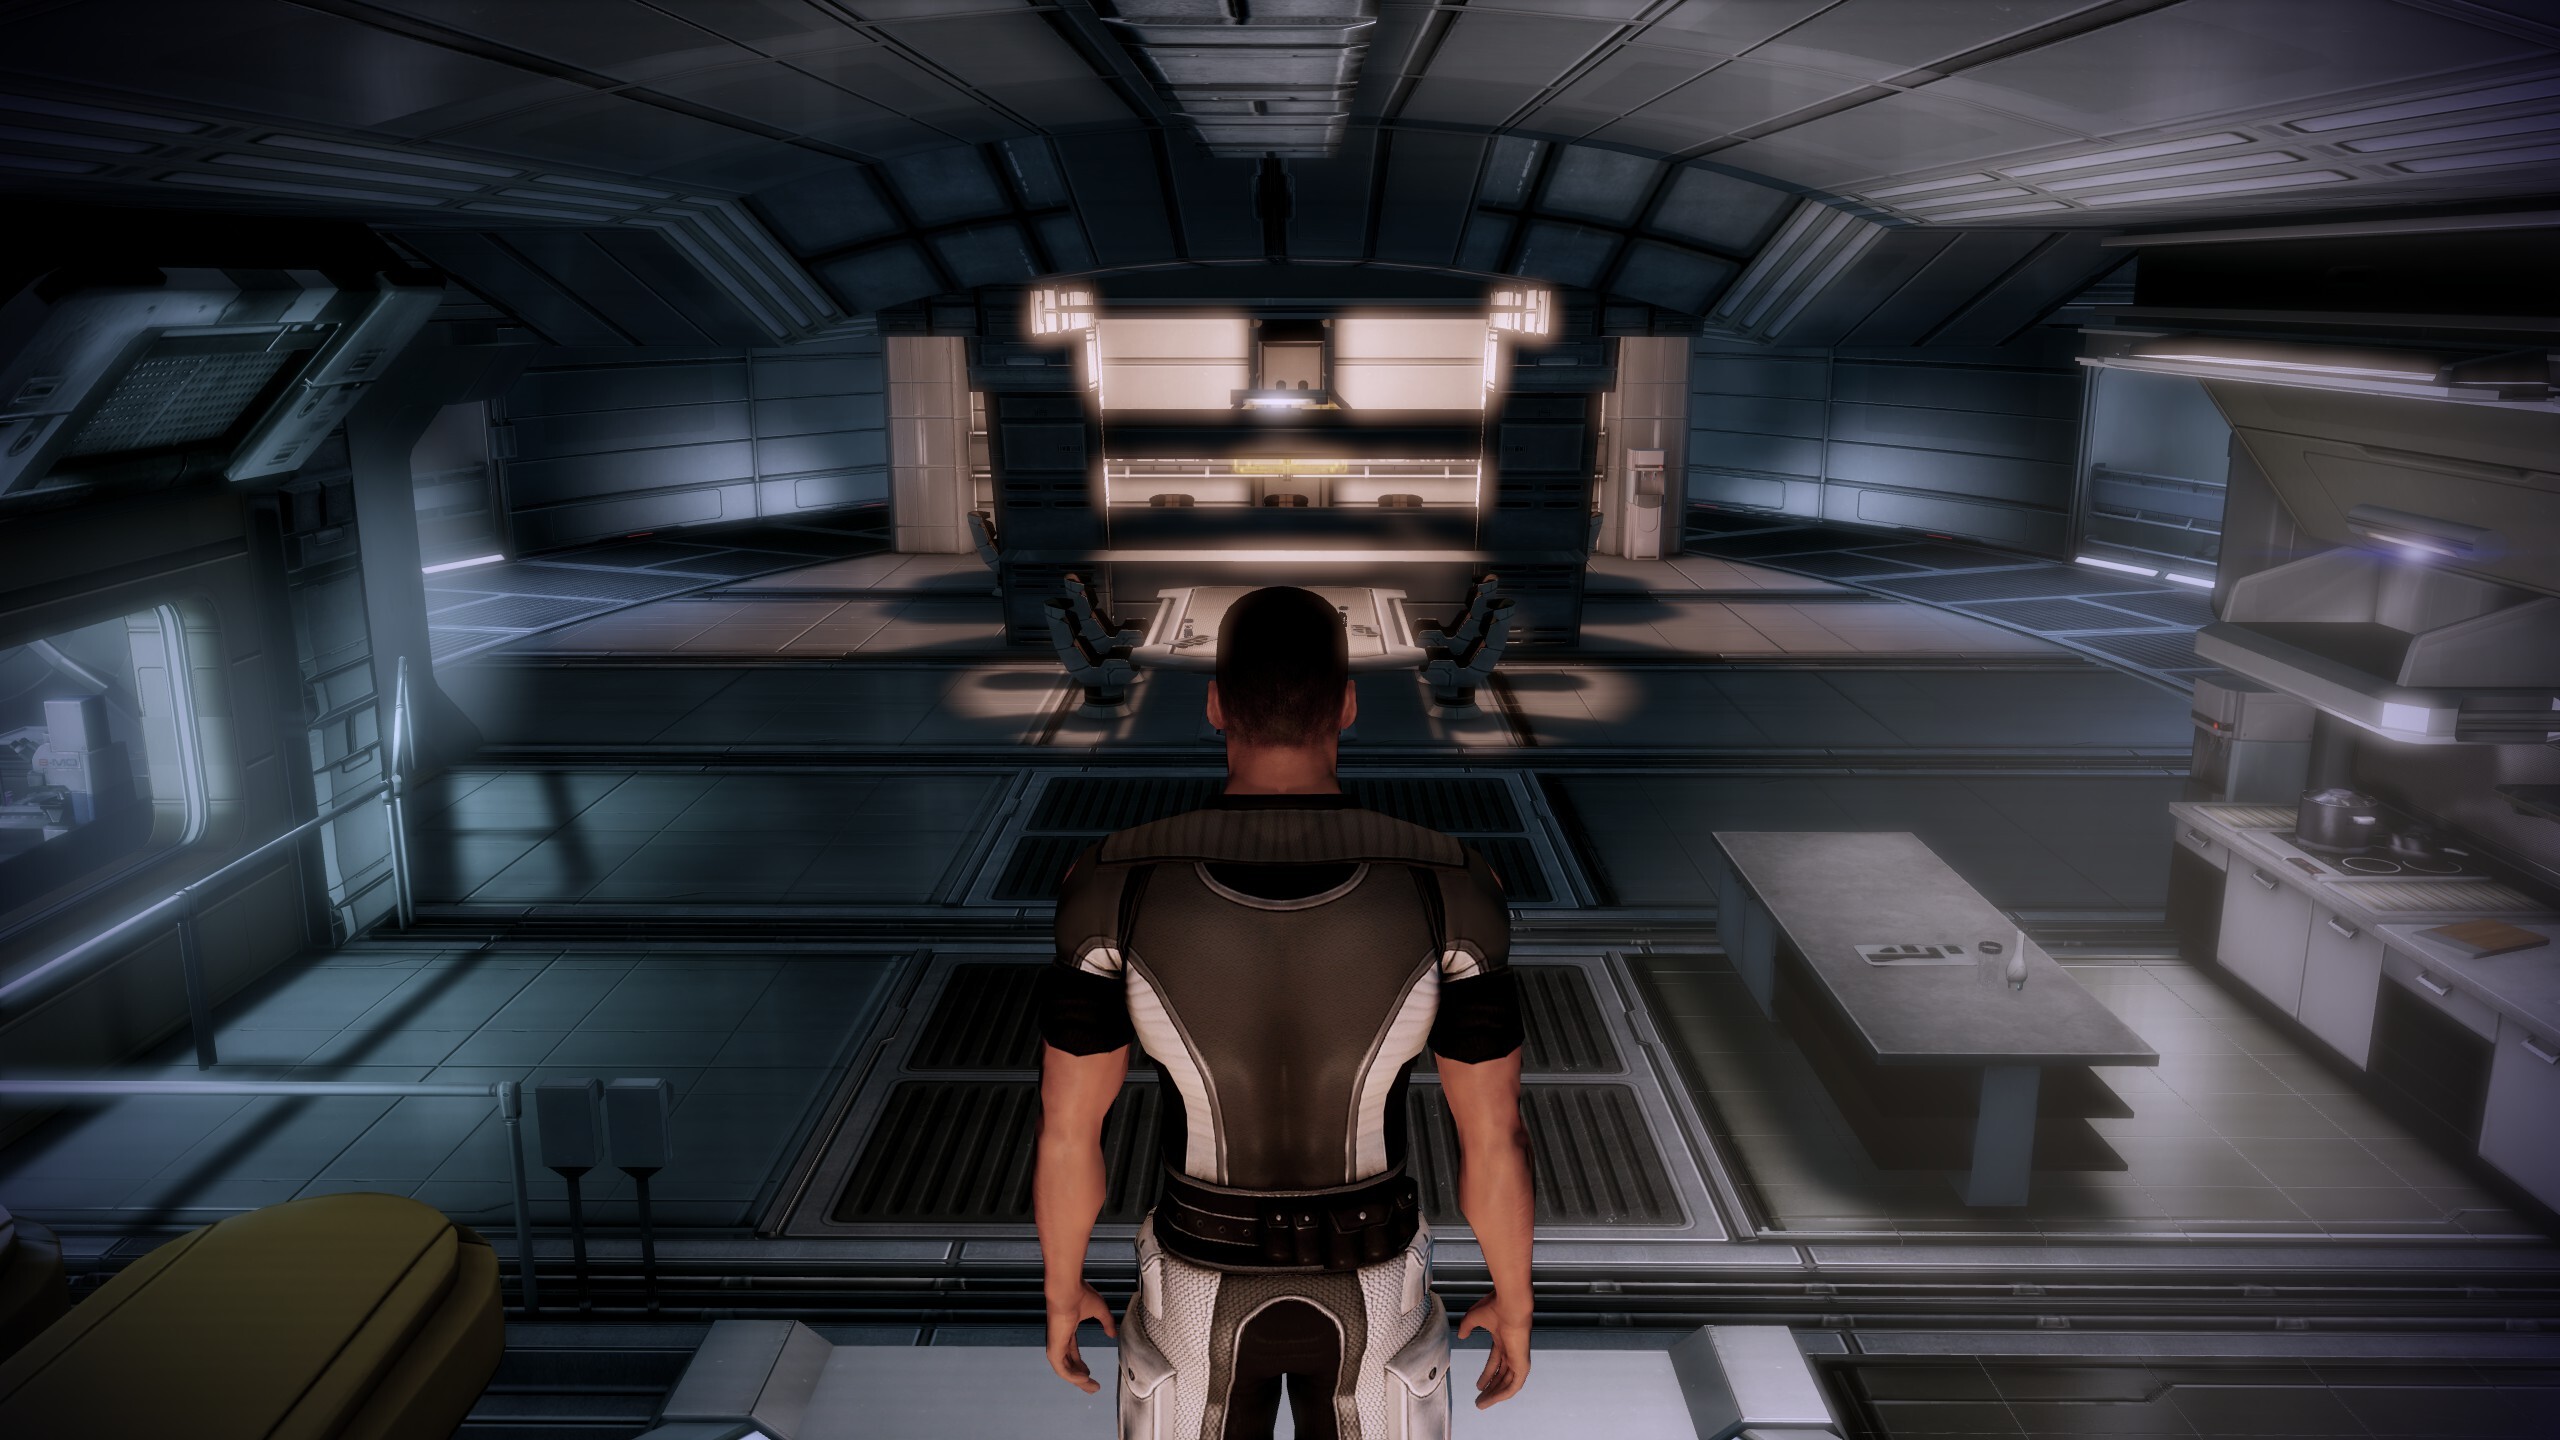
Mass Effect (2007).


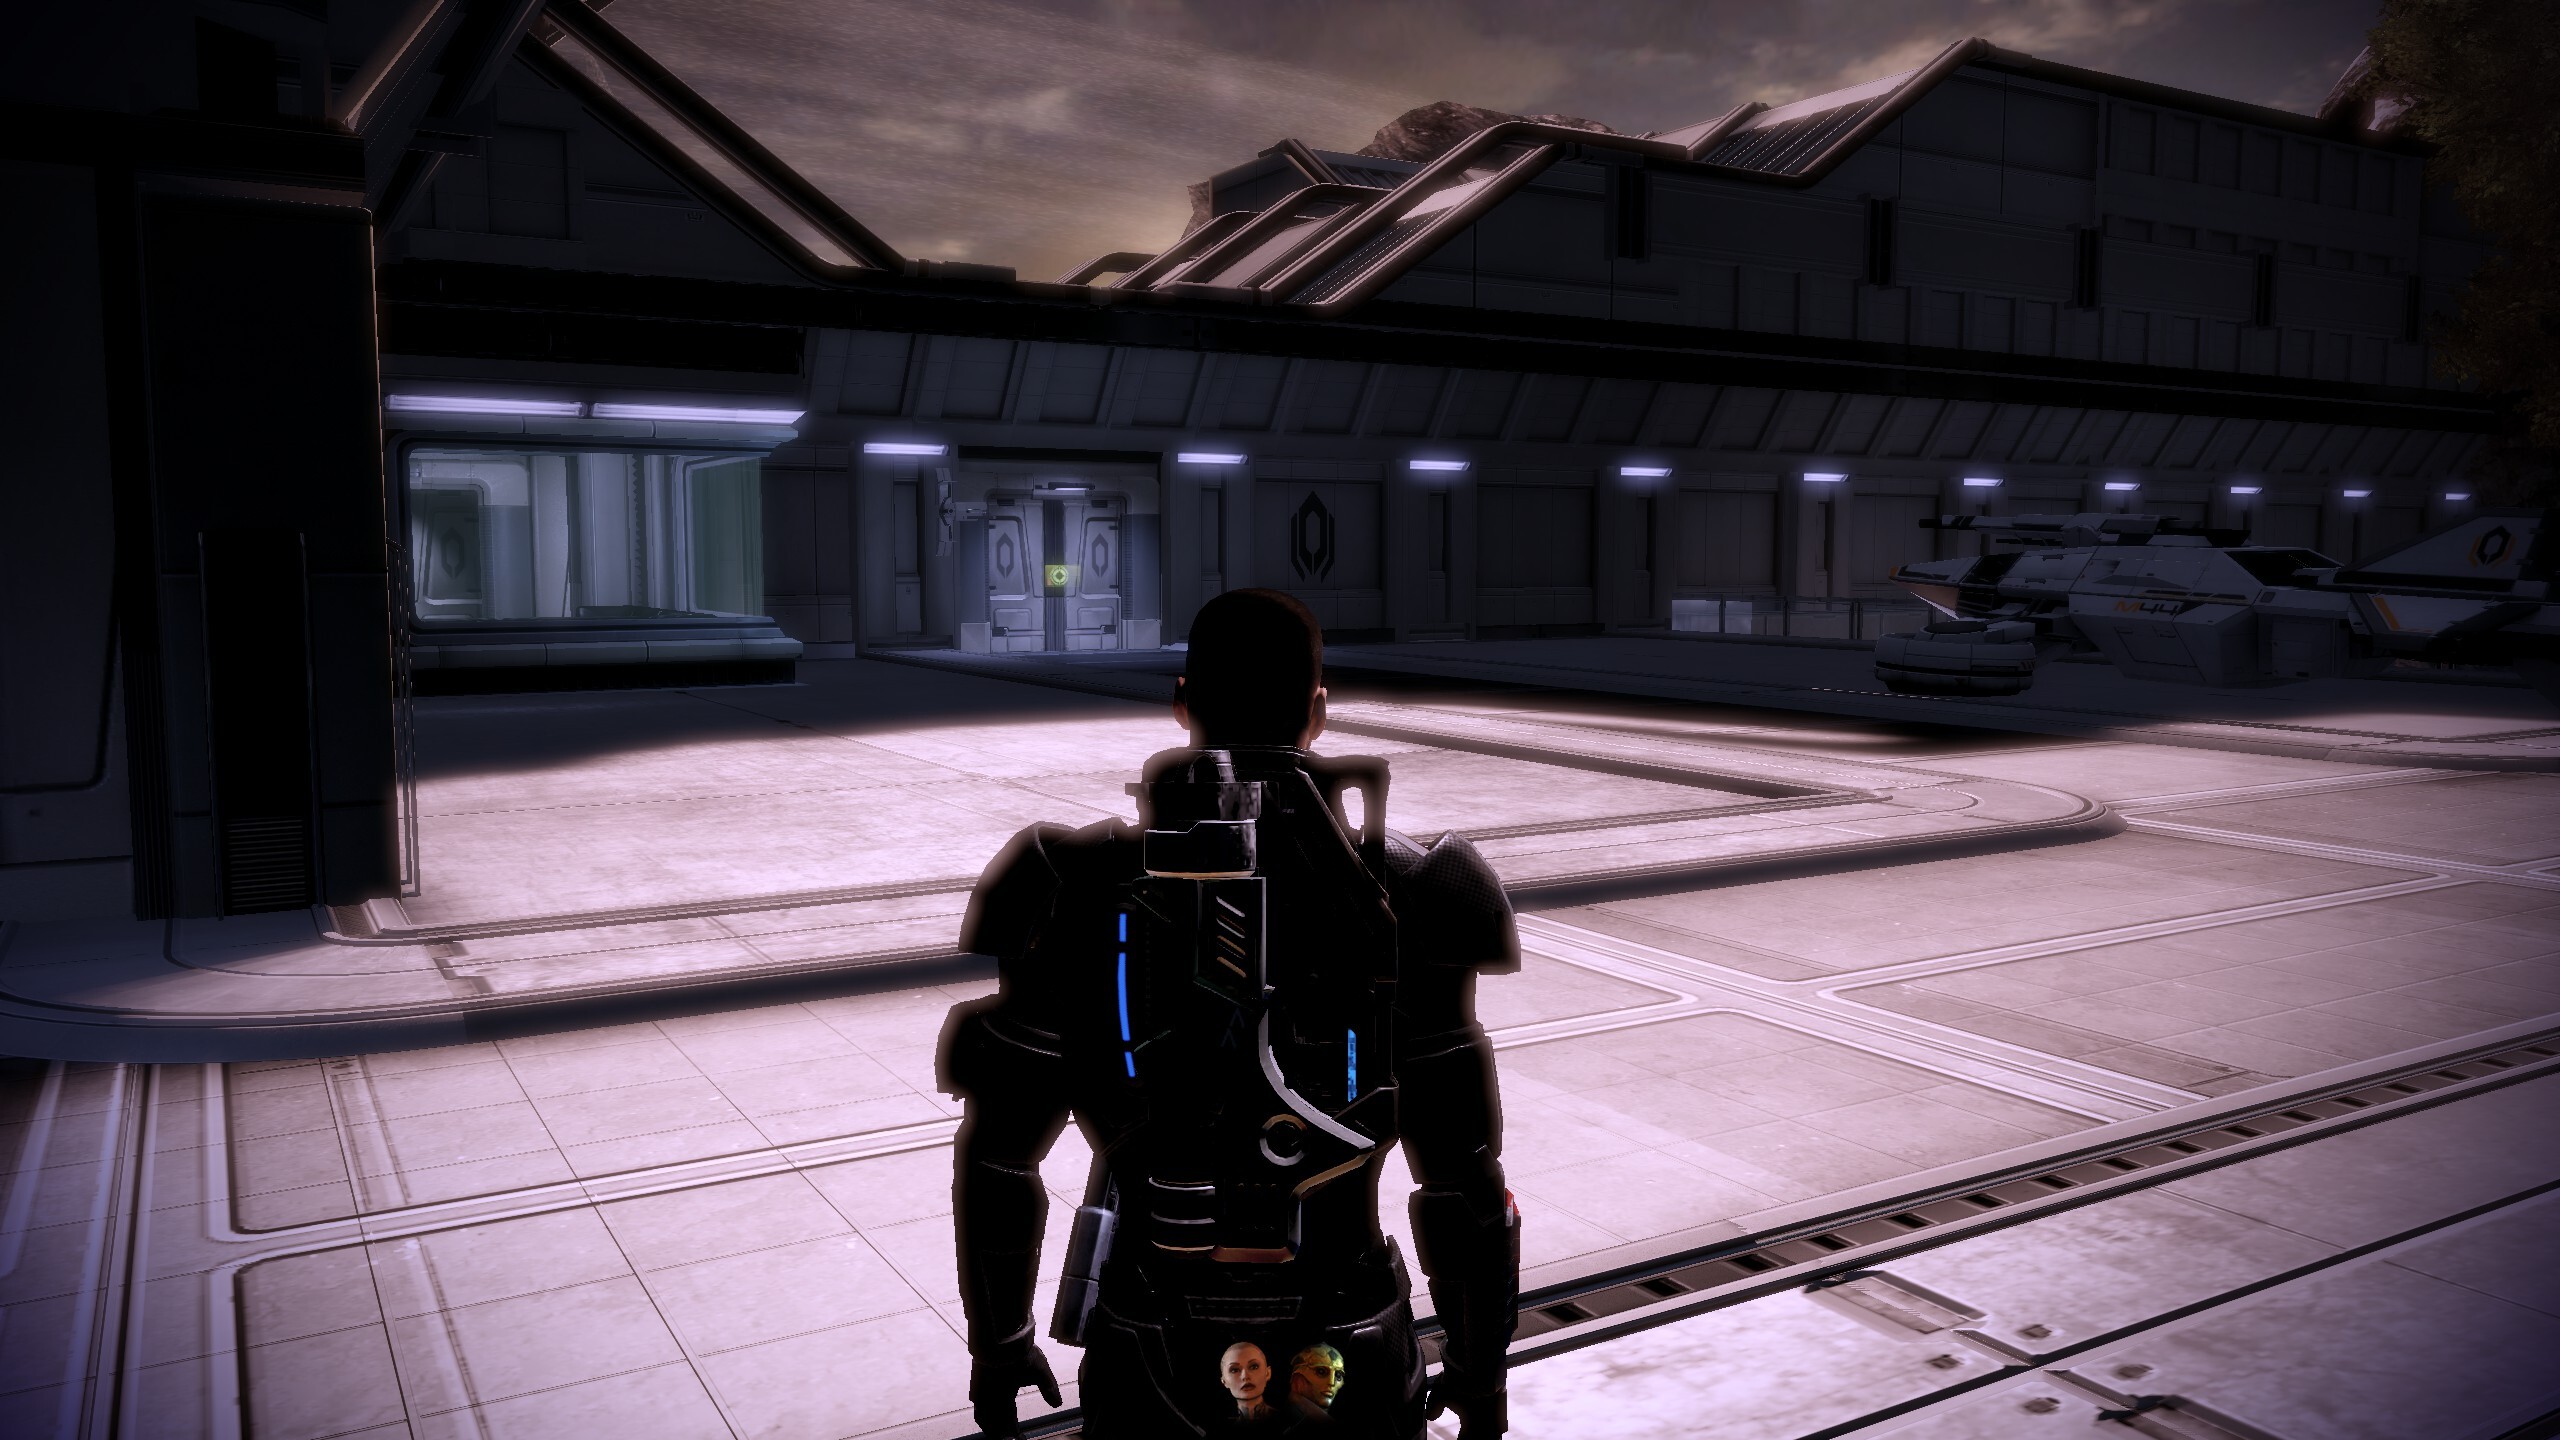
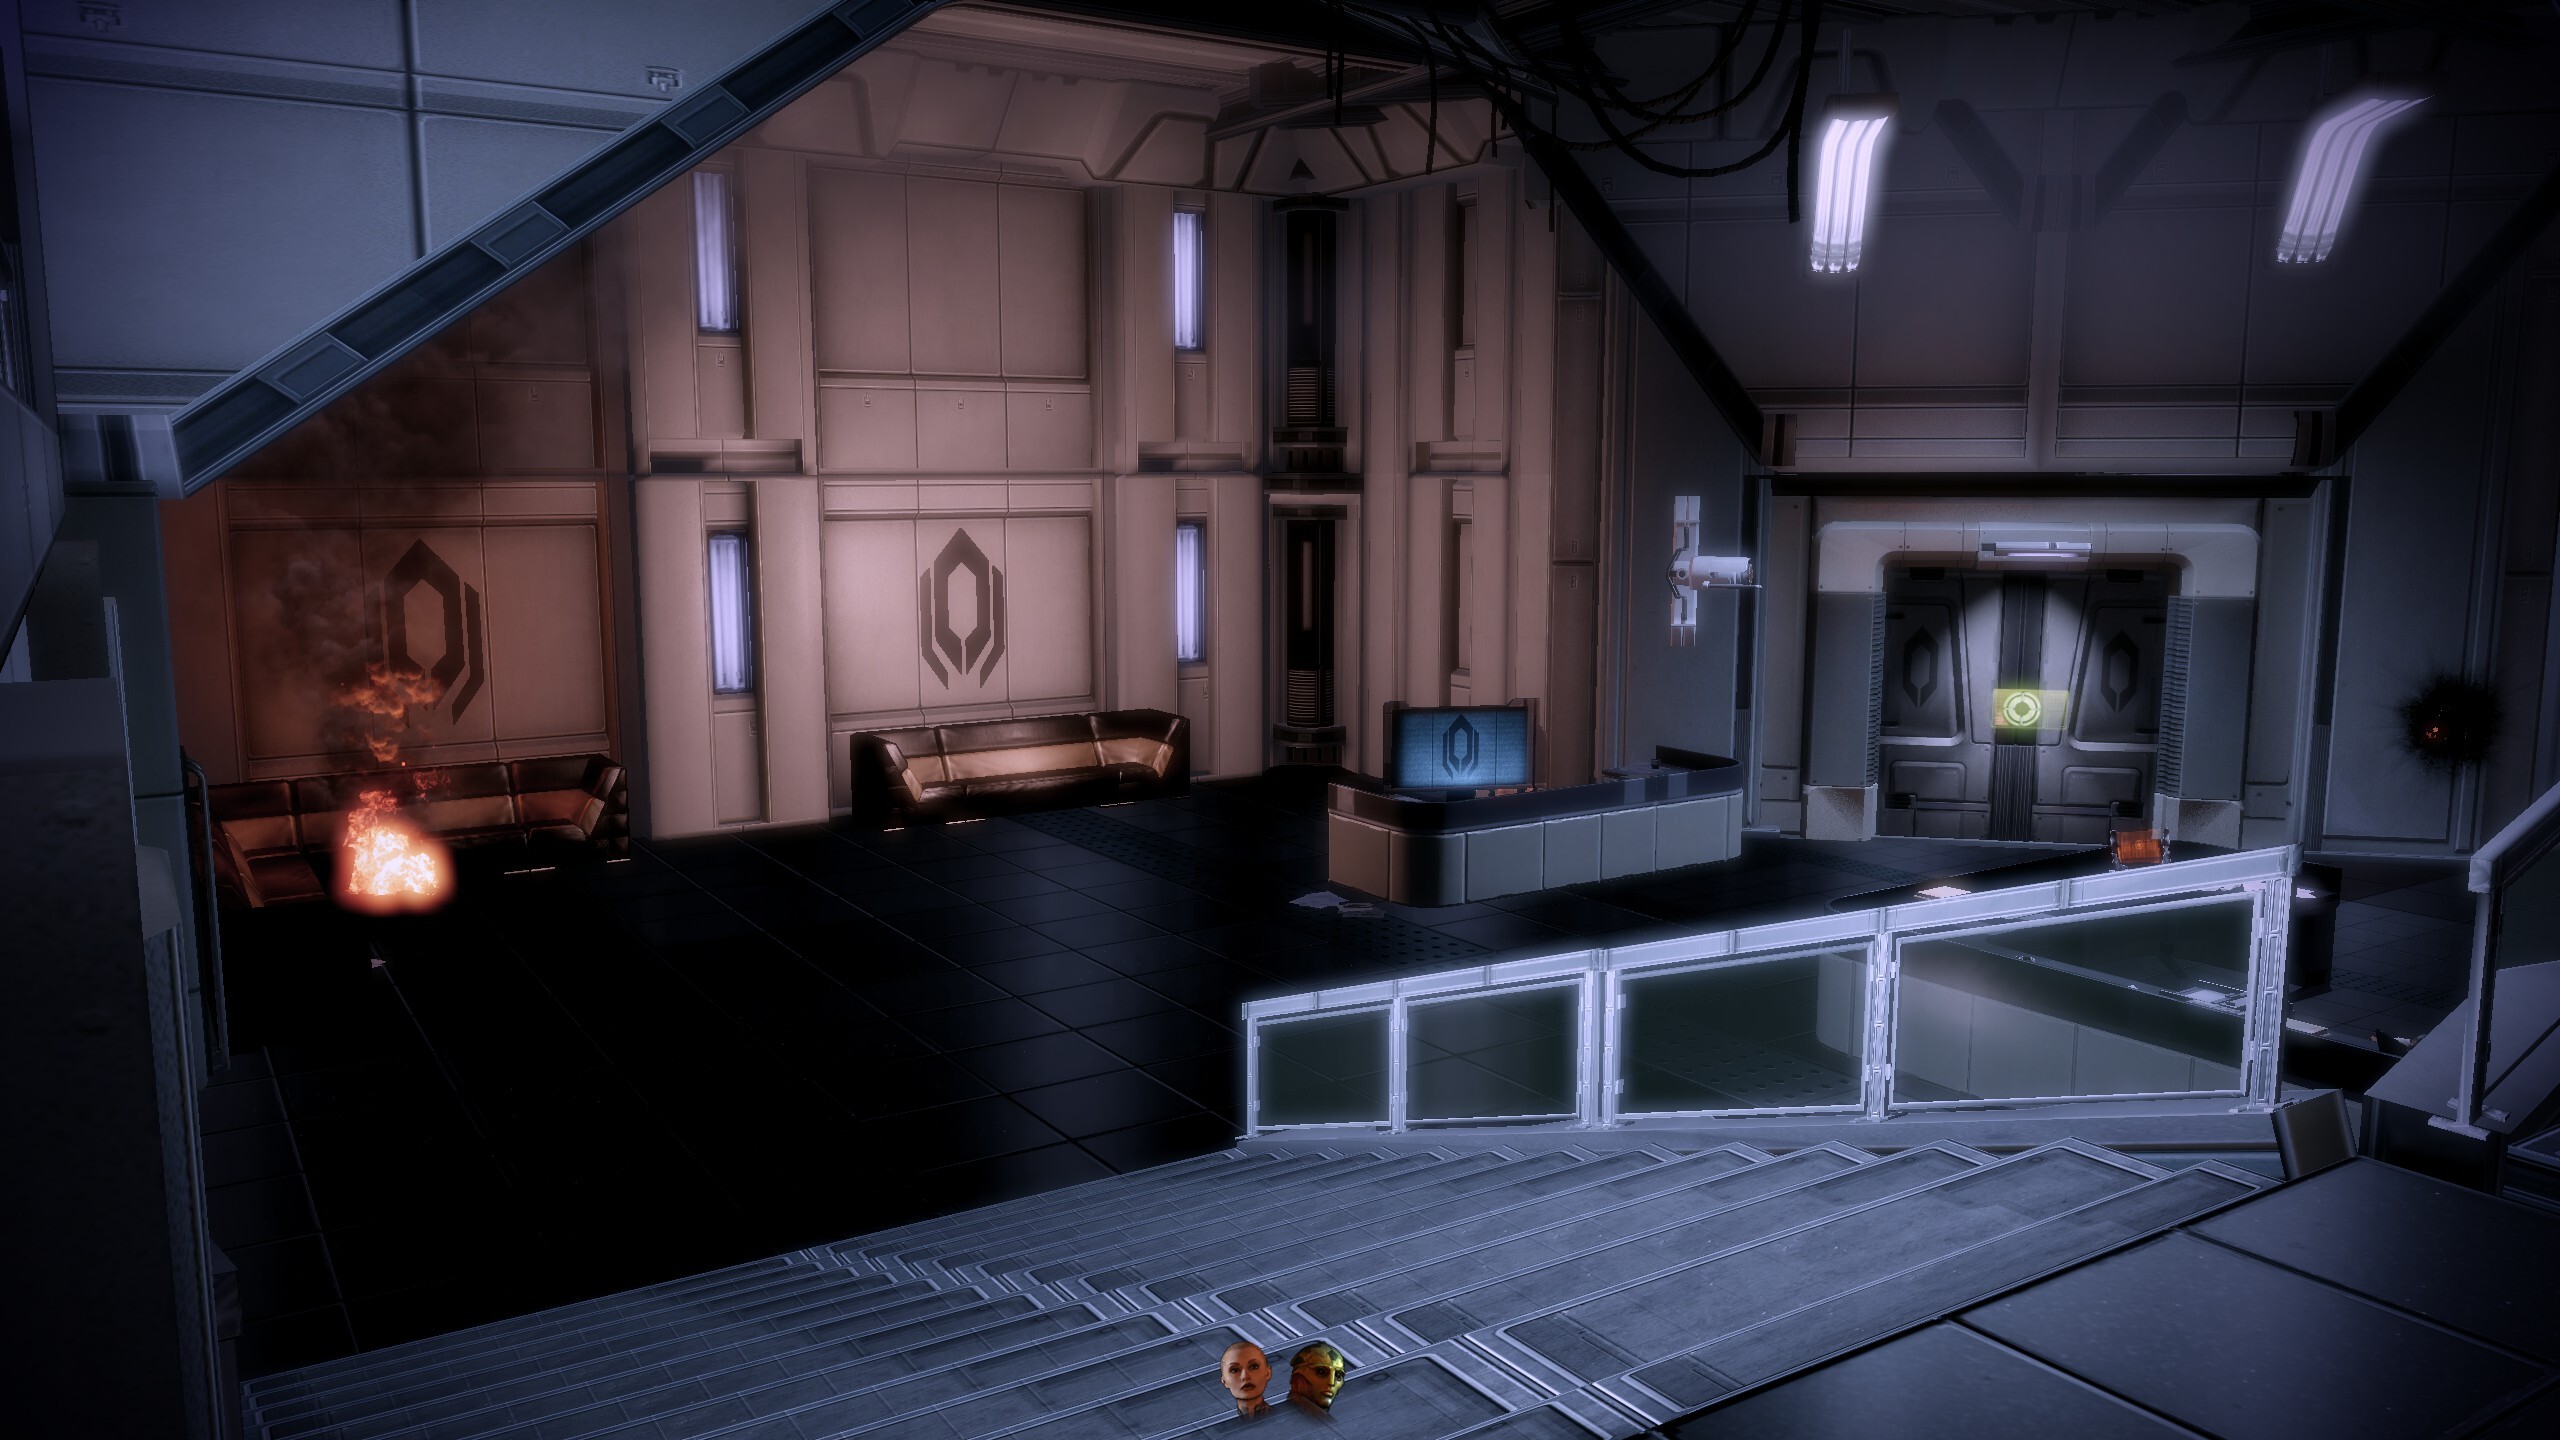
Mass Effect 2 (2010).

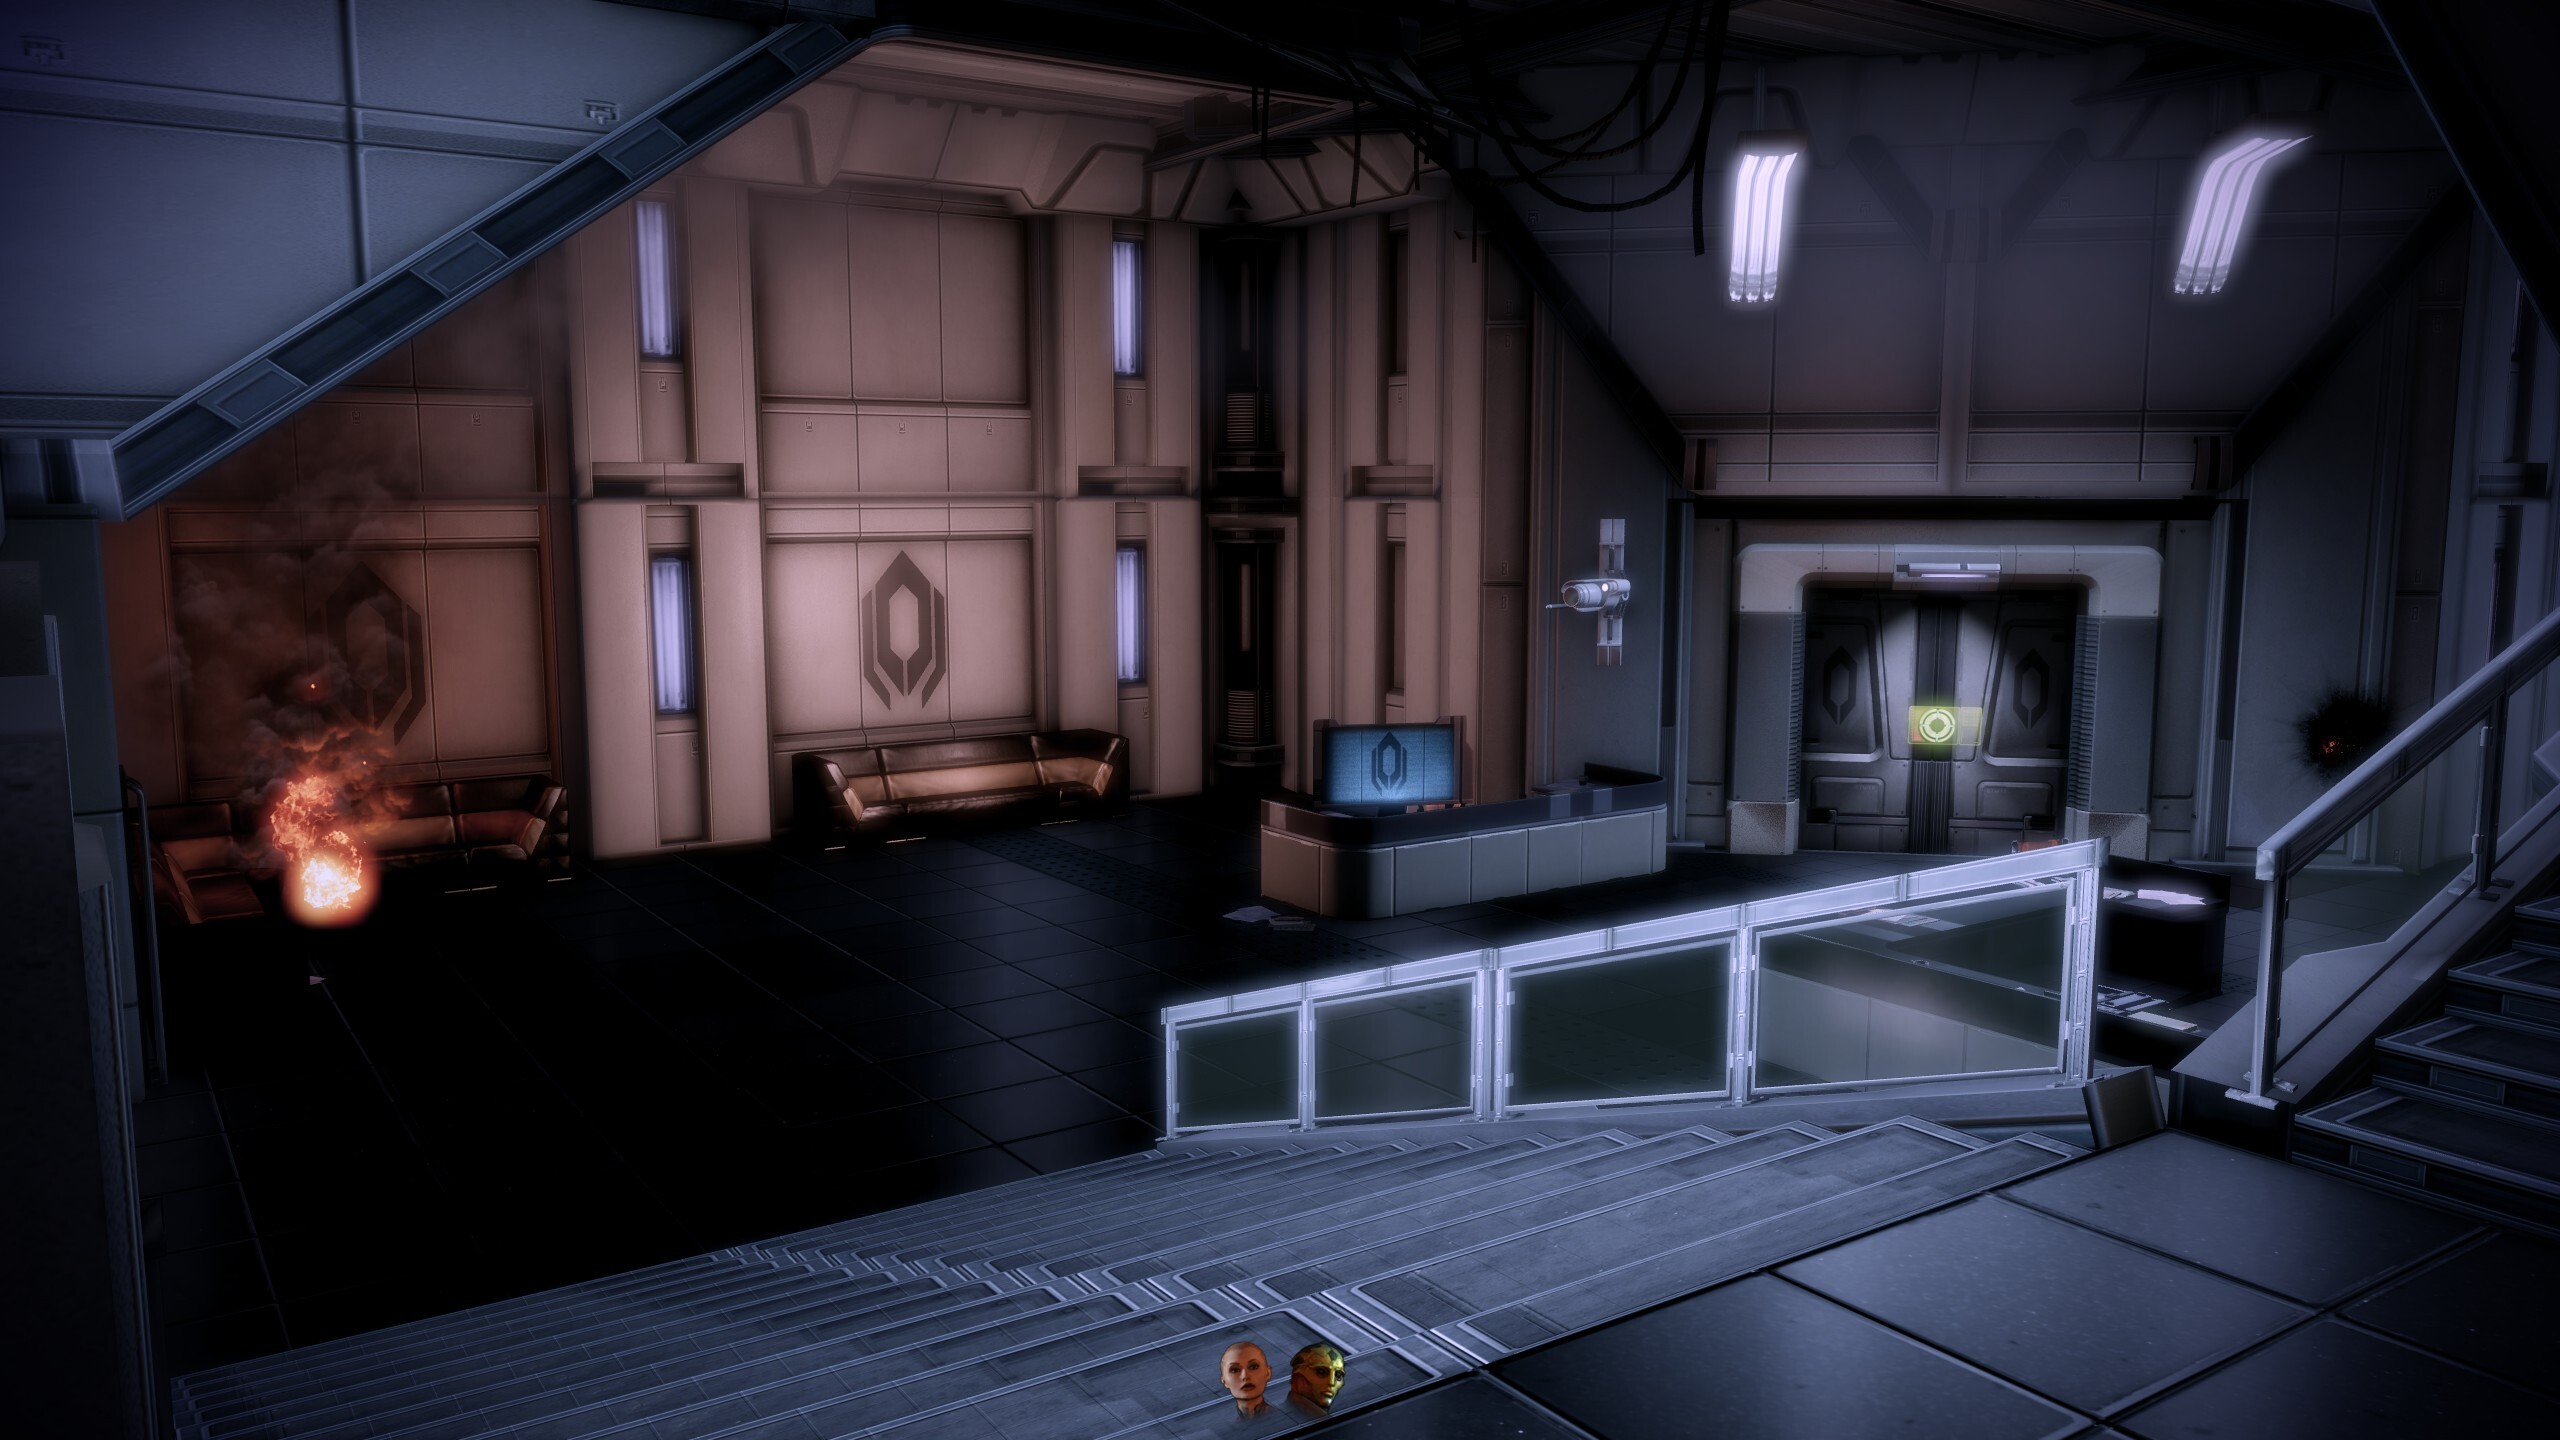
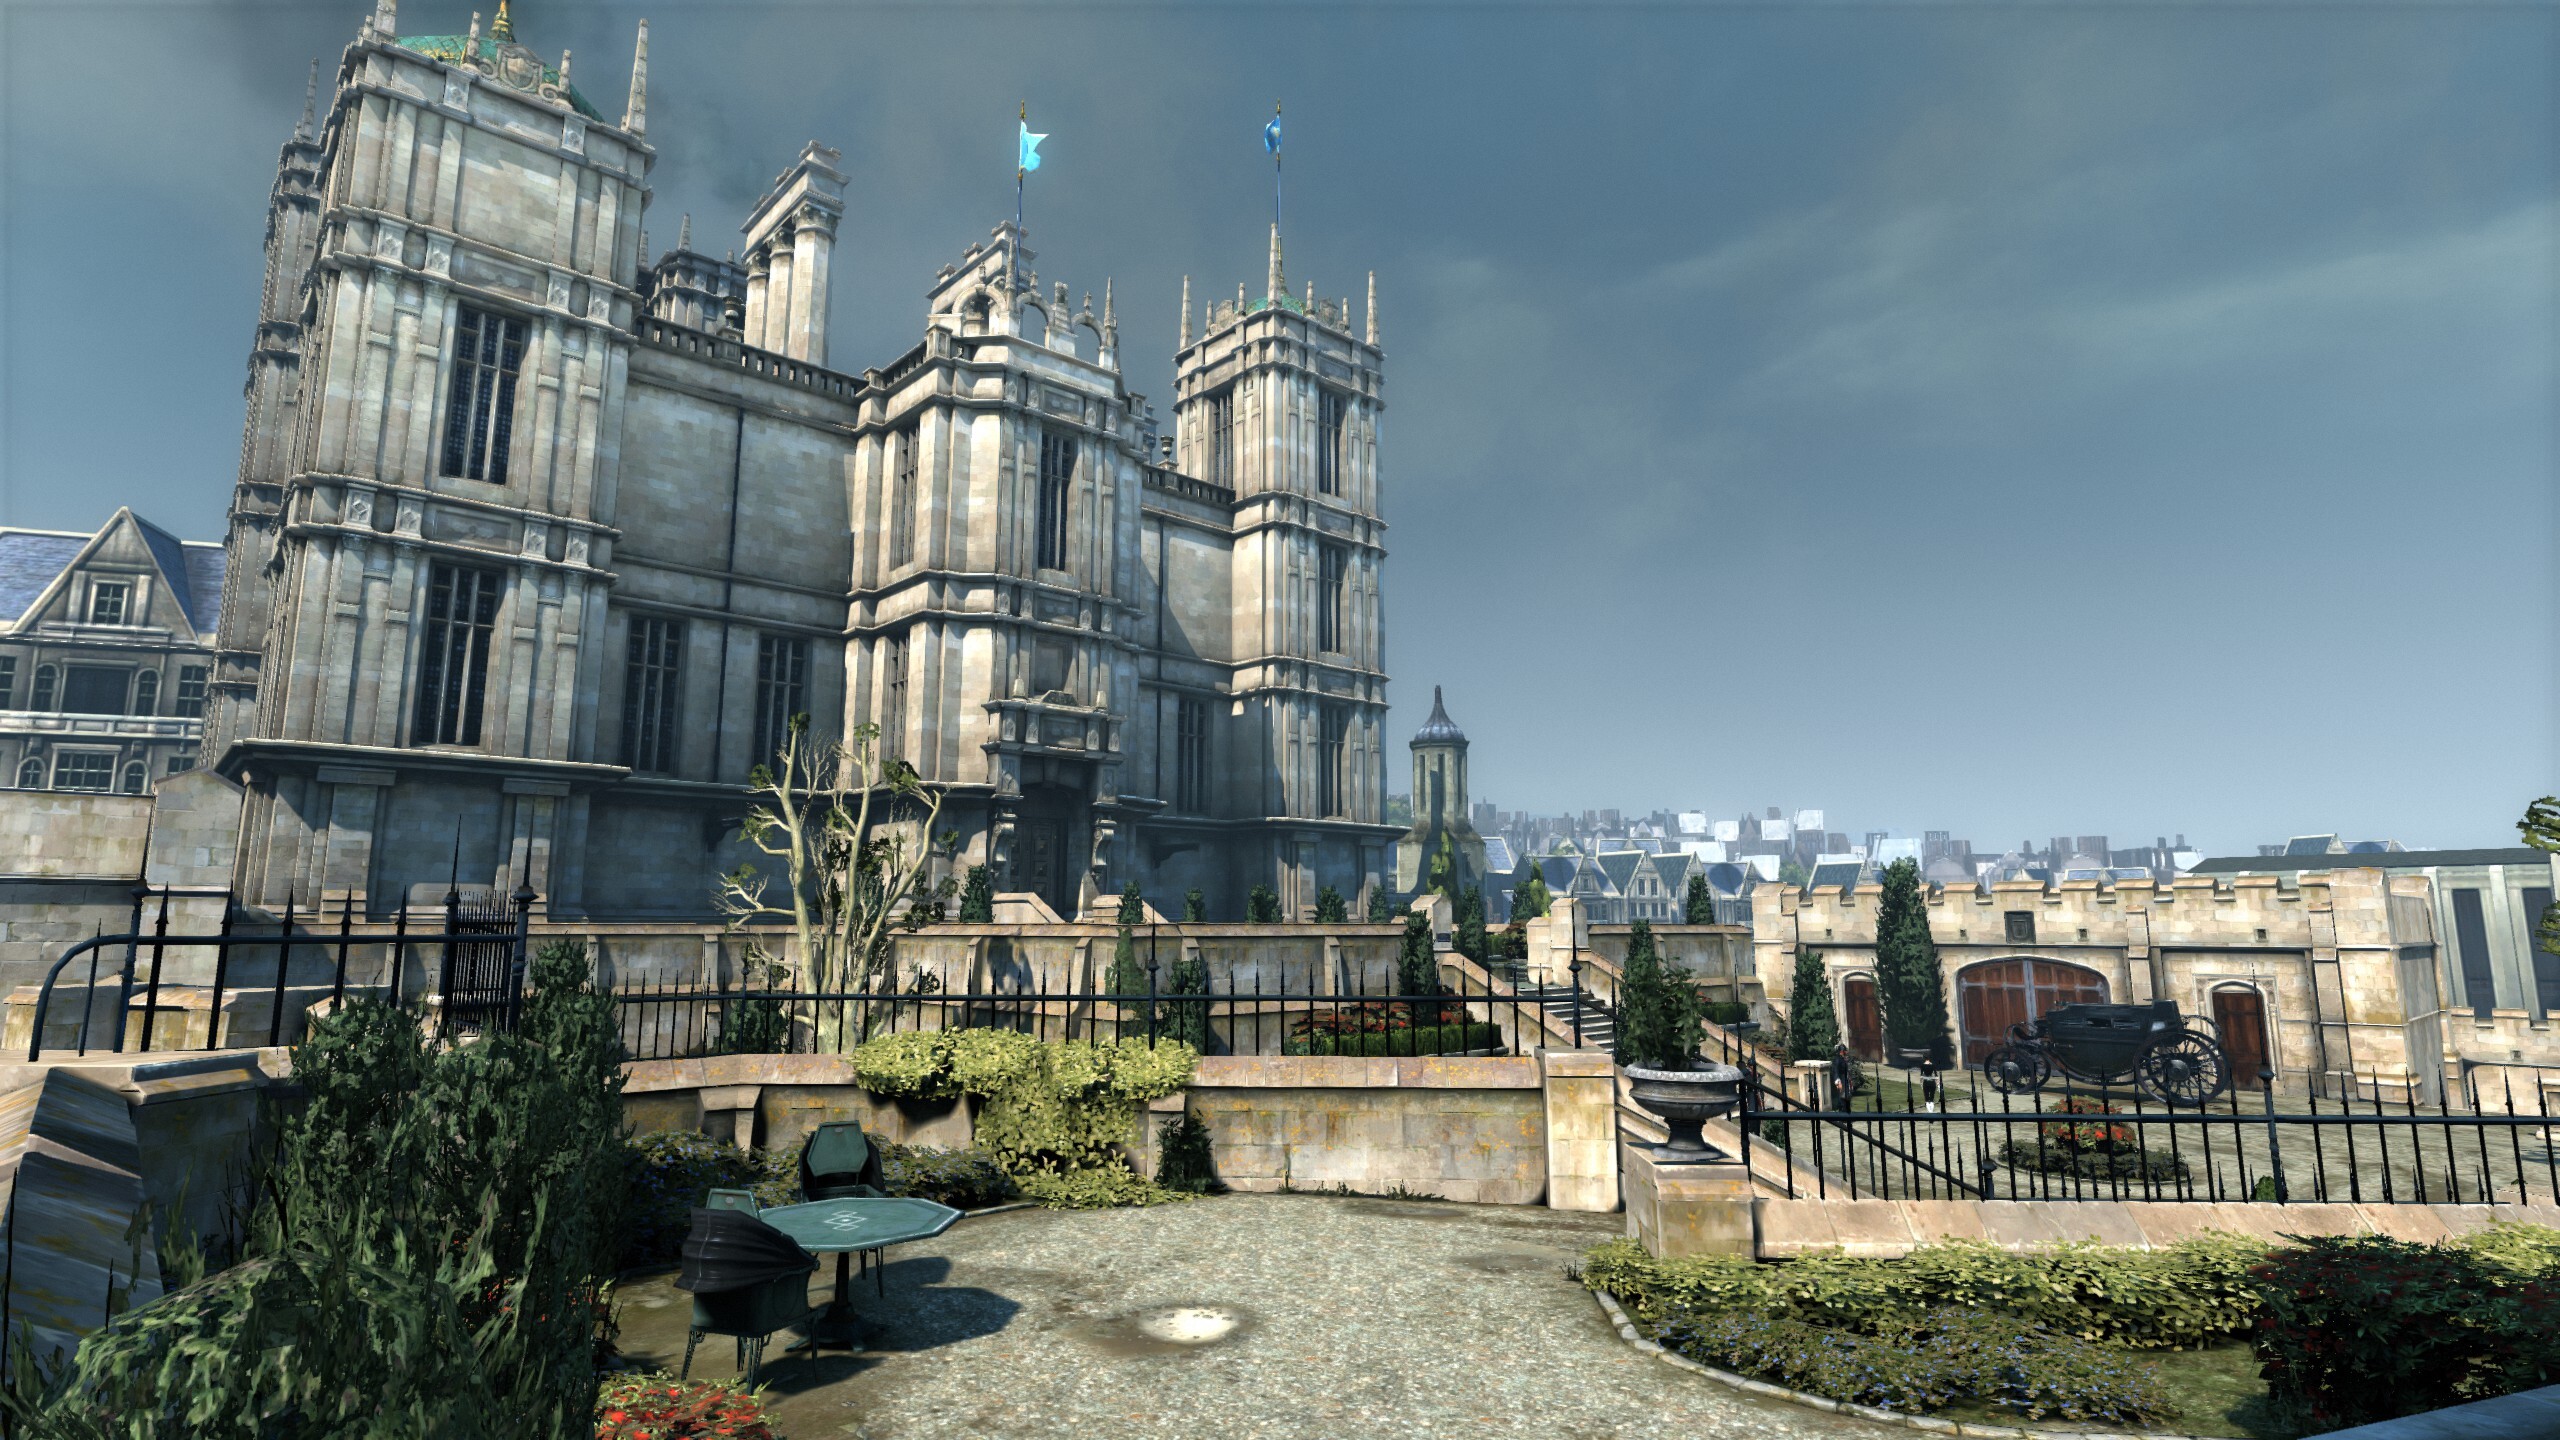
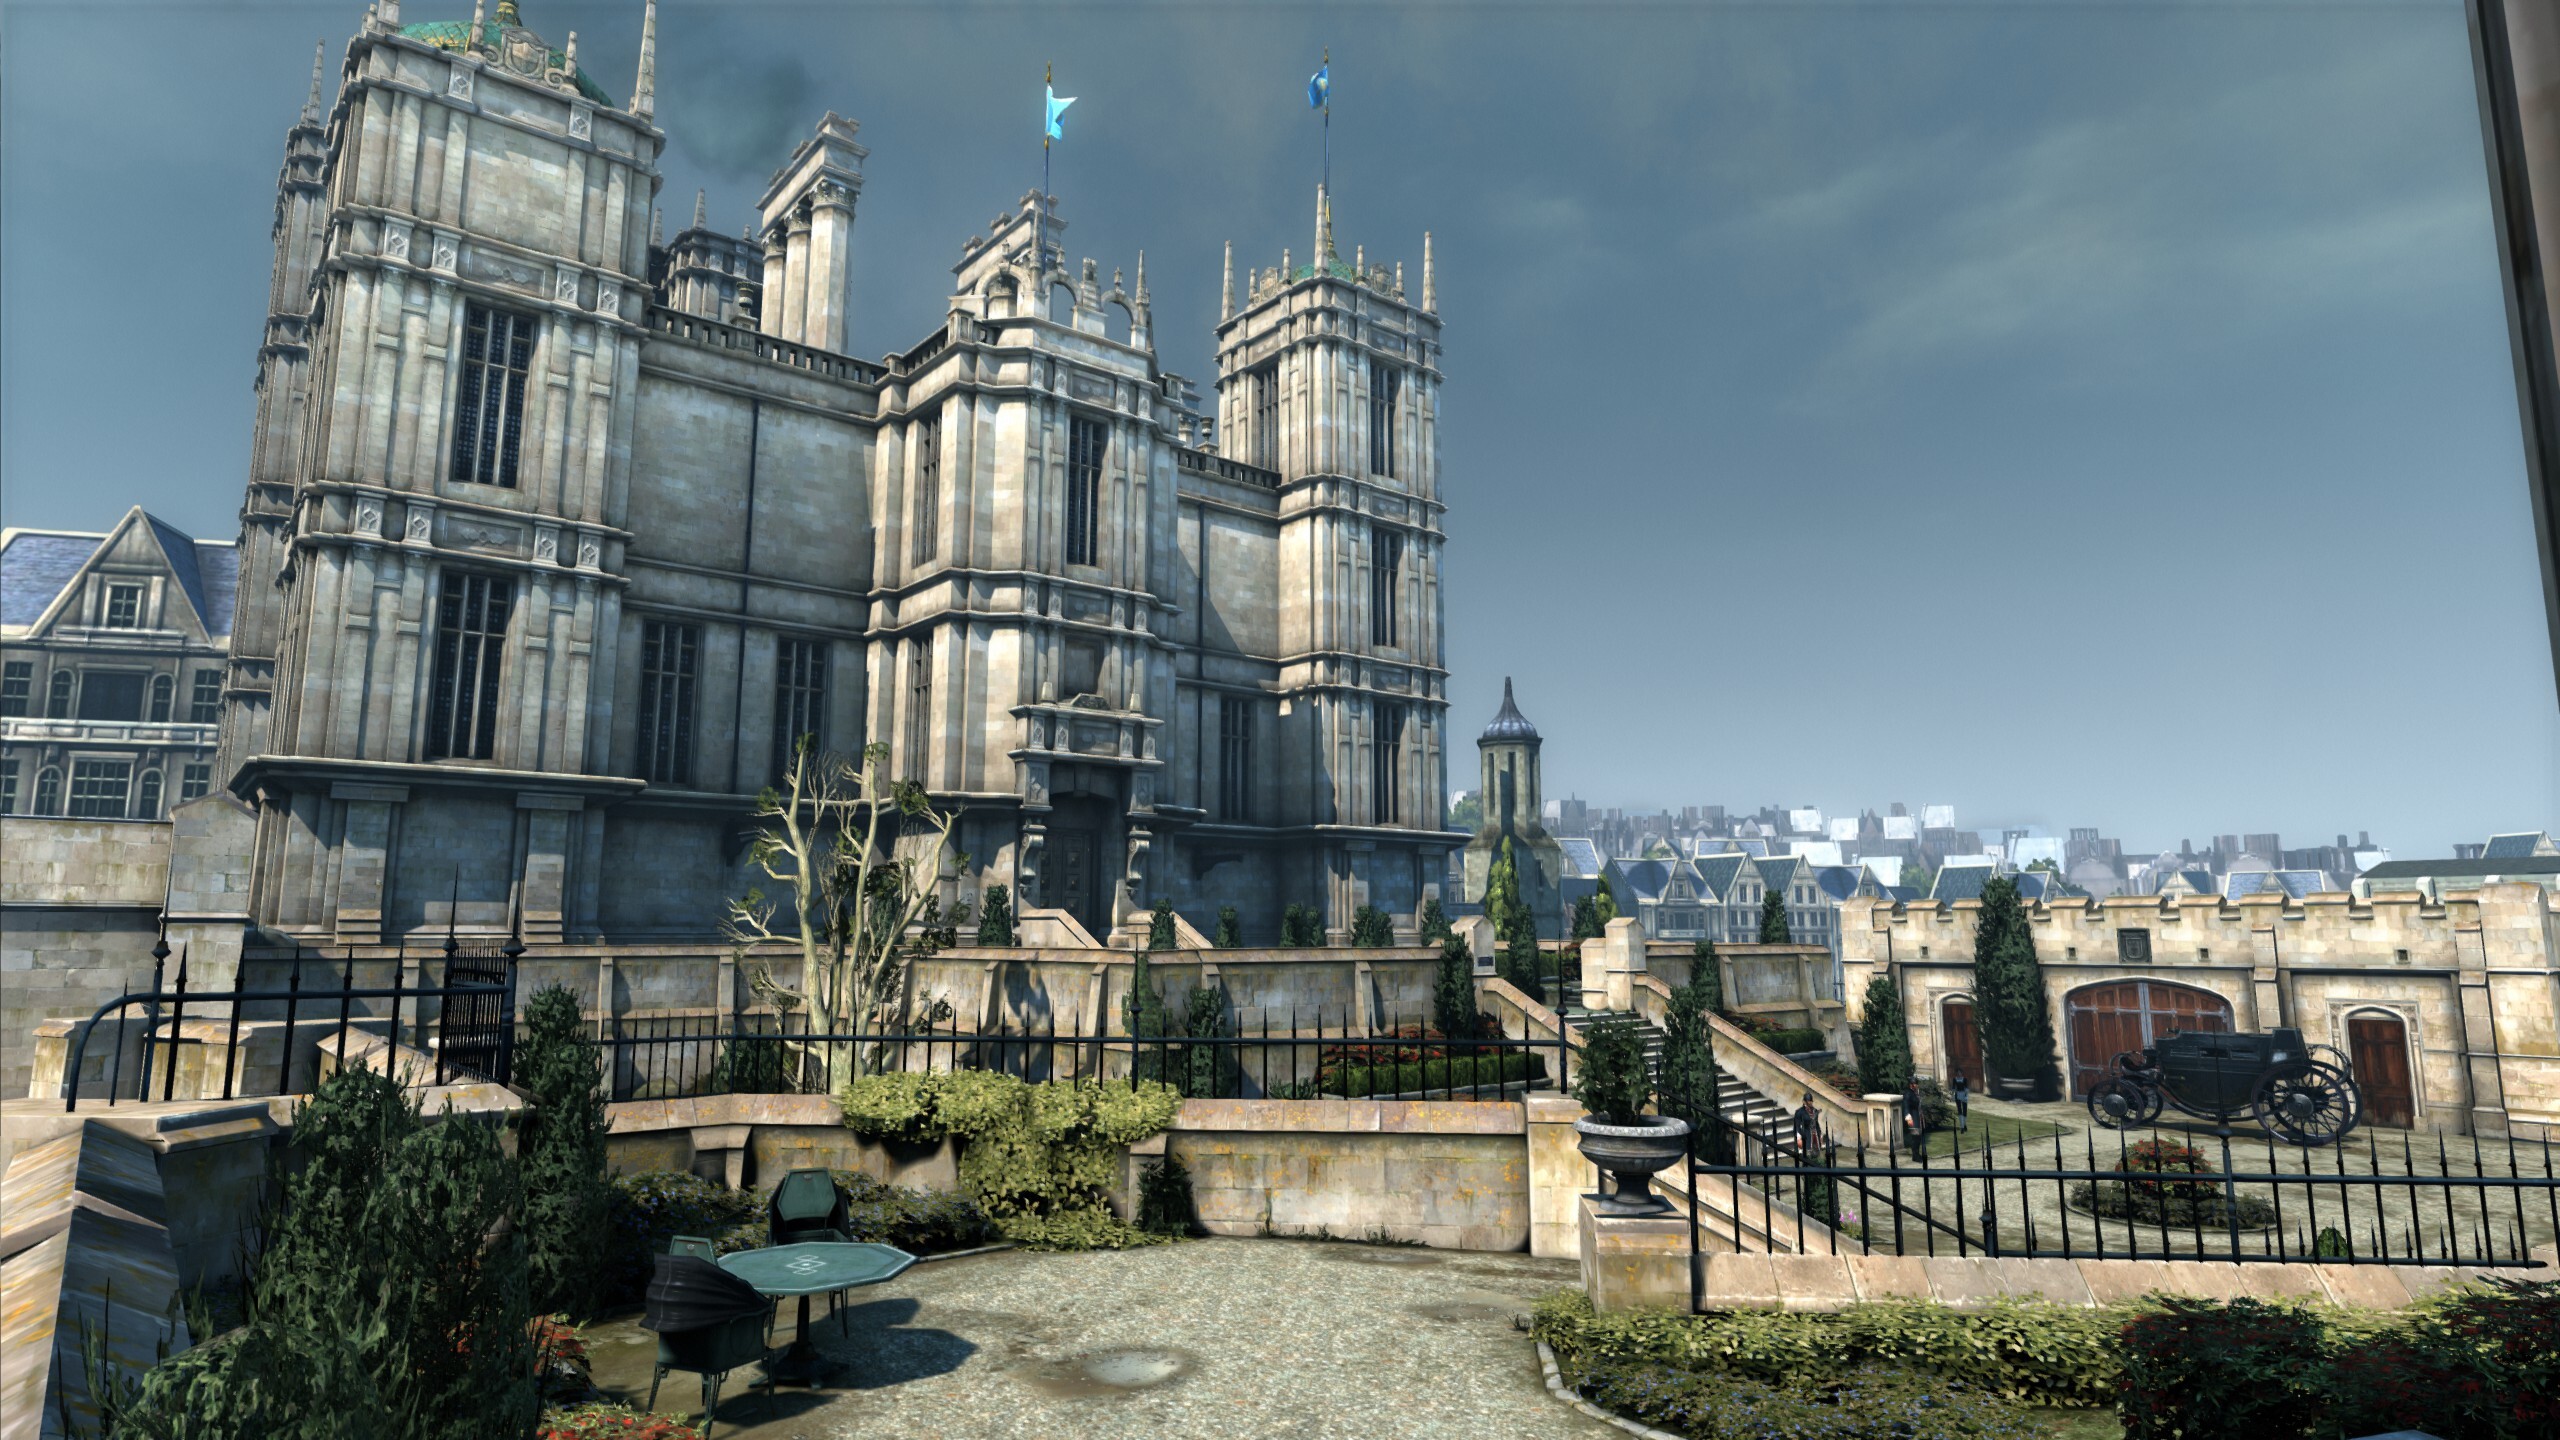
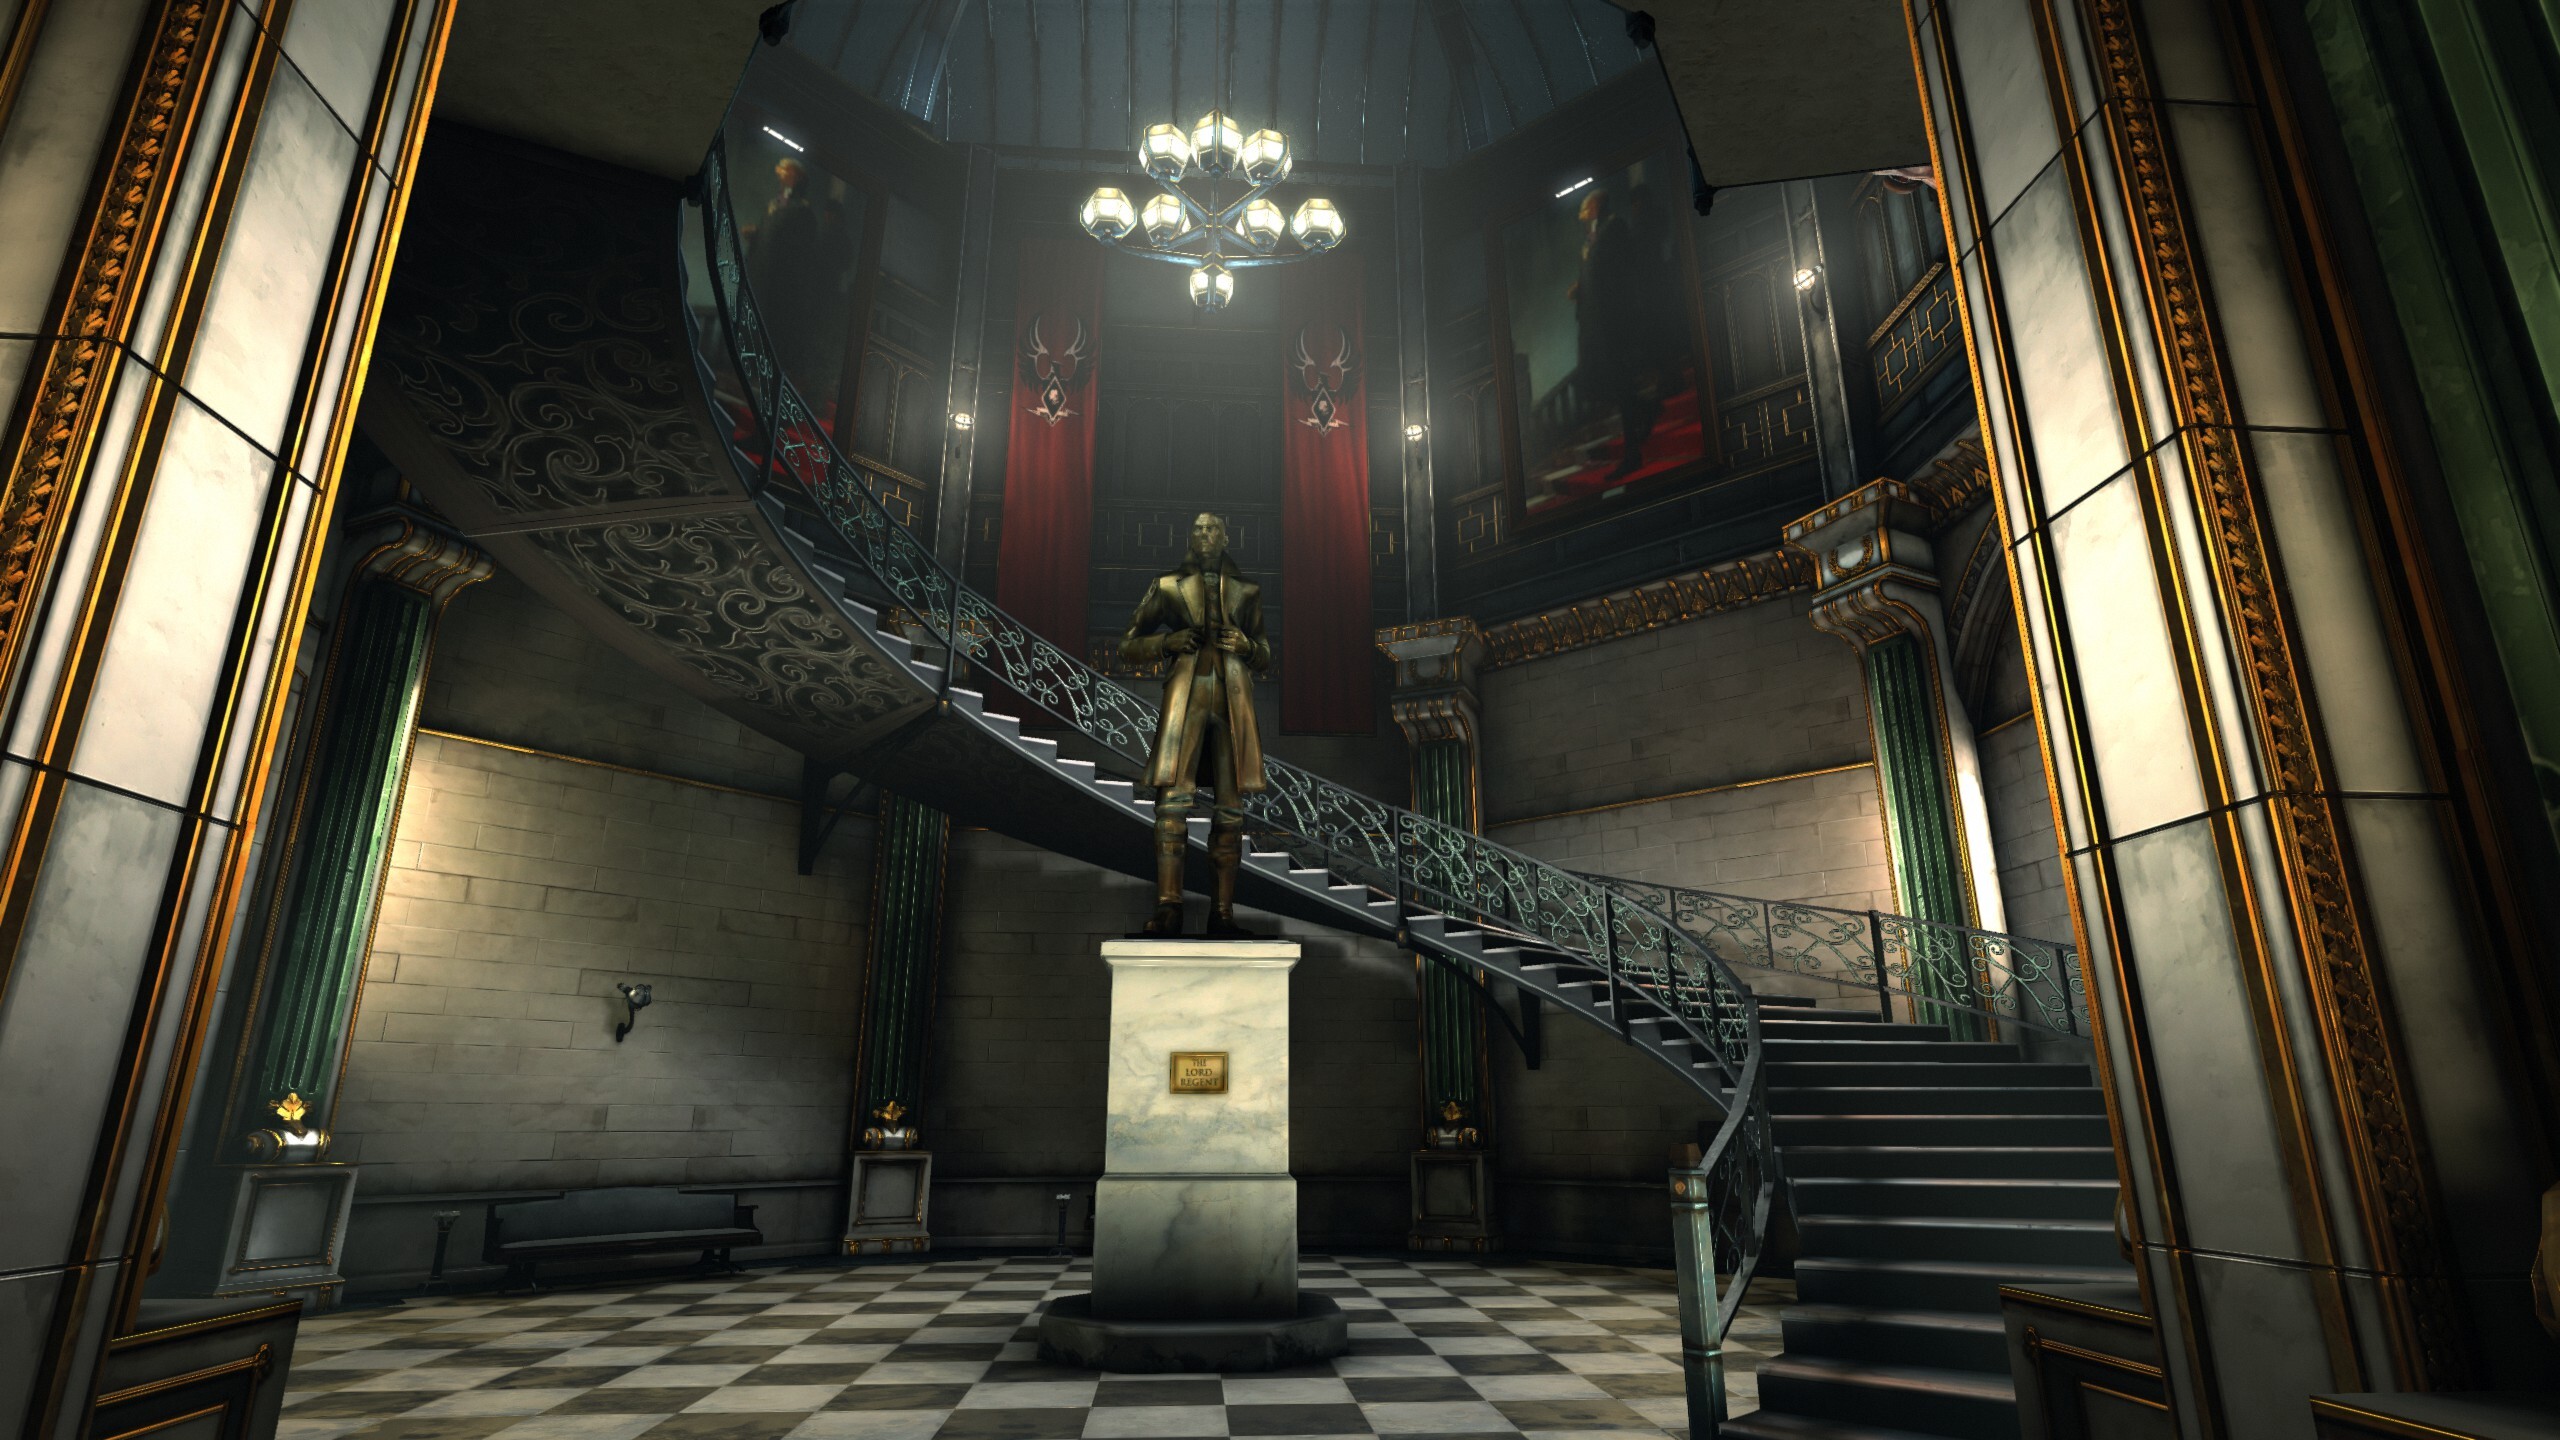
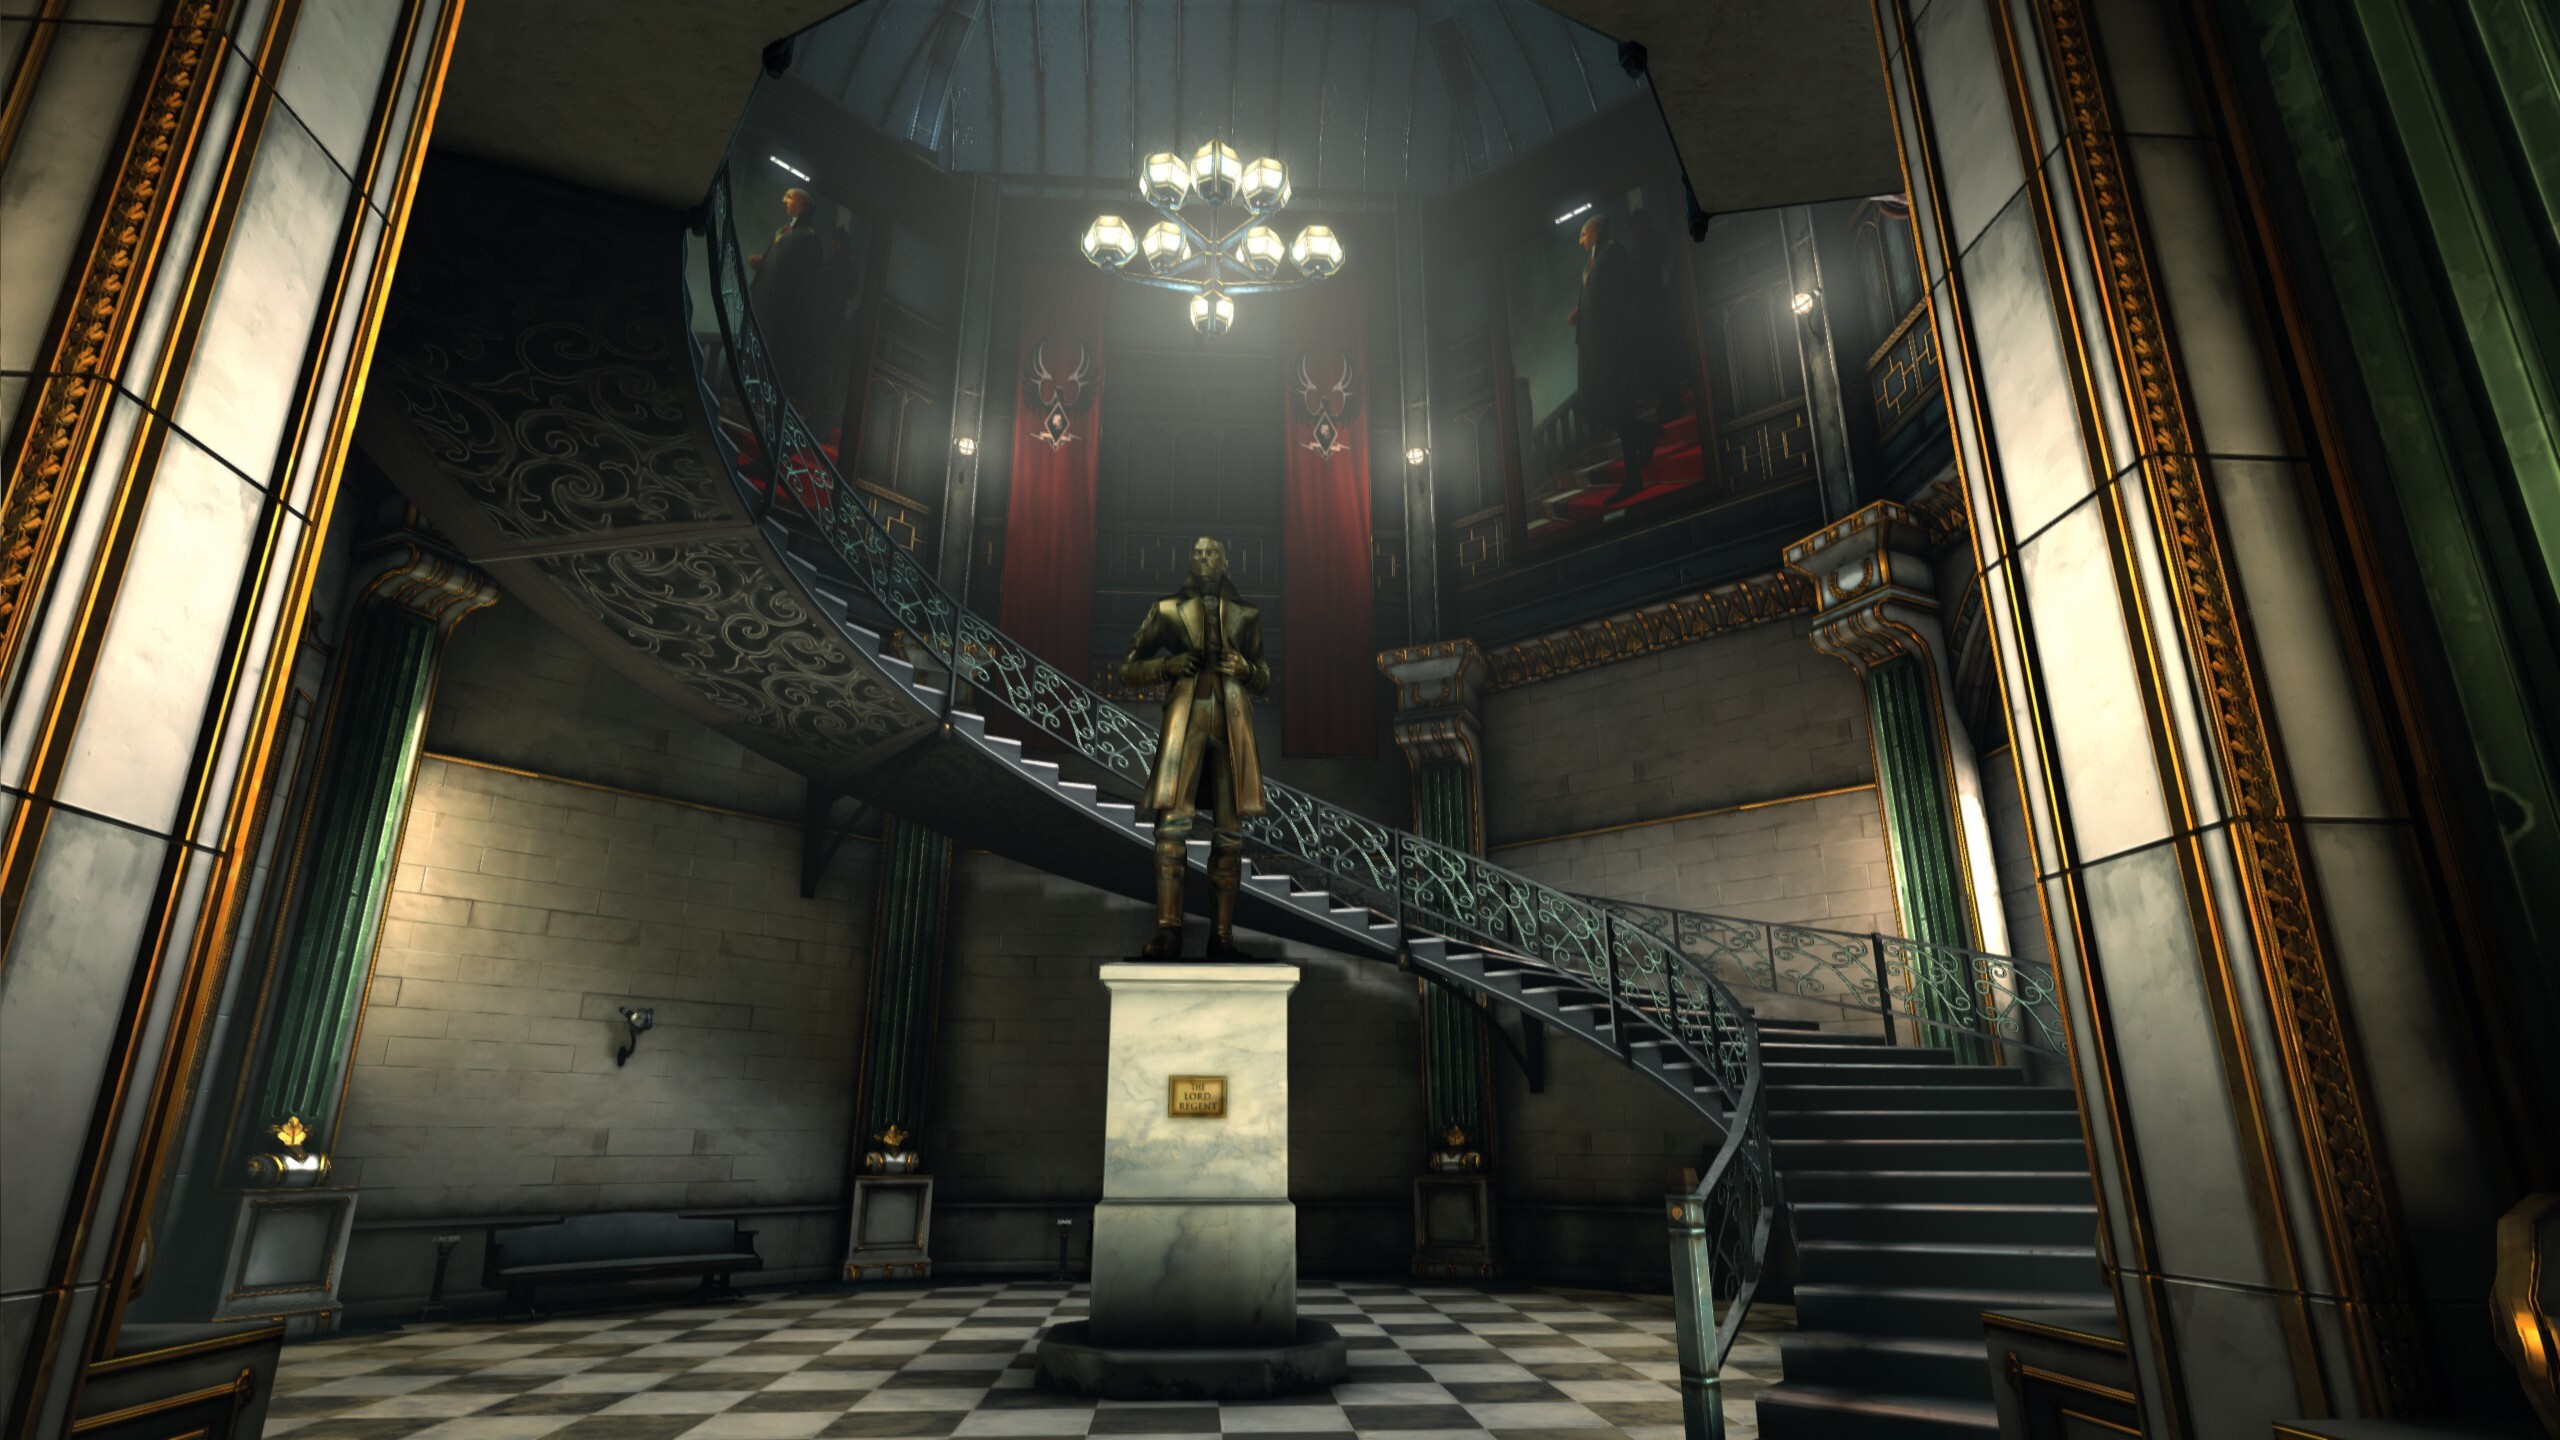
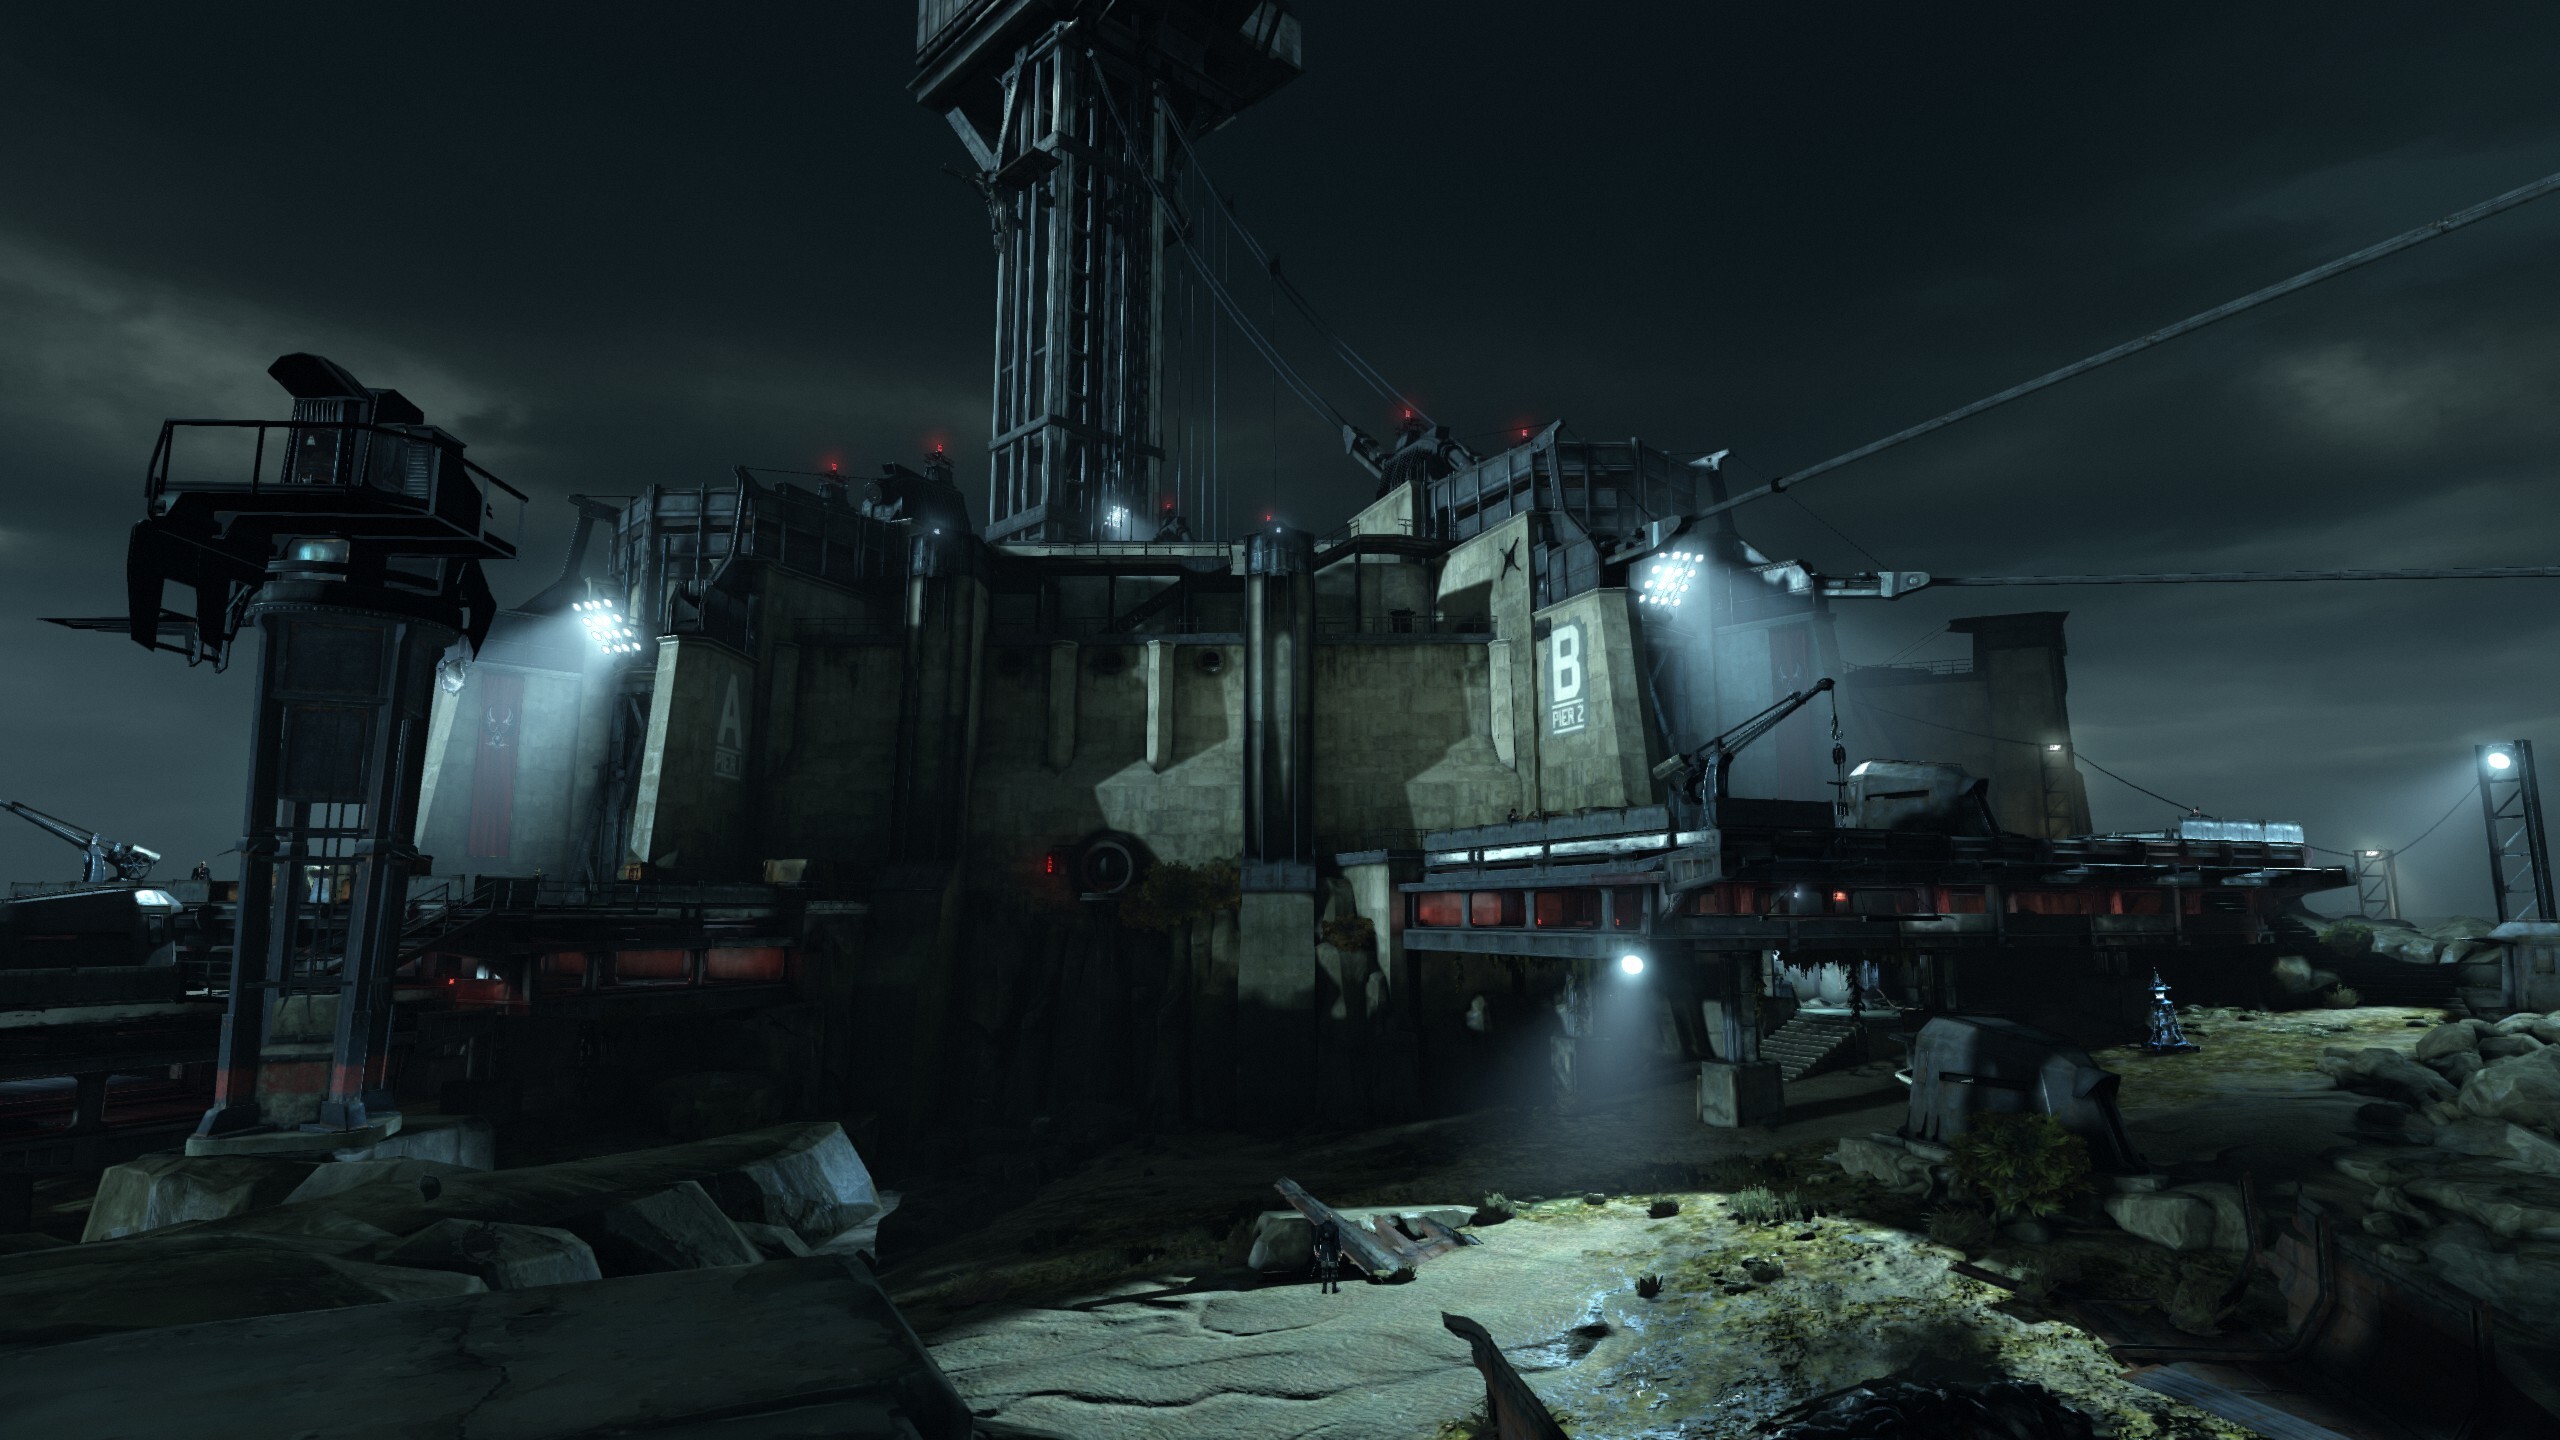
Dishonored (2012).
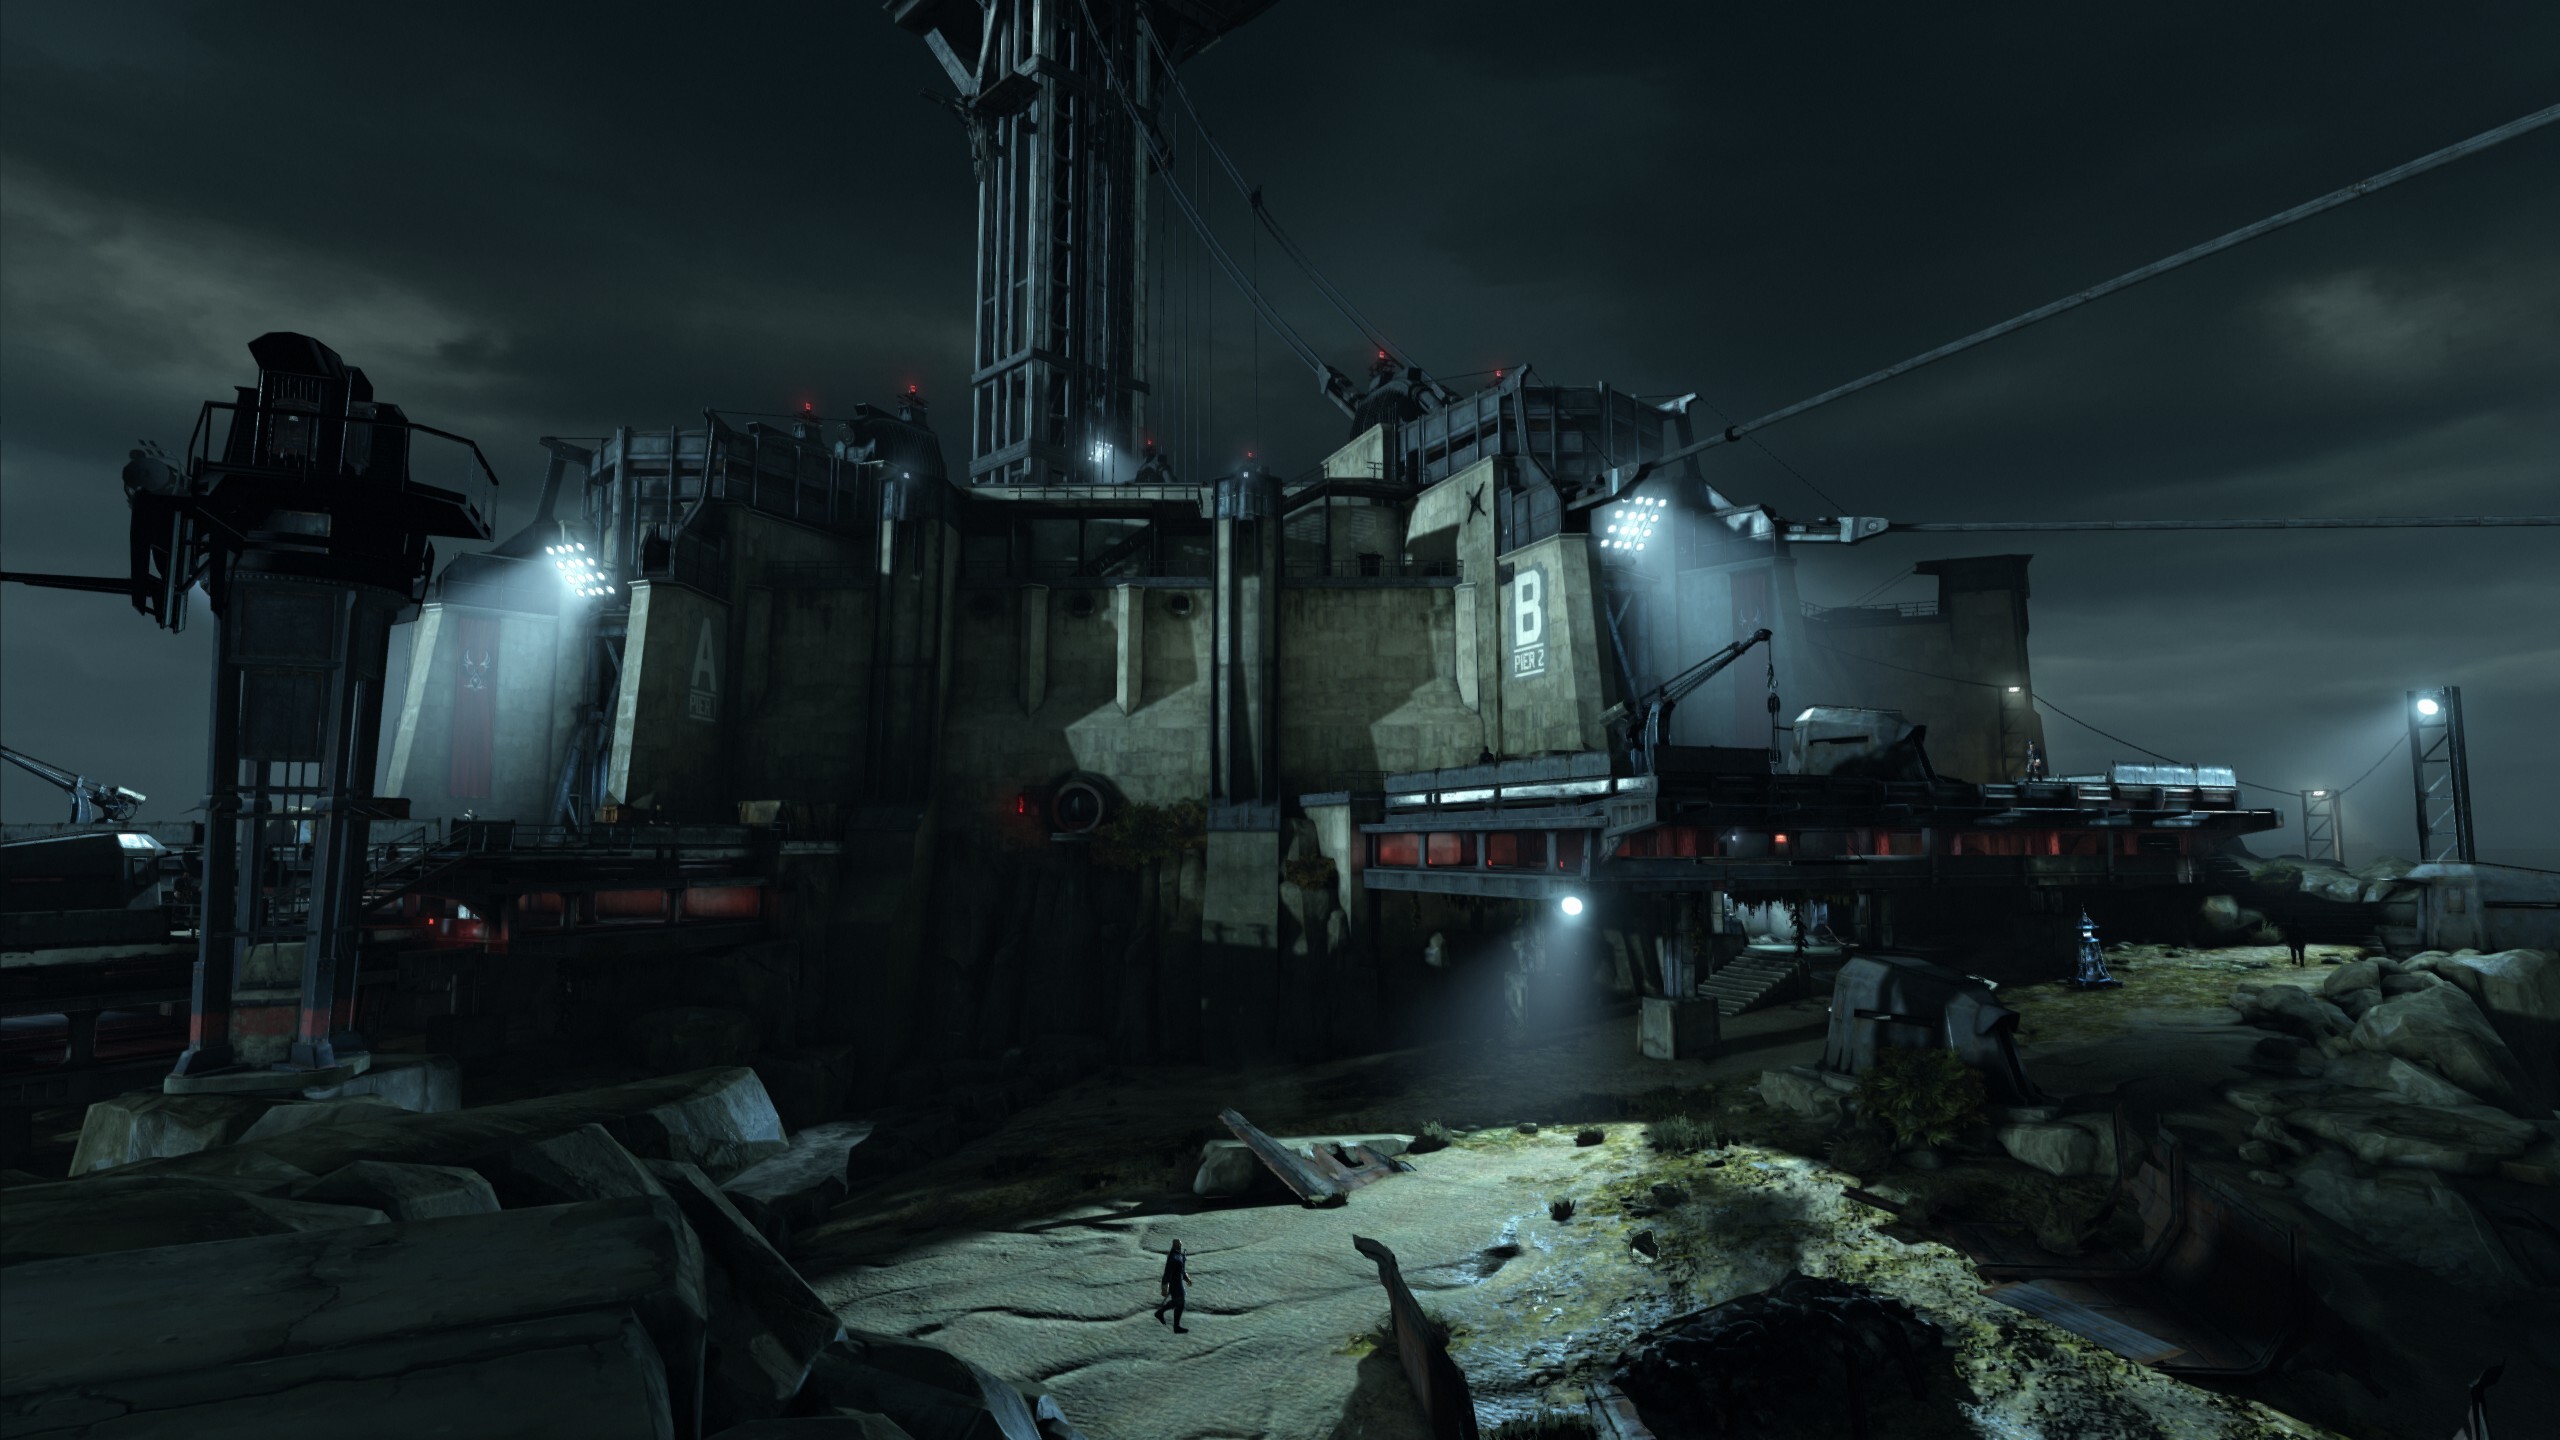
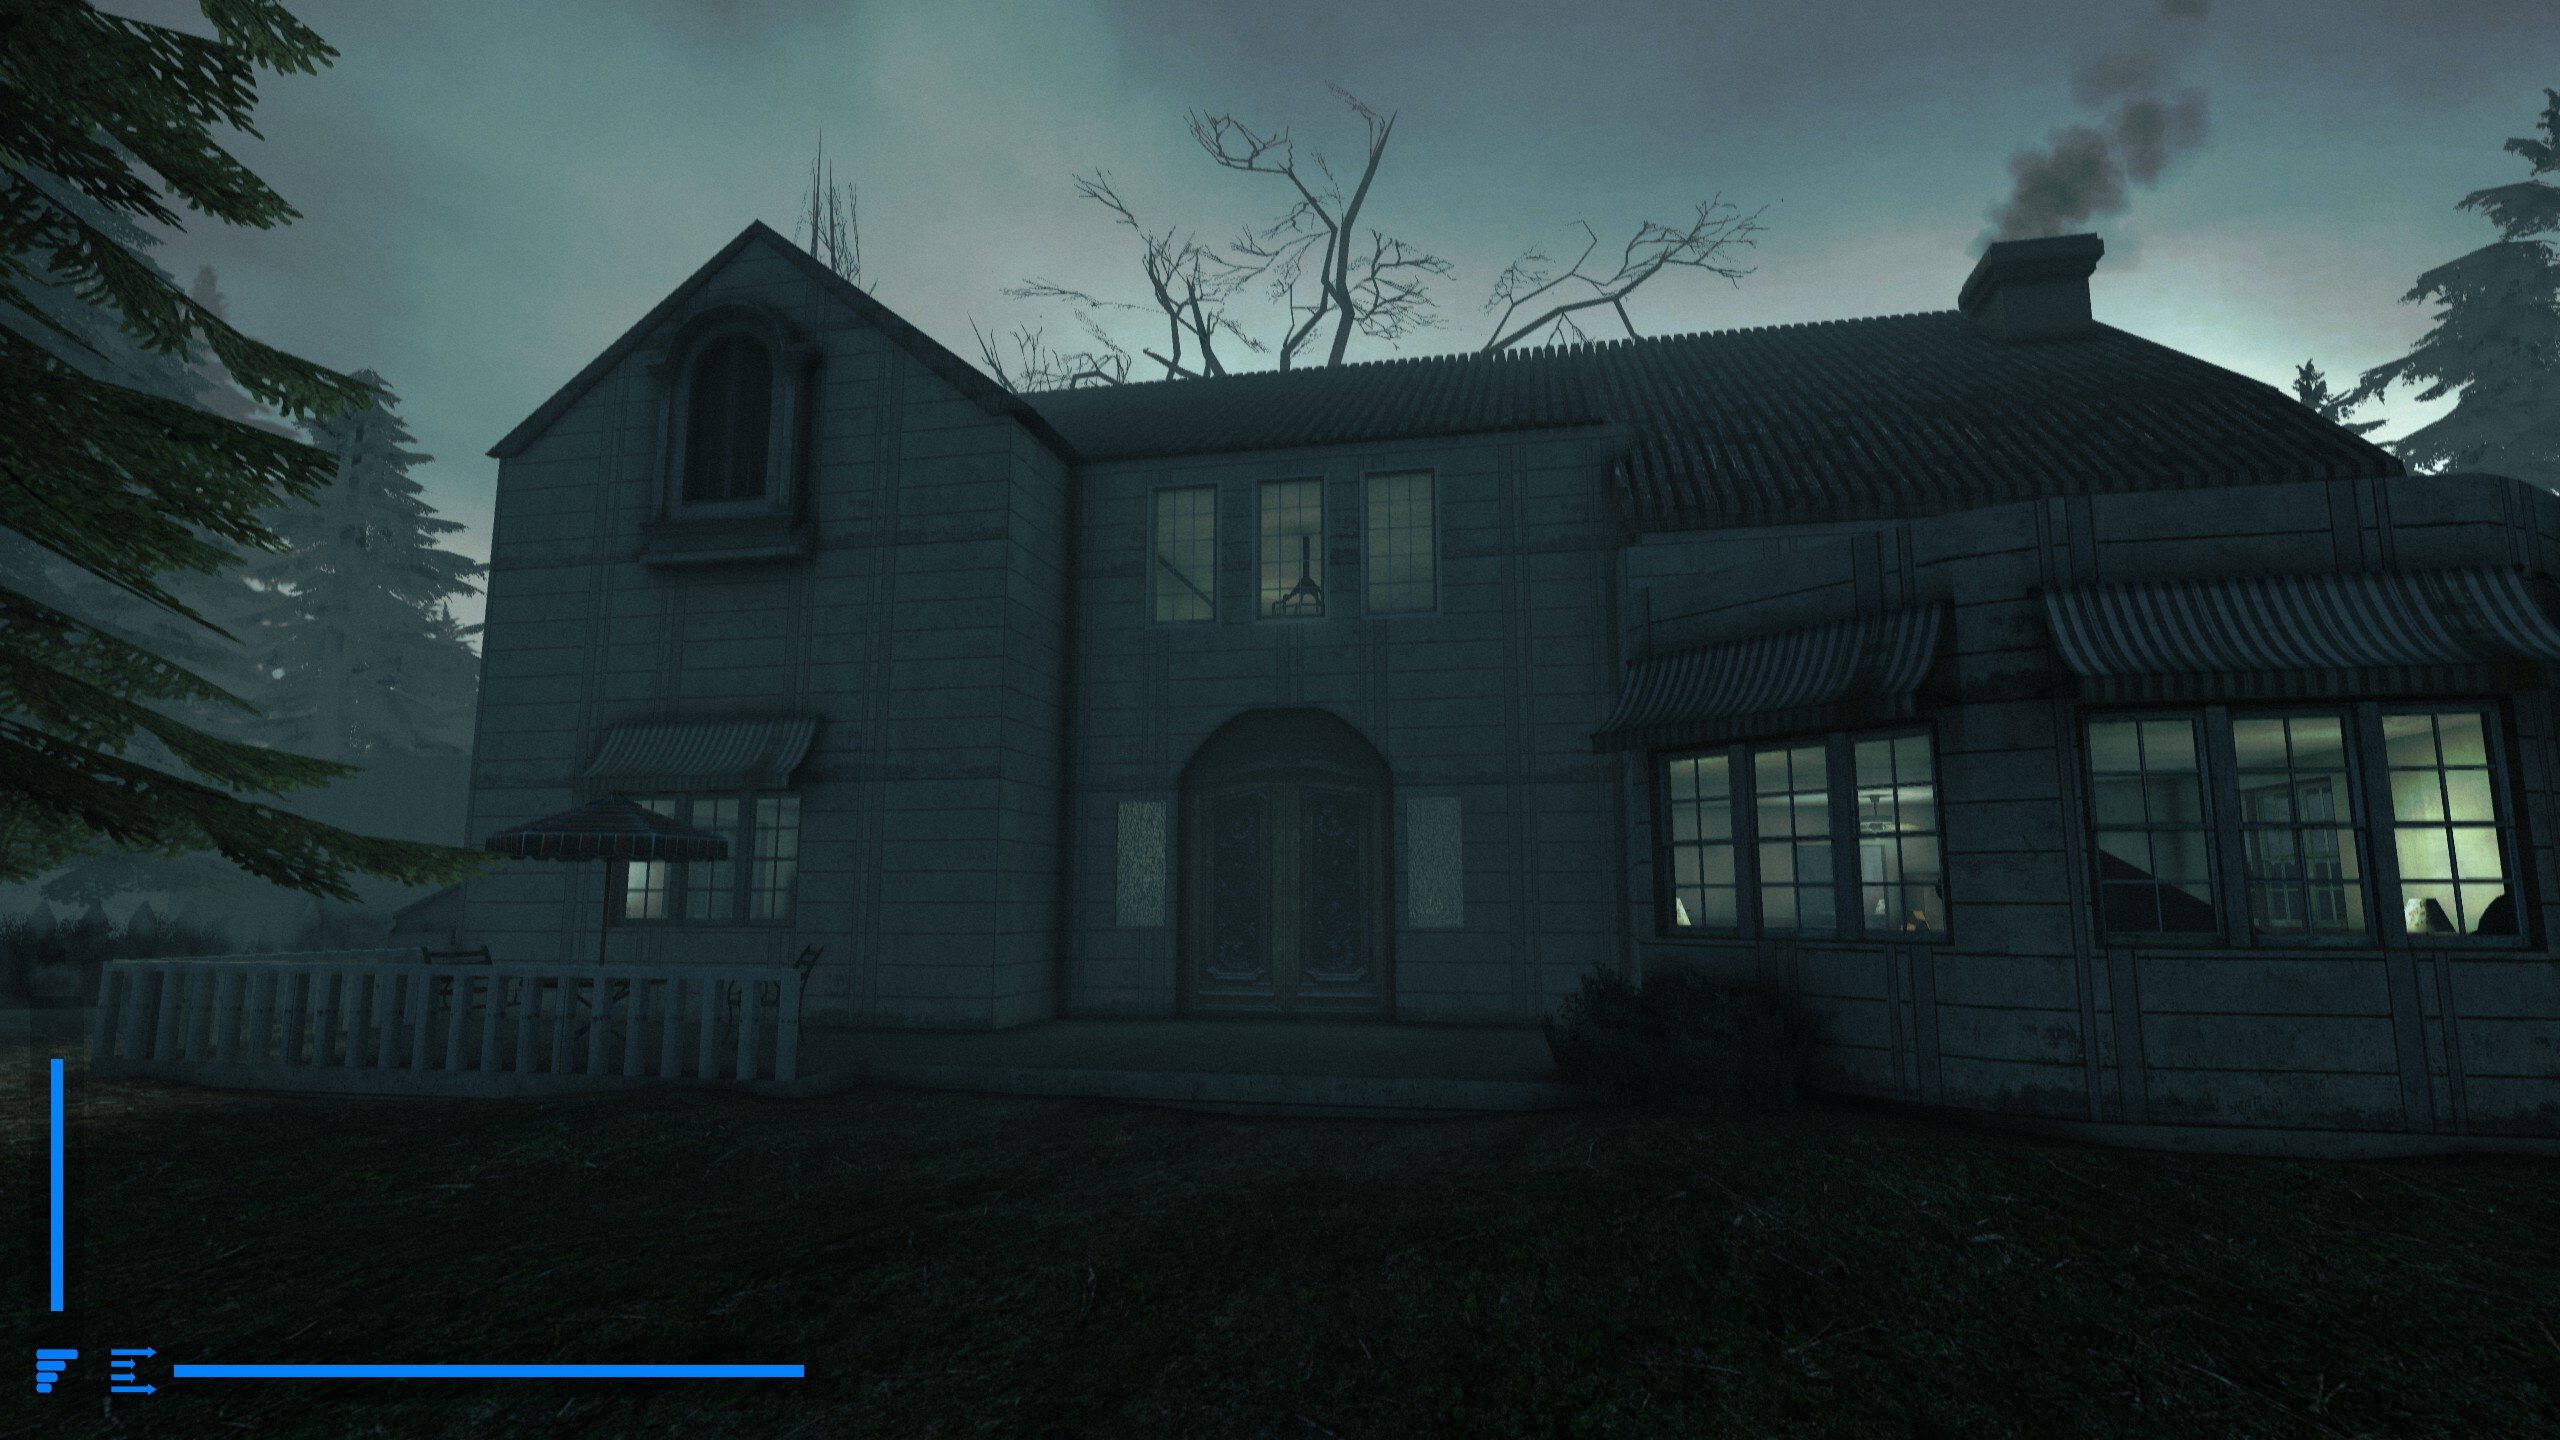
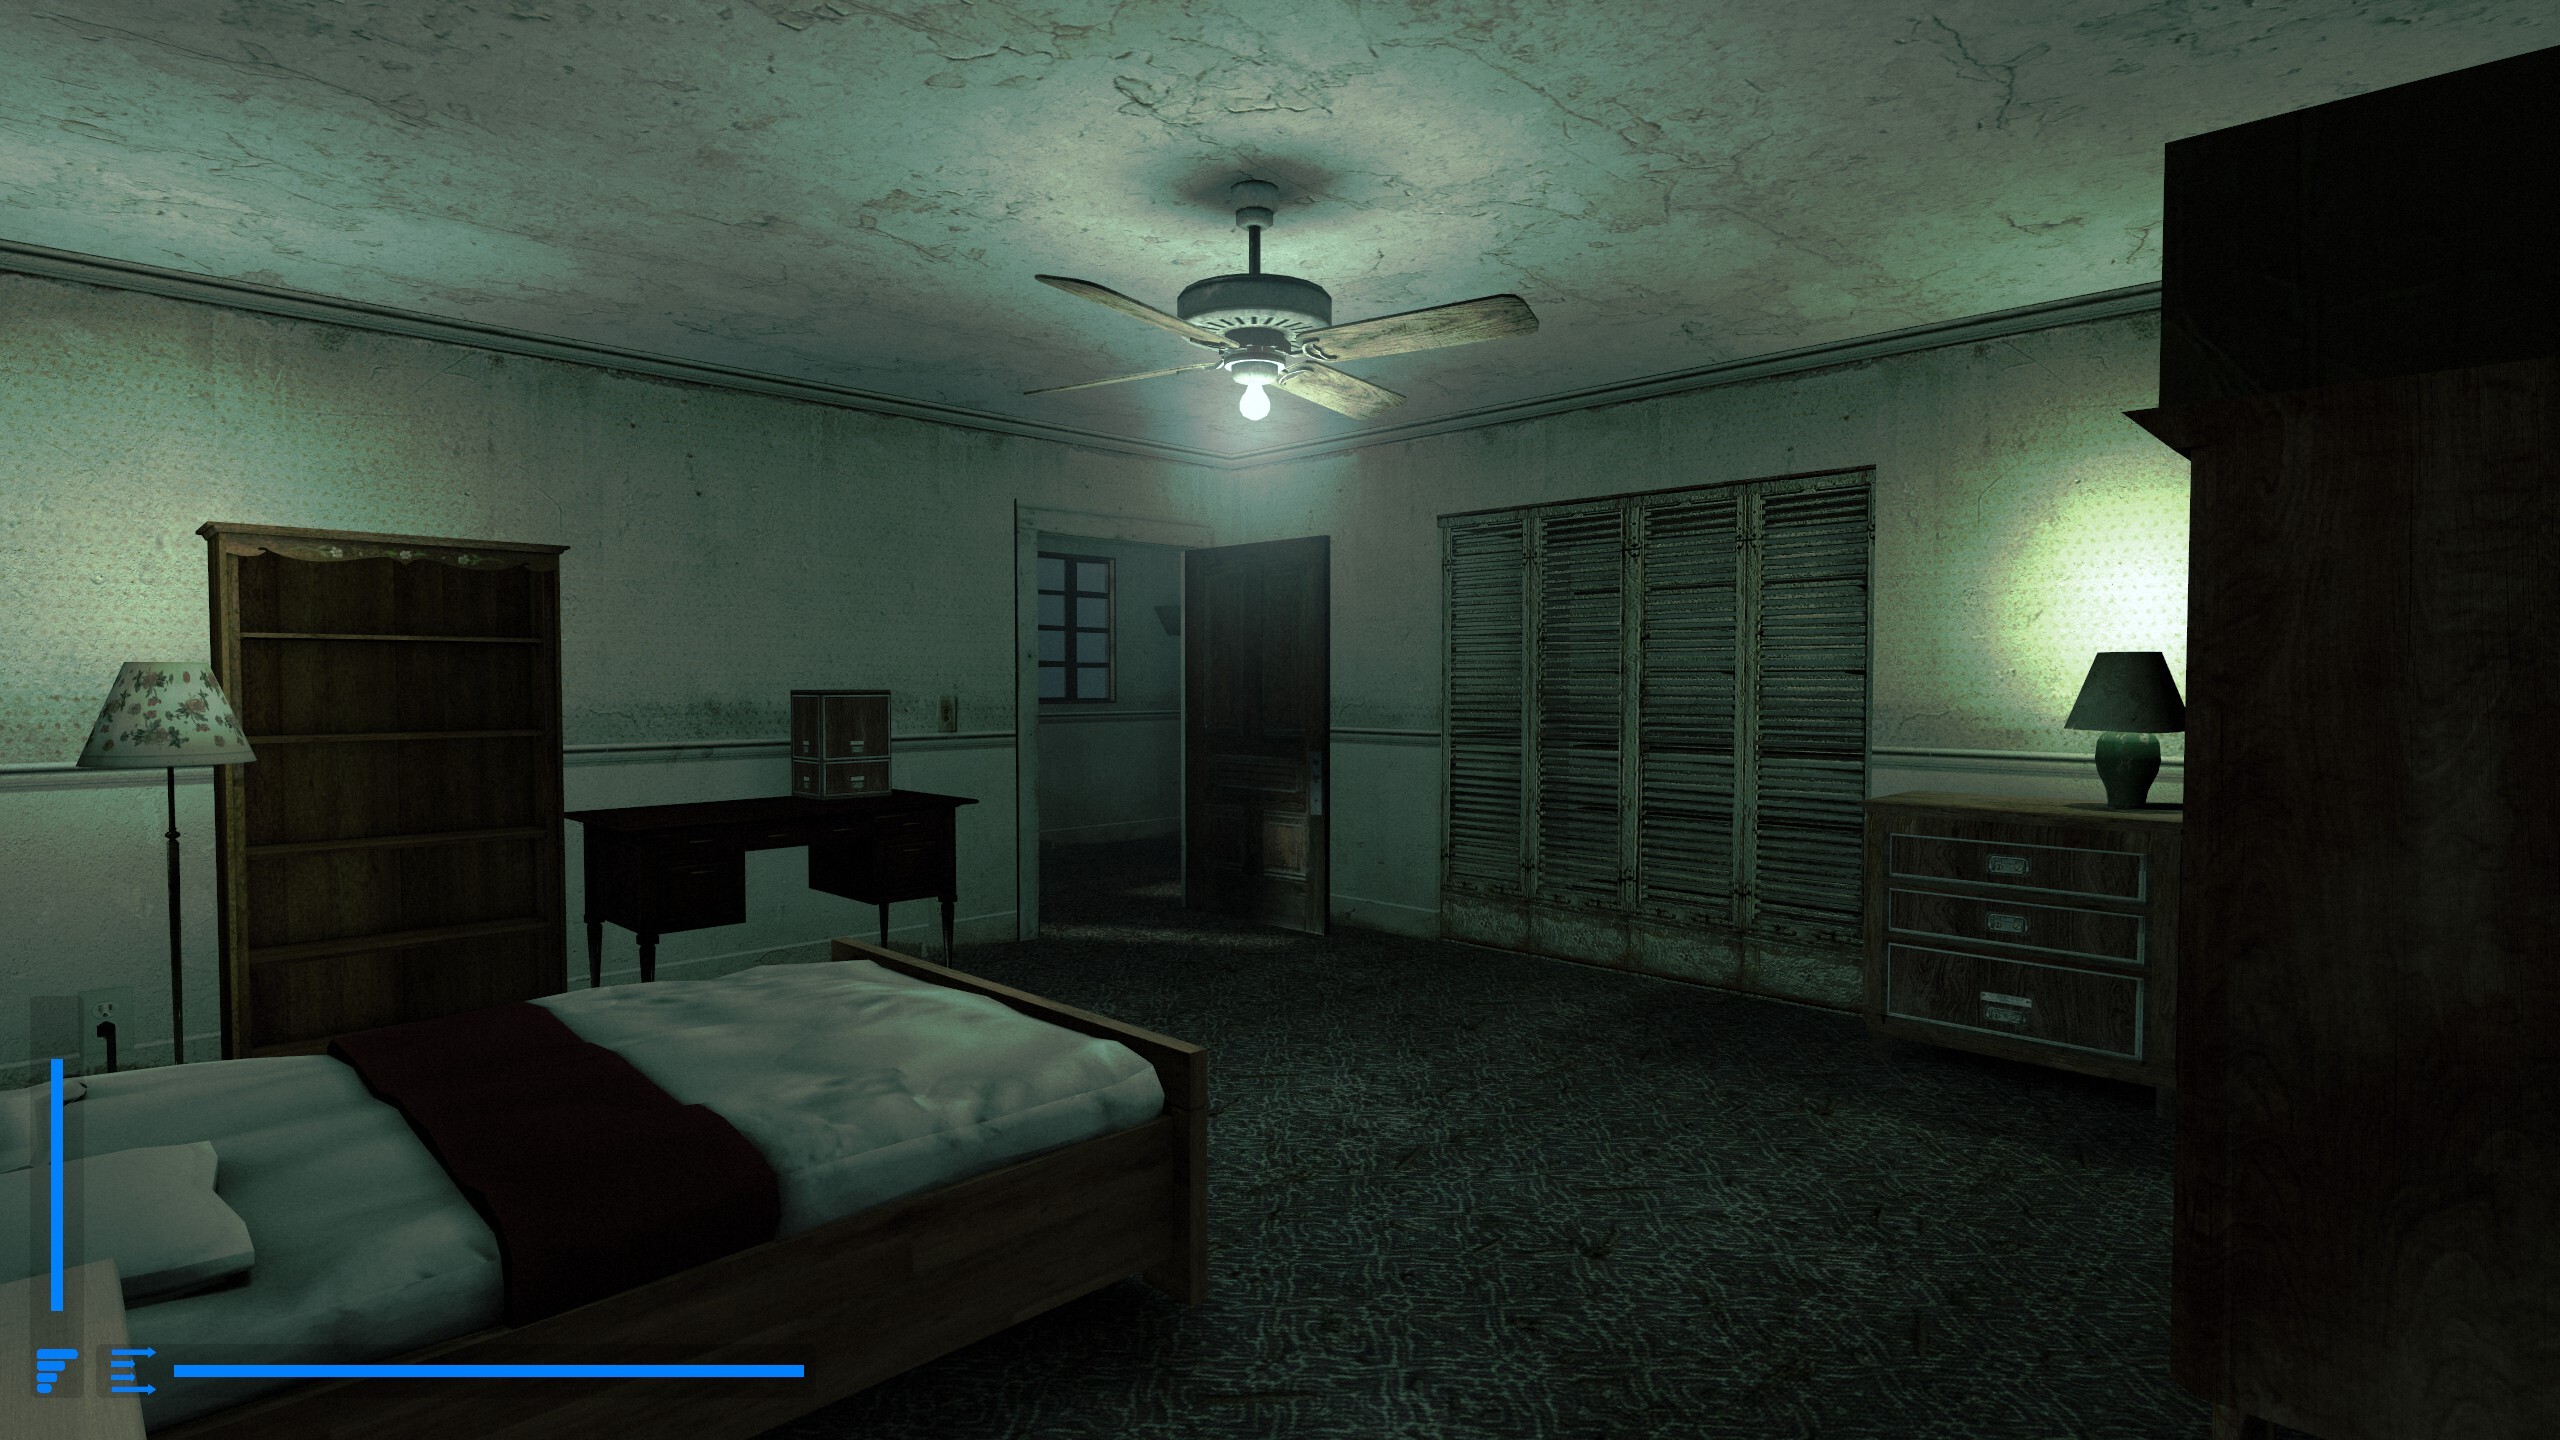
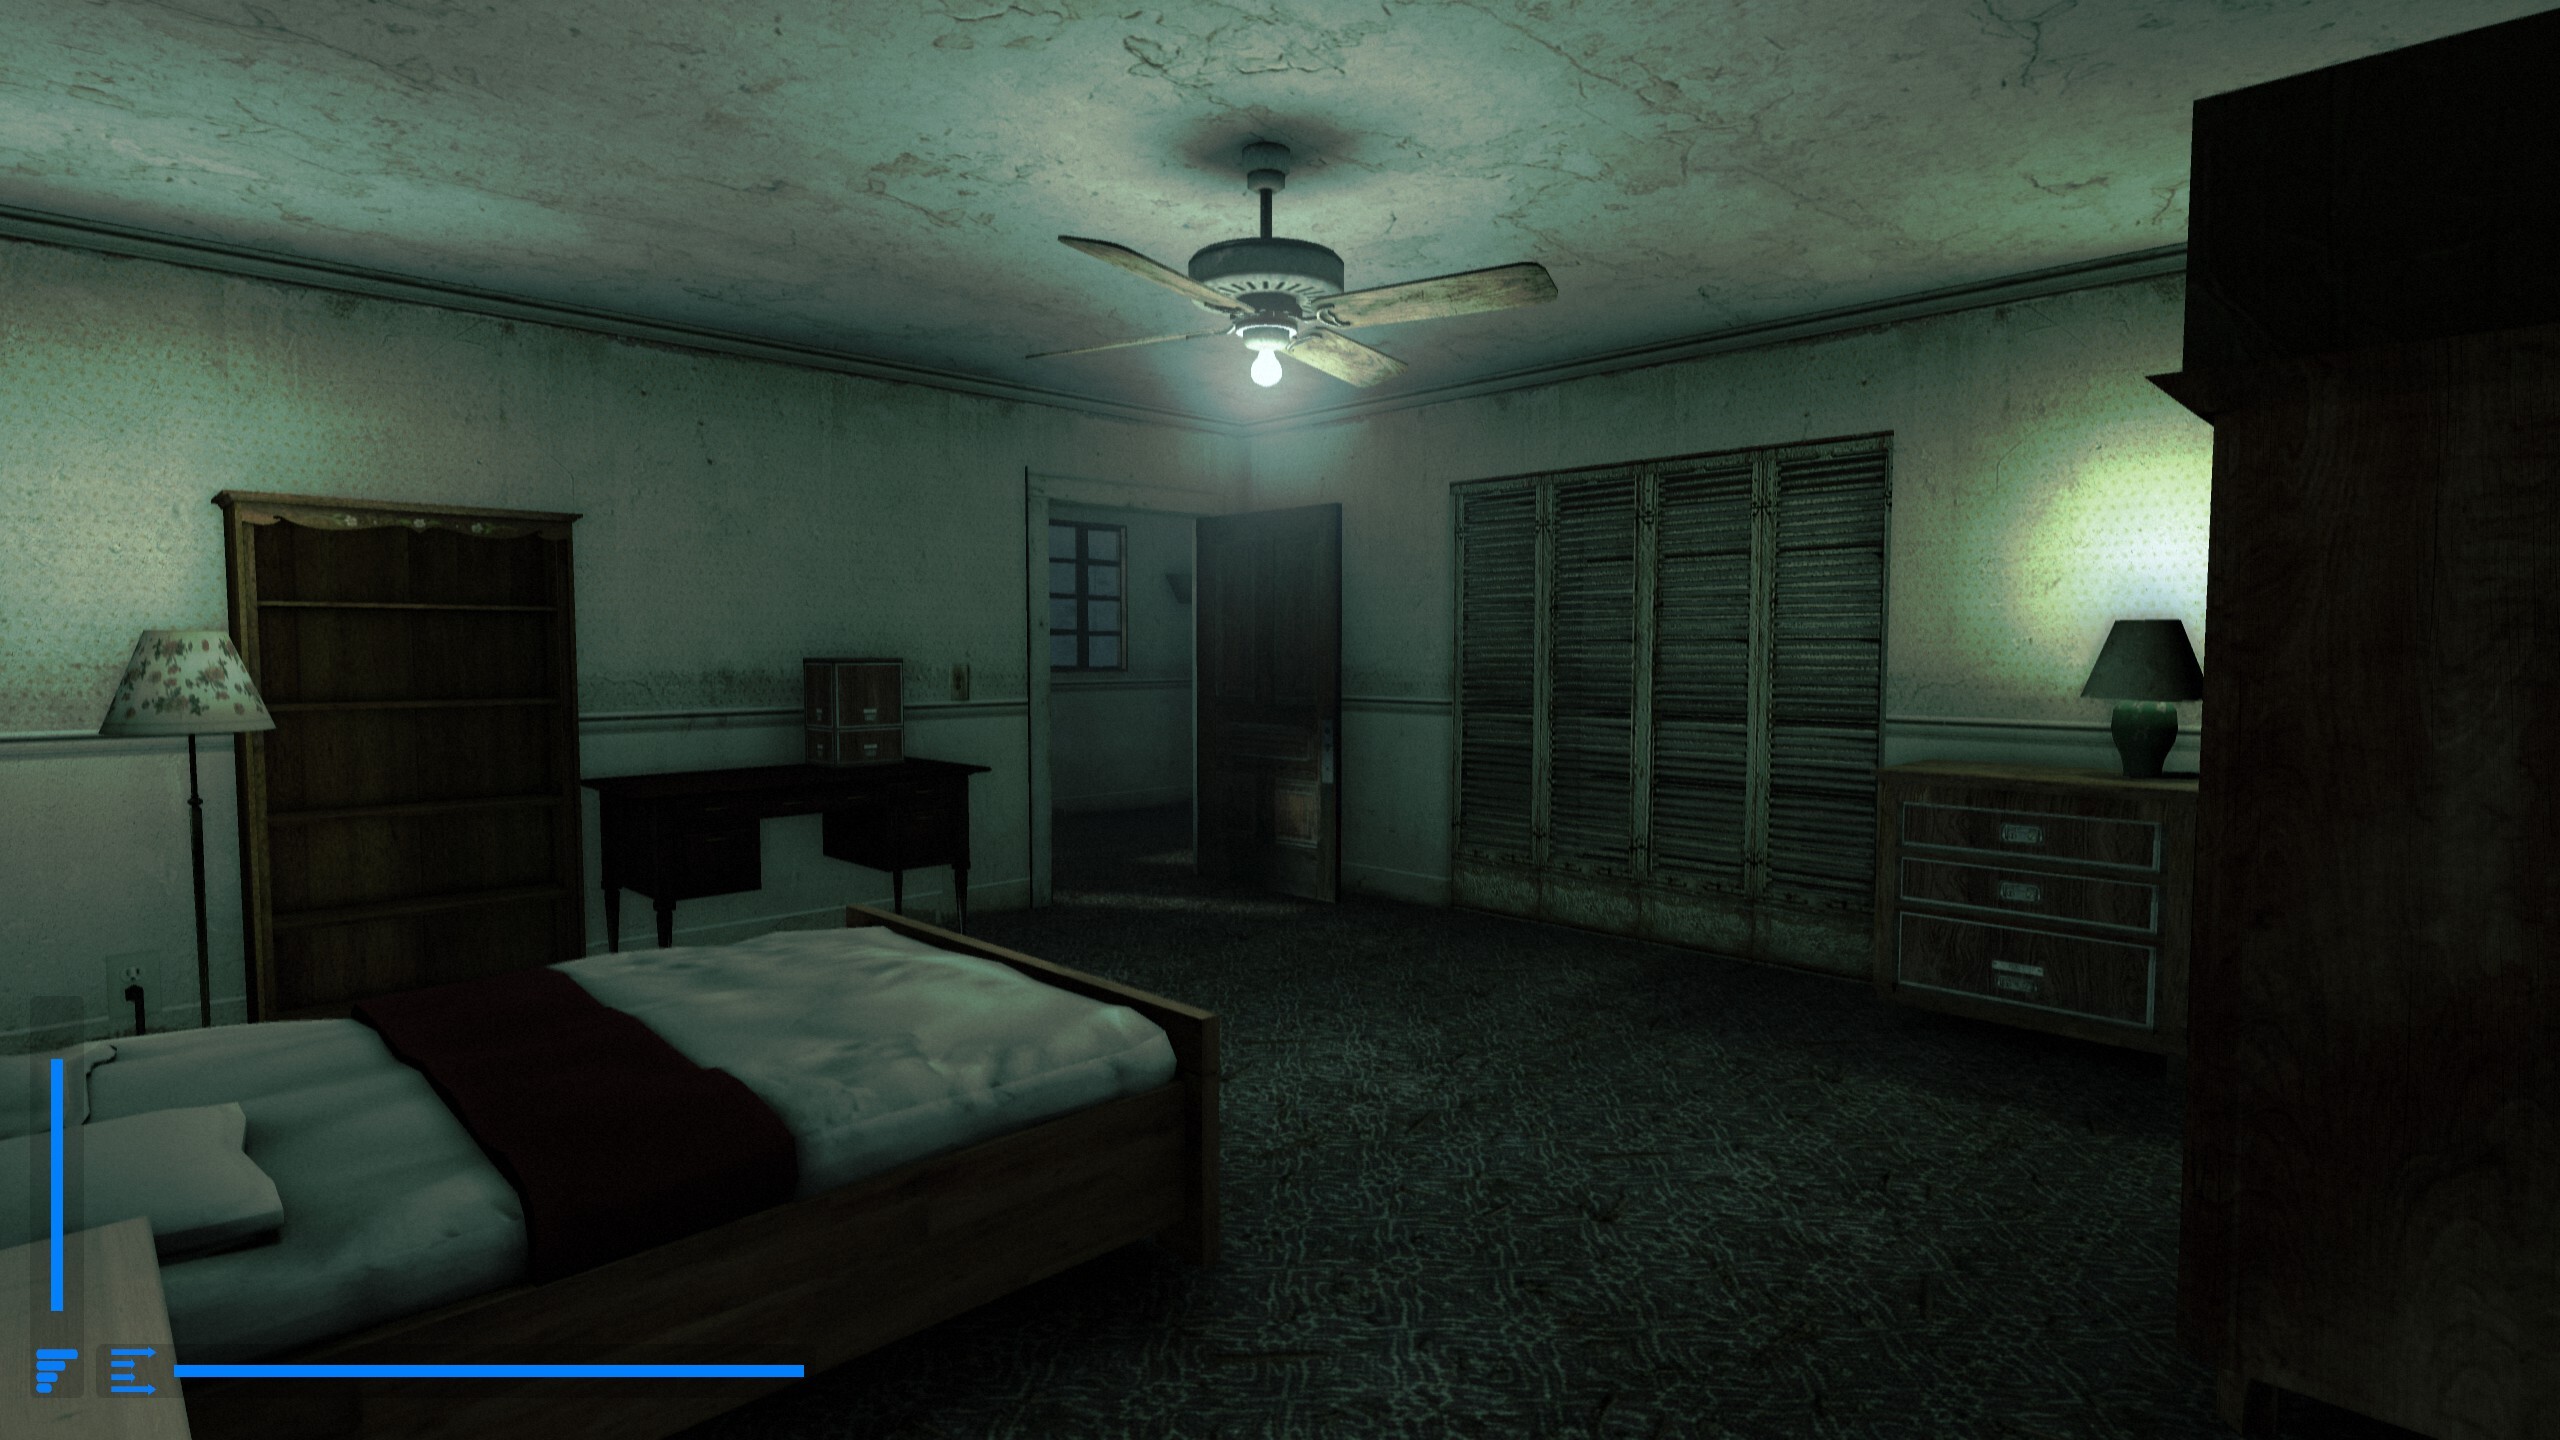
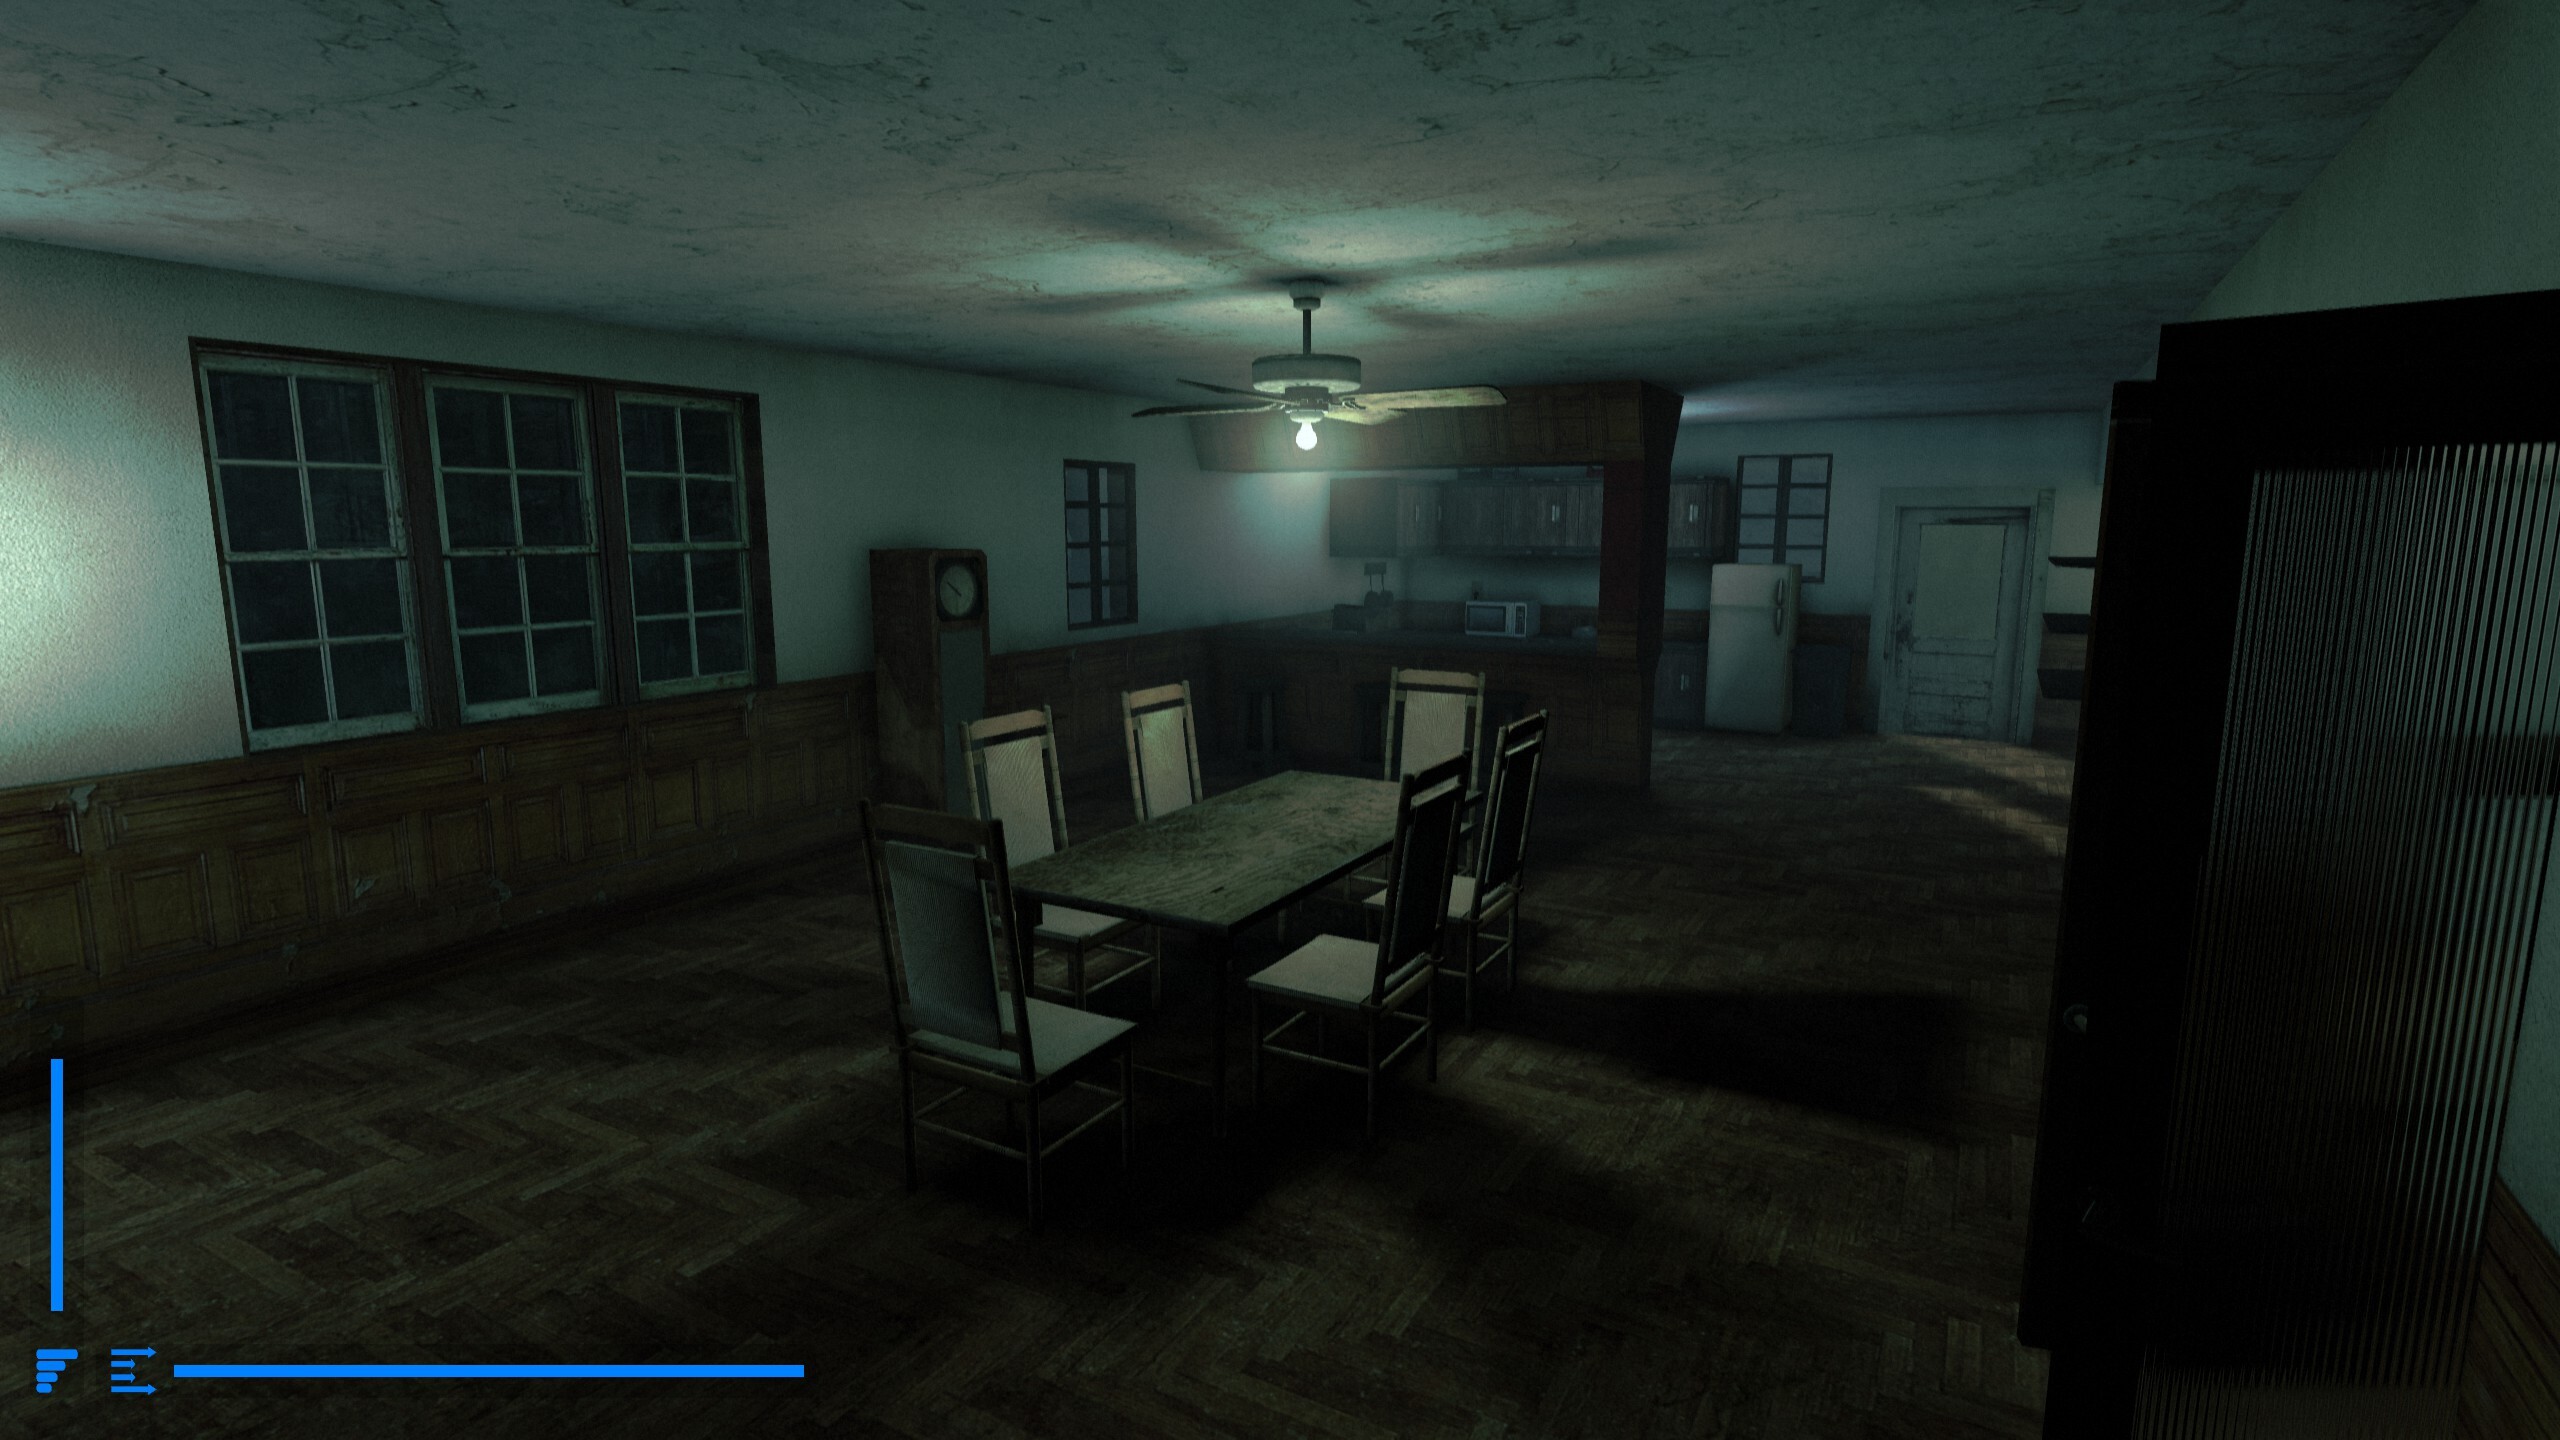
Source Engine games
Underhell (2013).


No More Room in Hell (2013).


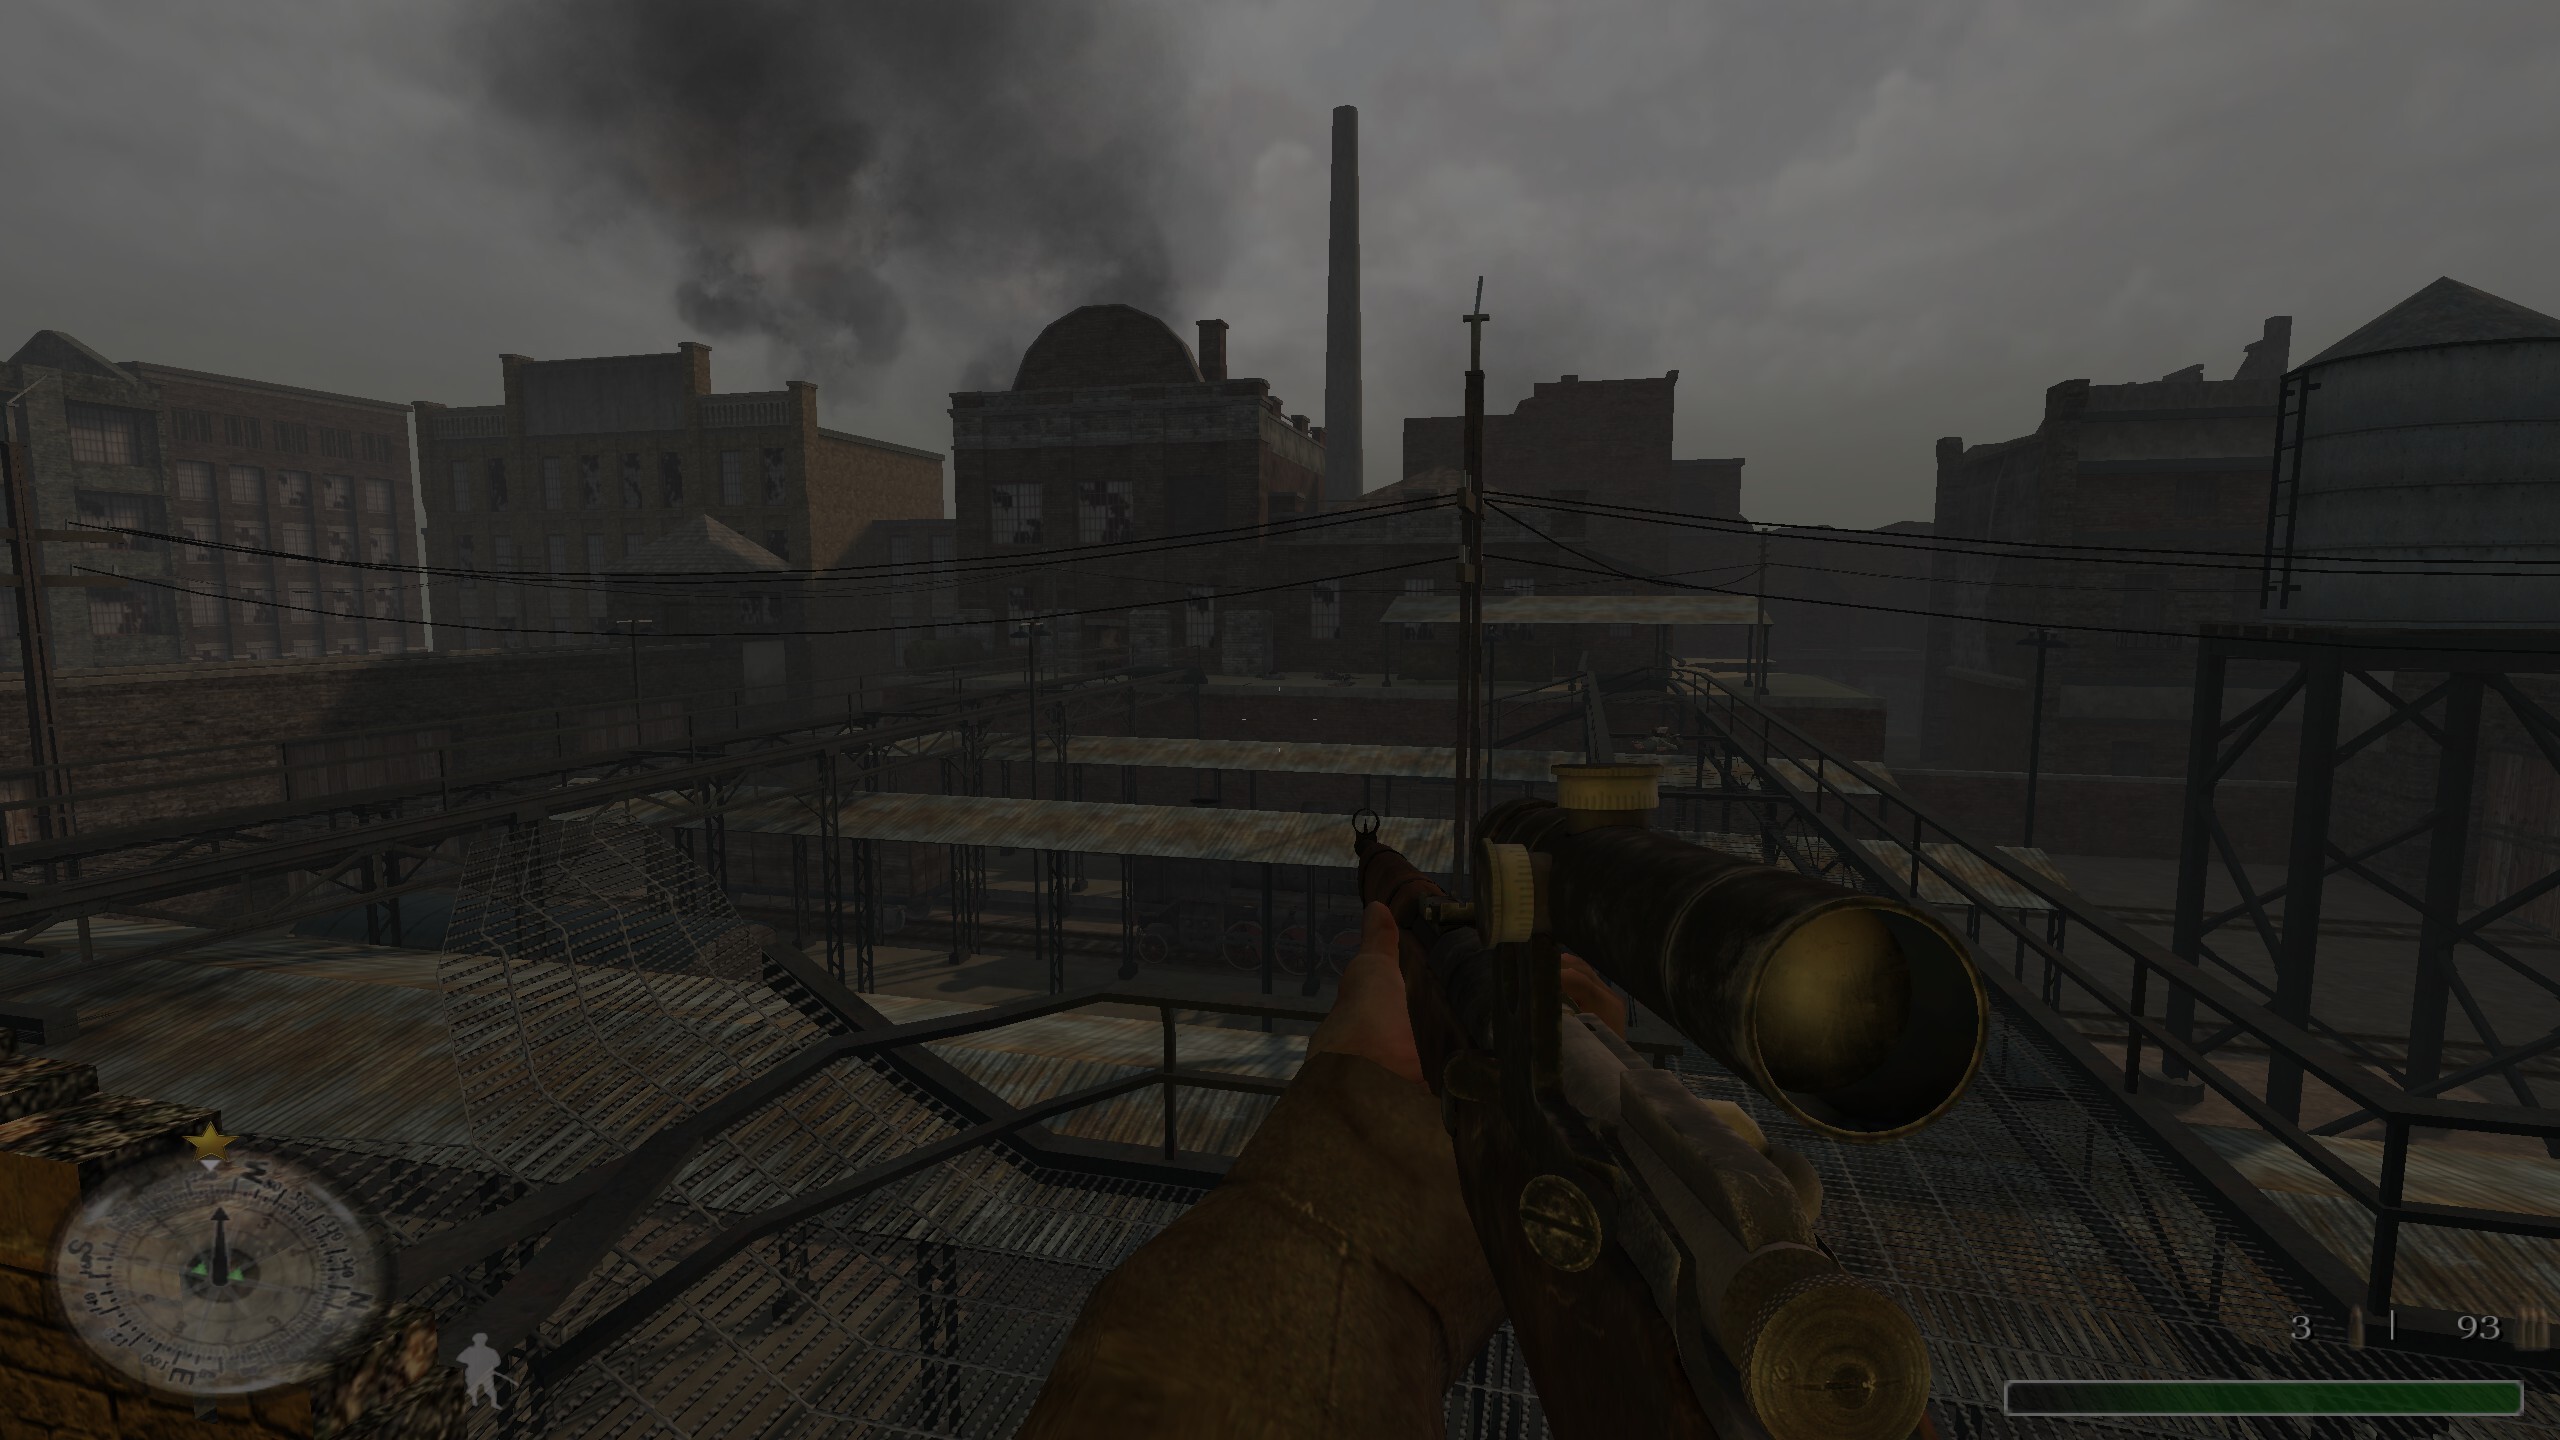
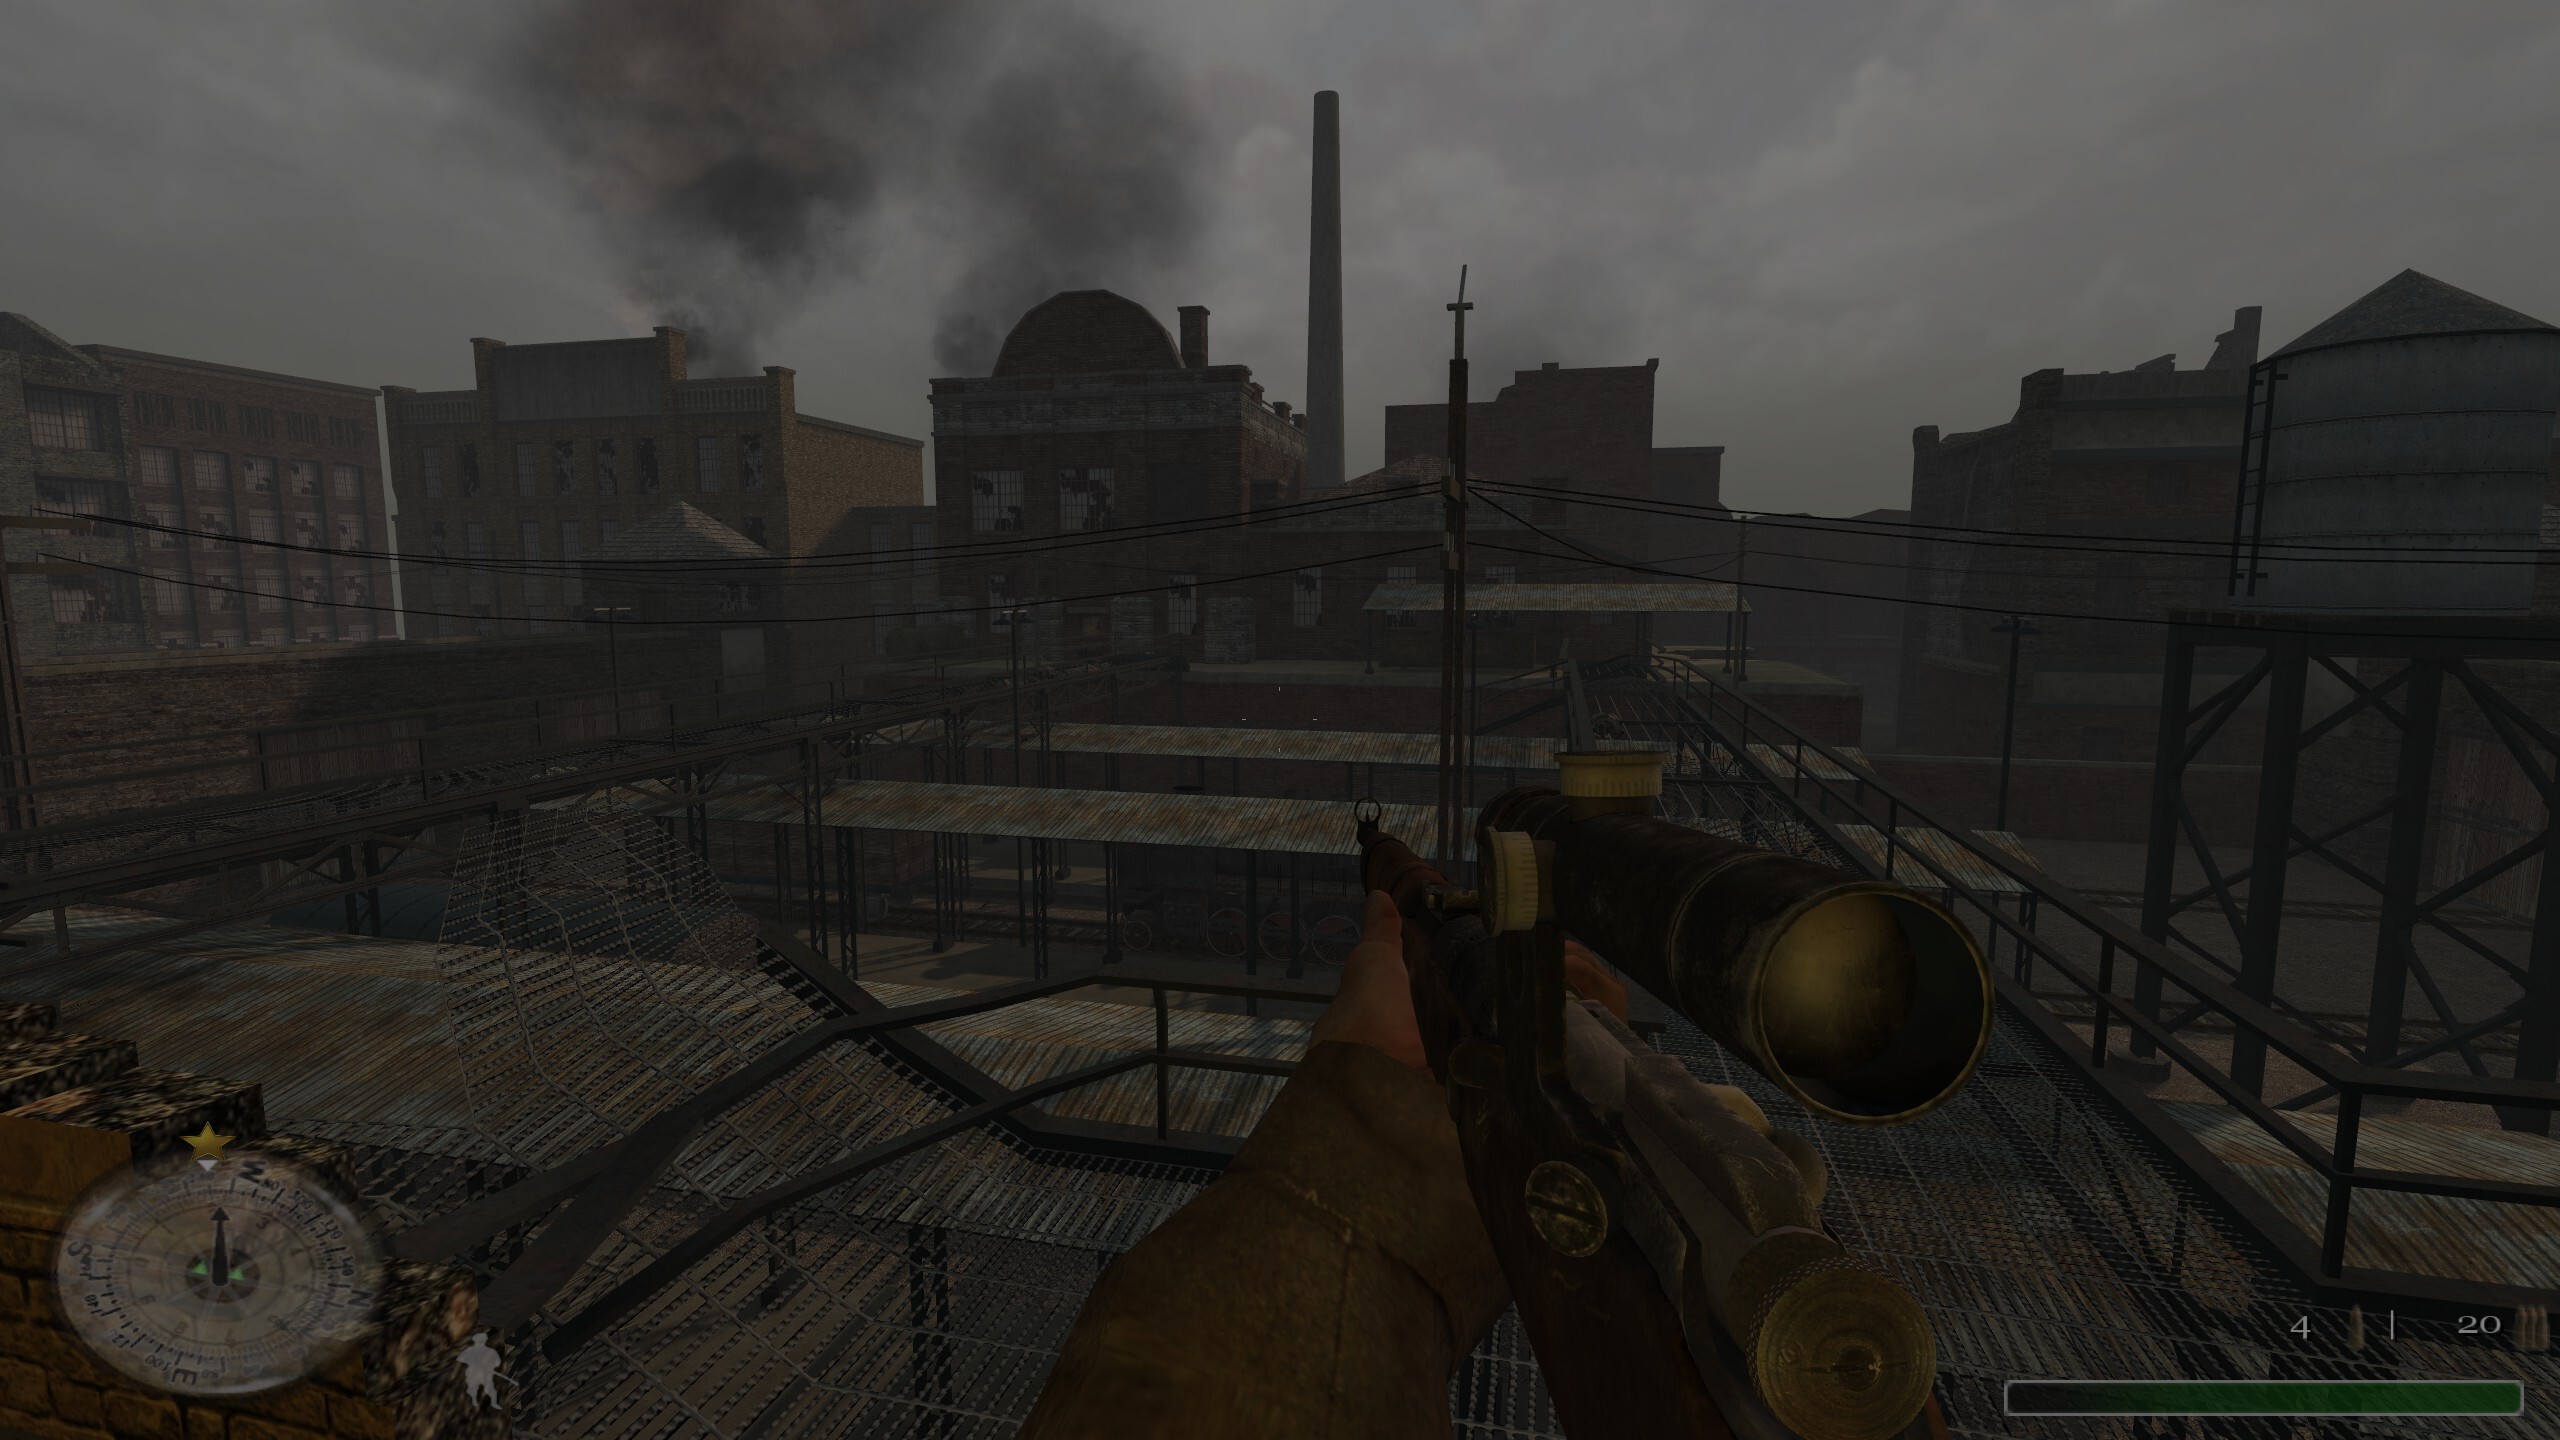
id Tech games
Call of Duty (2003).
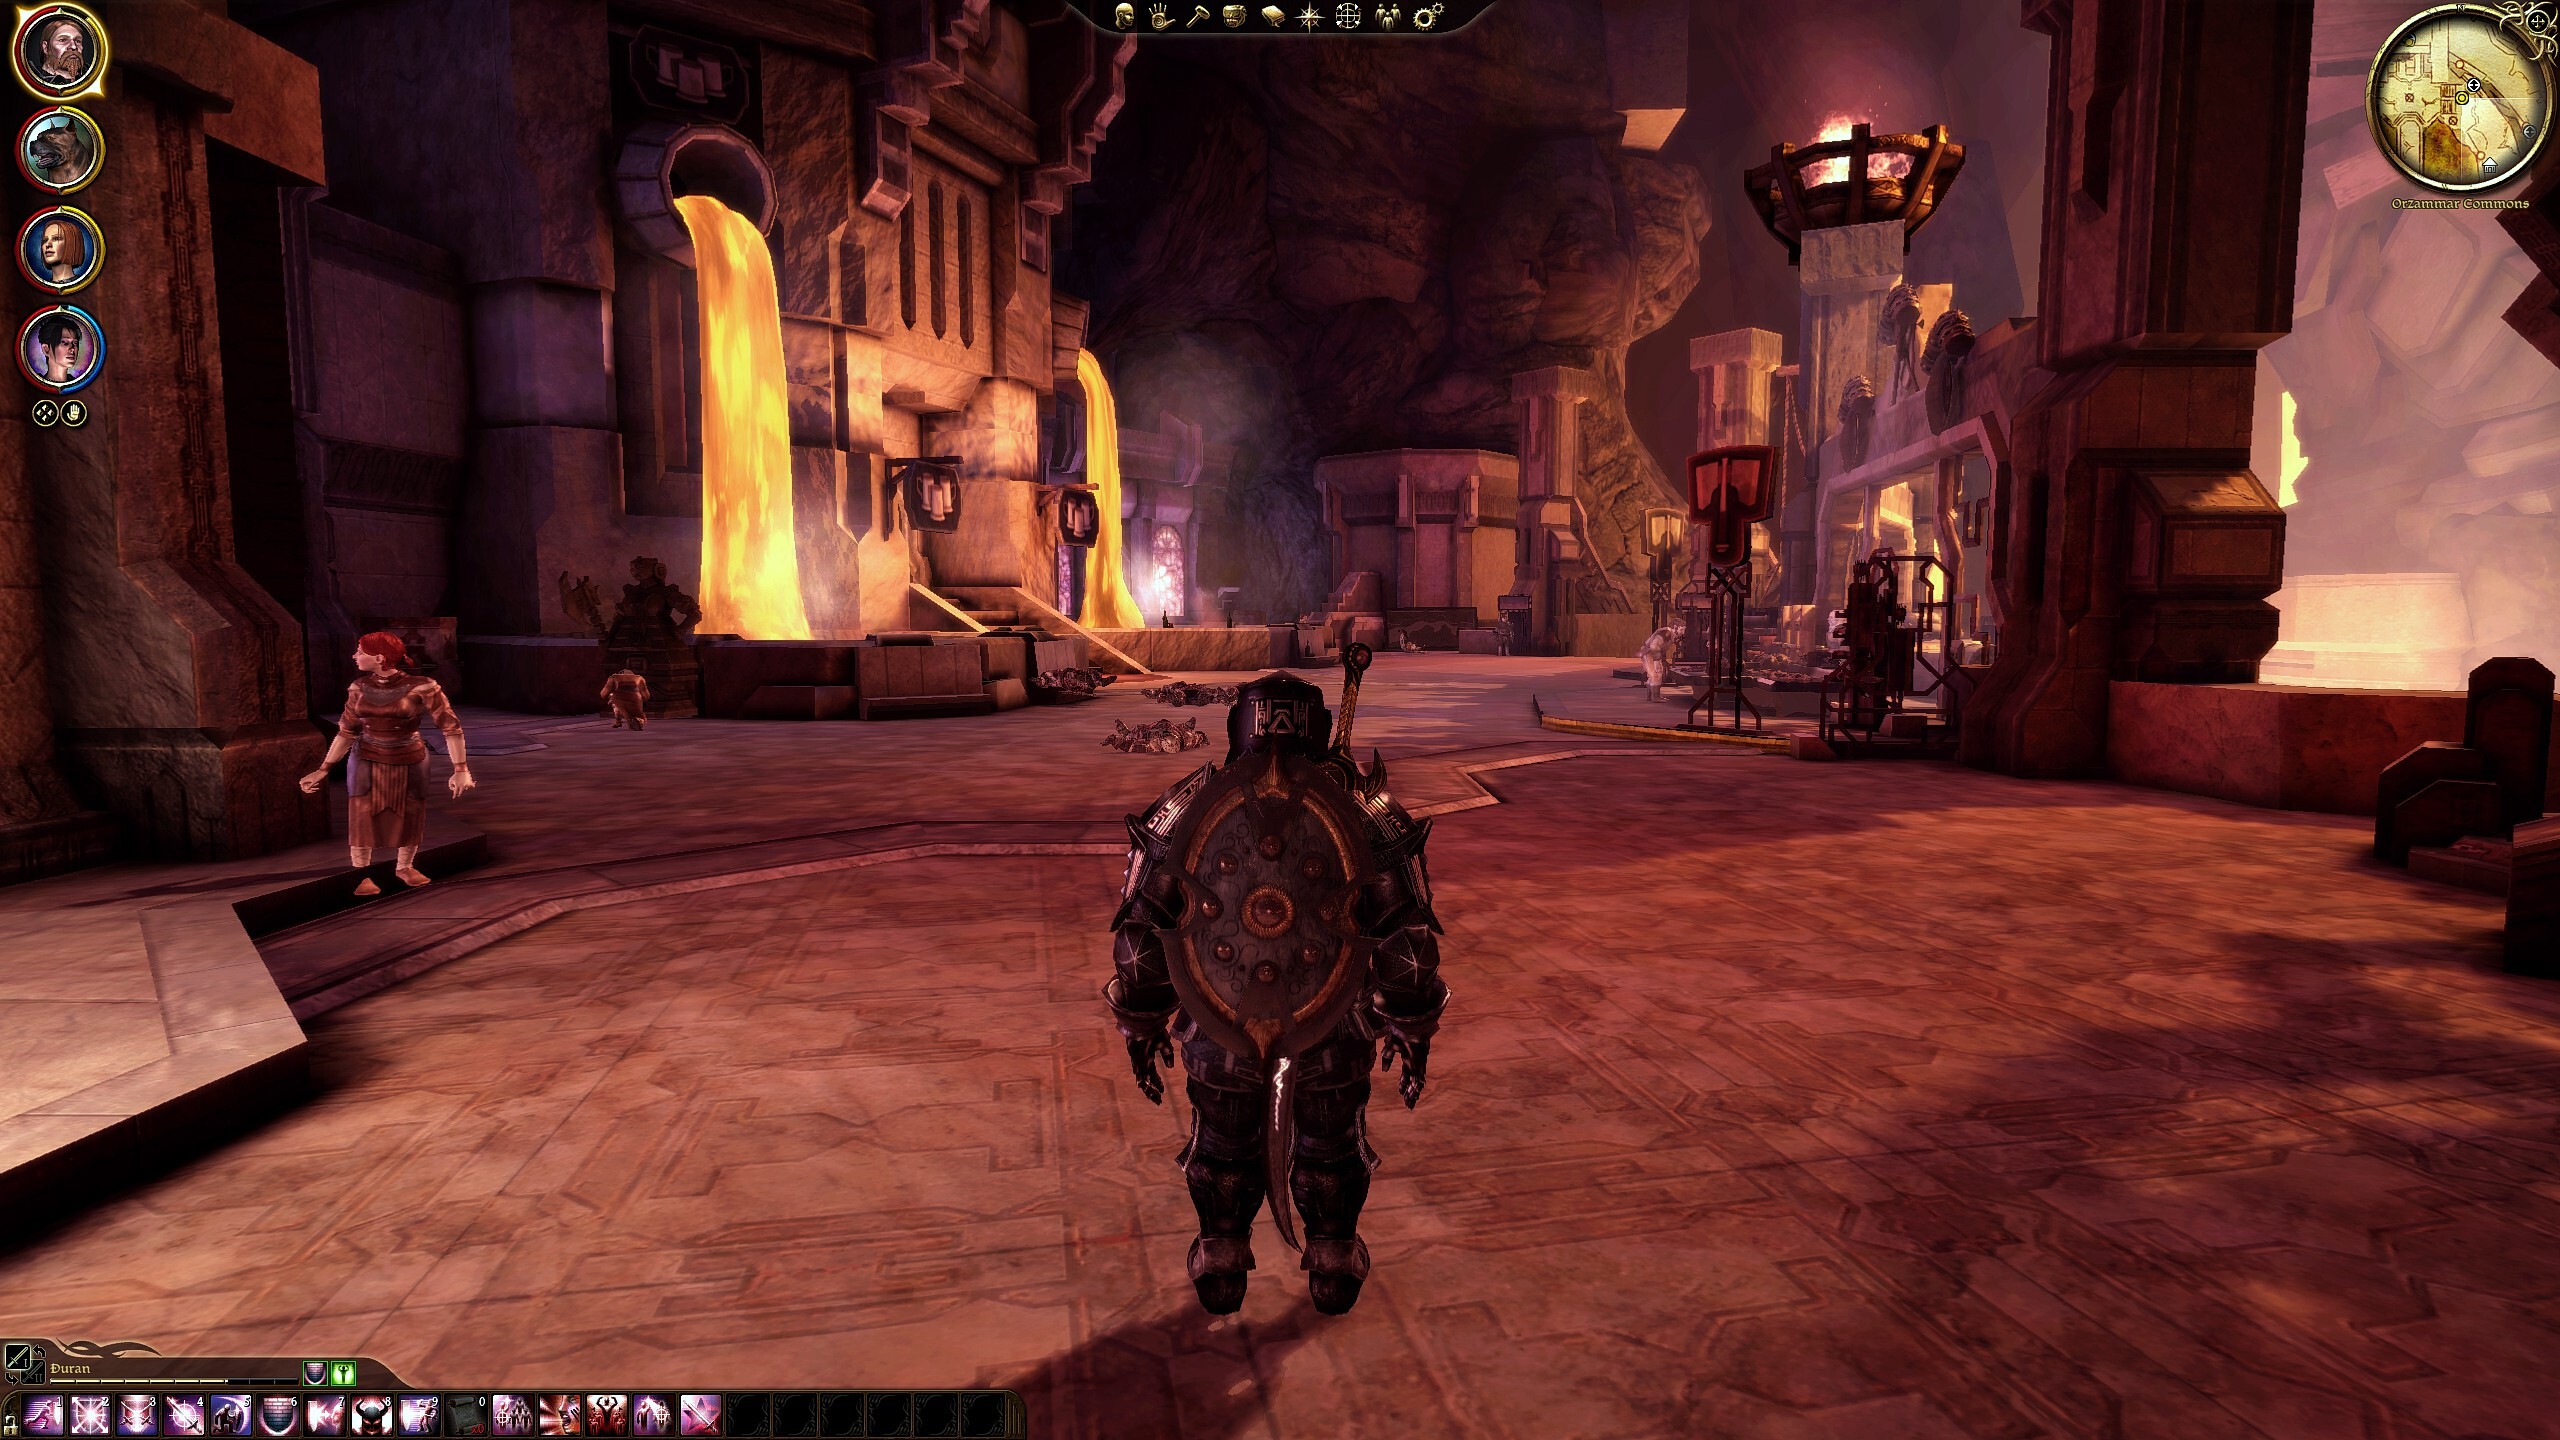
Other Examples
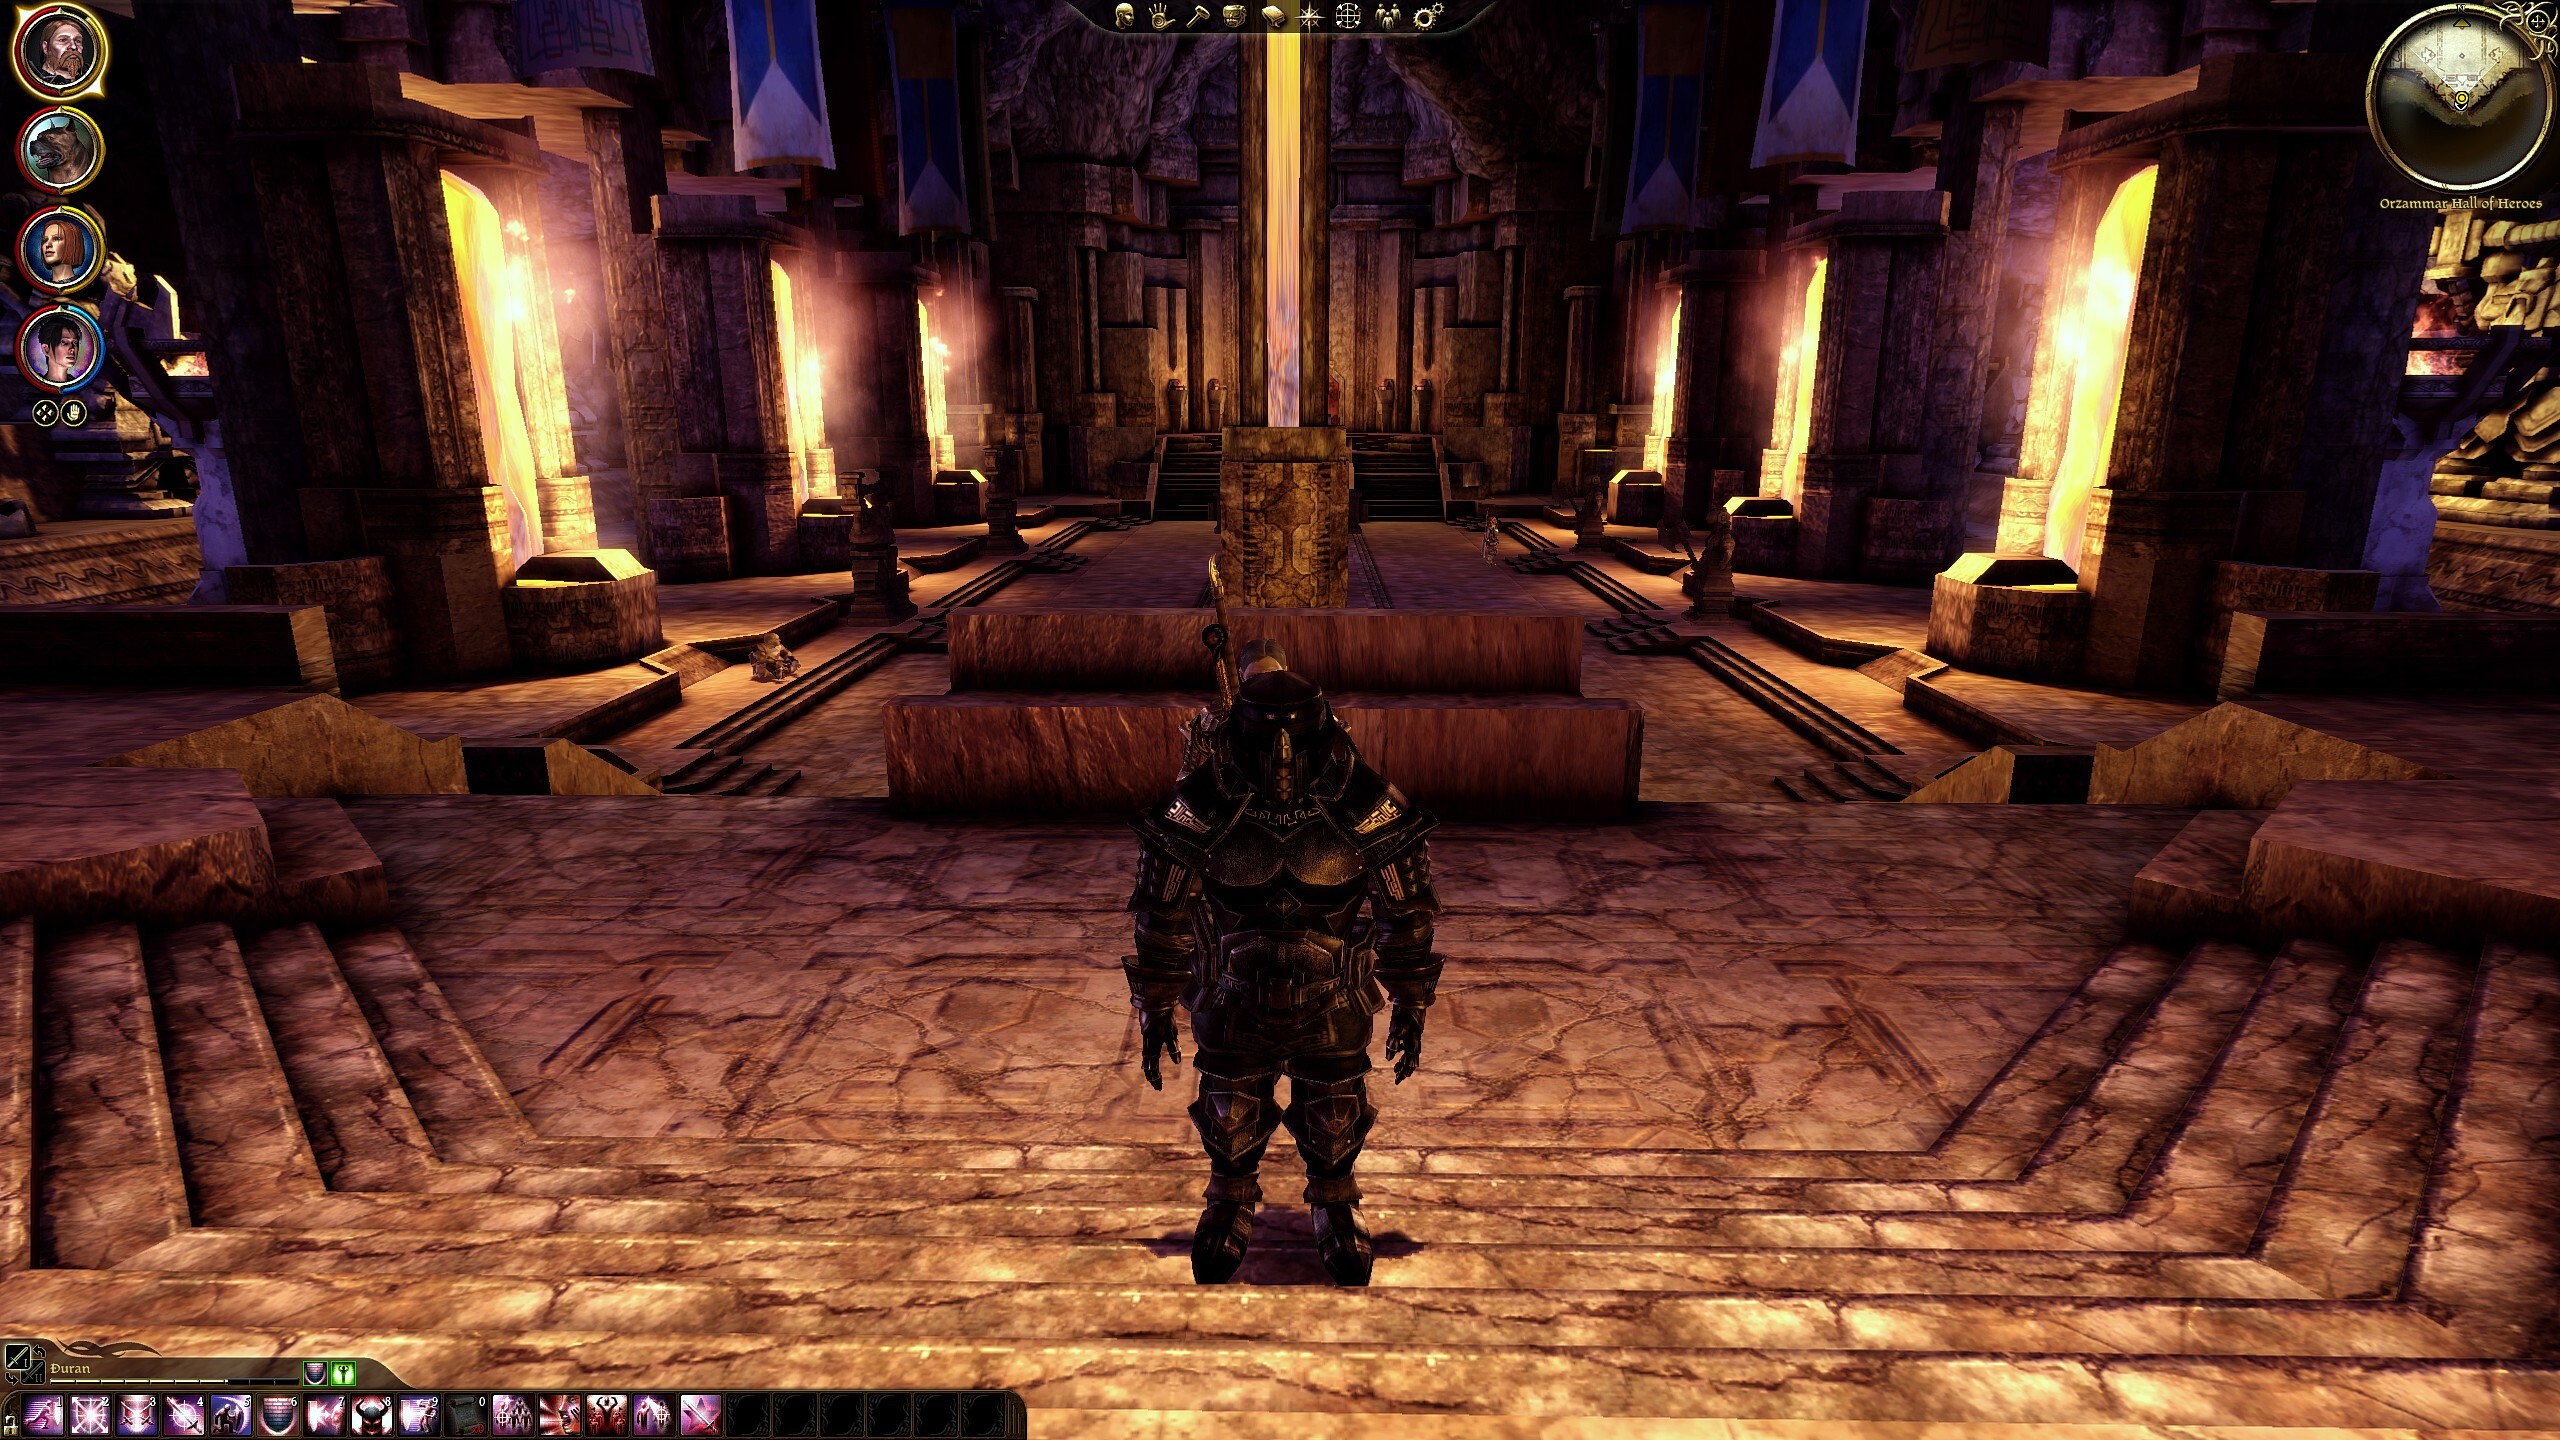
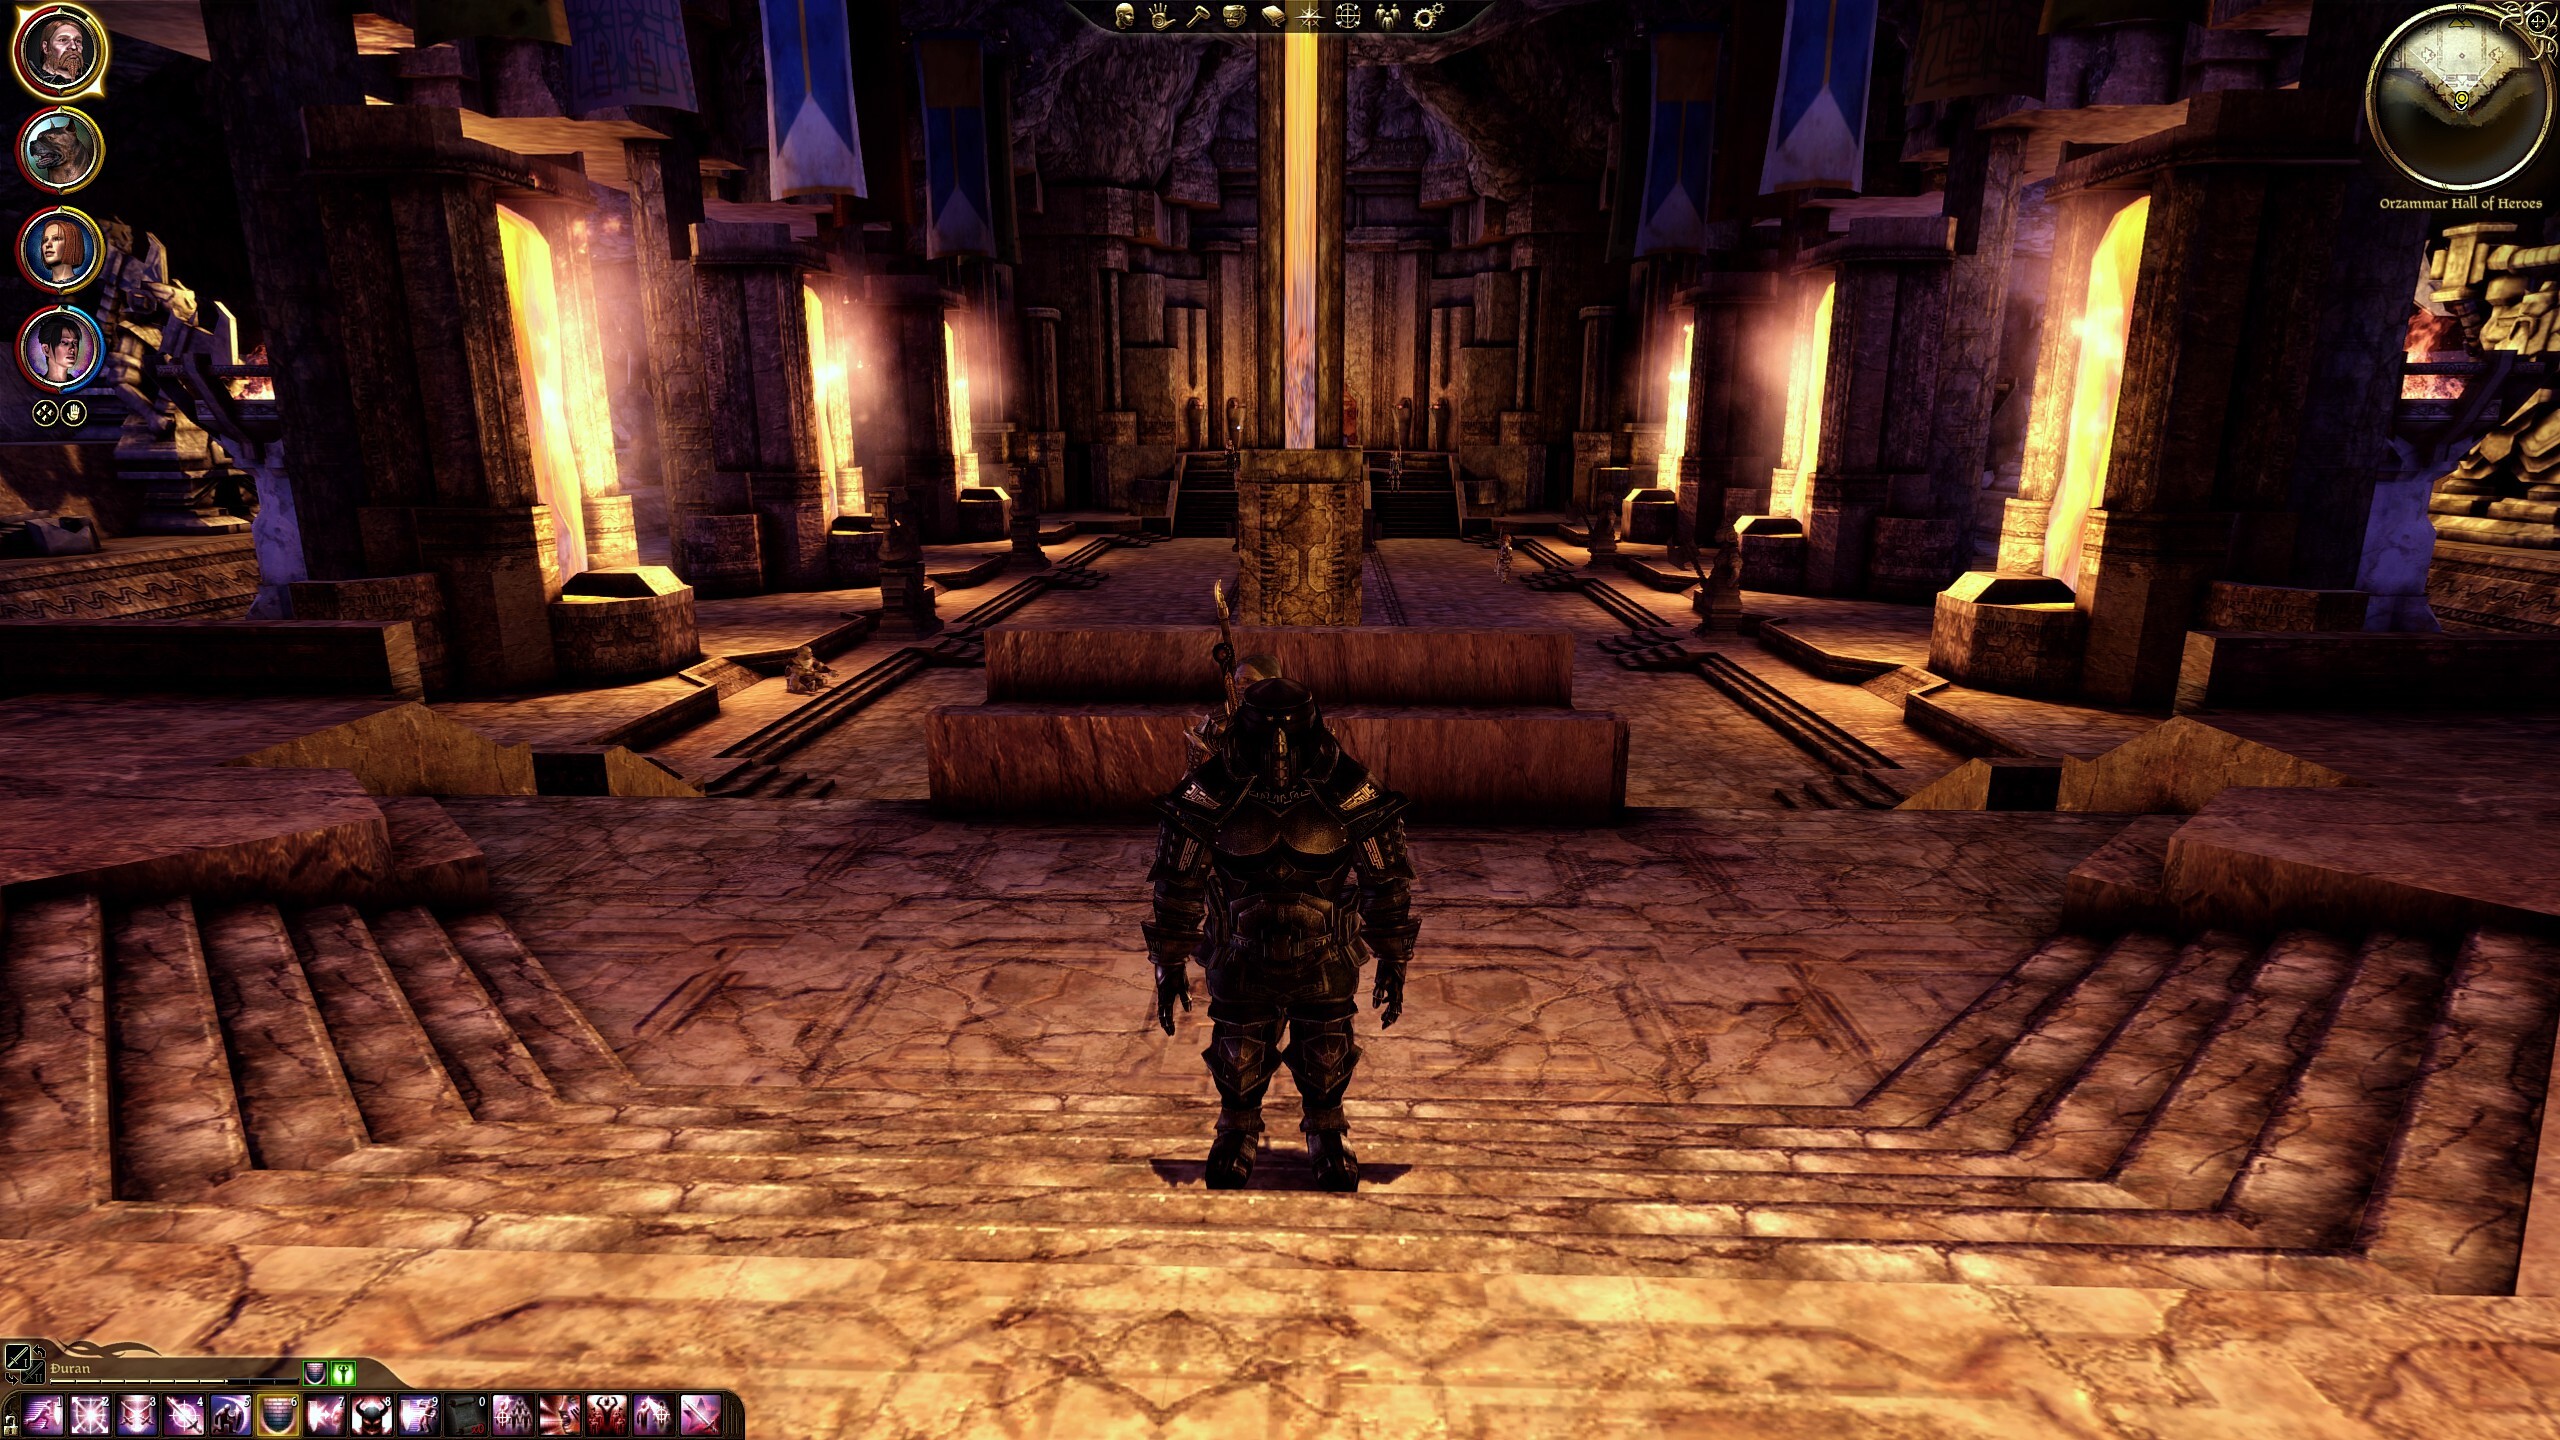
Dragon Age: Origins (2009).
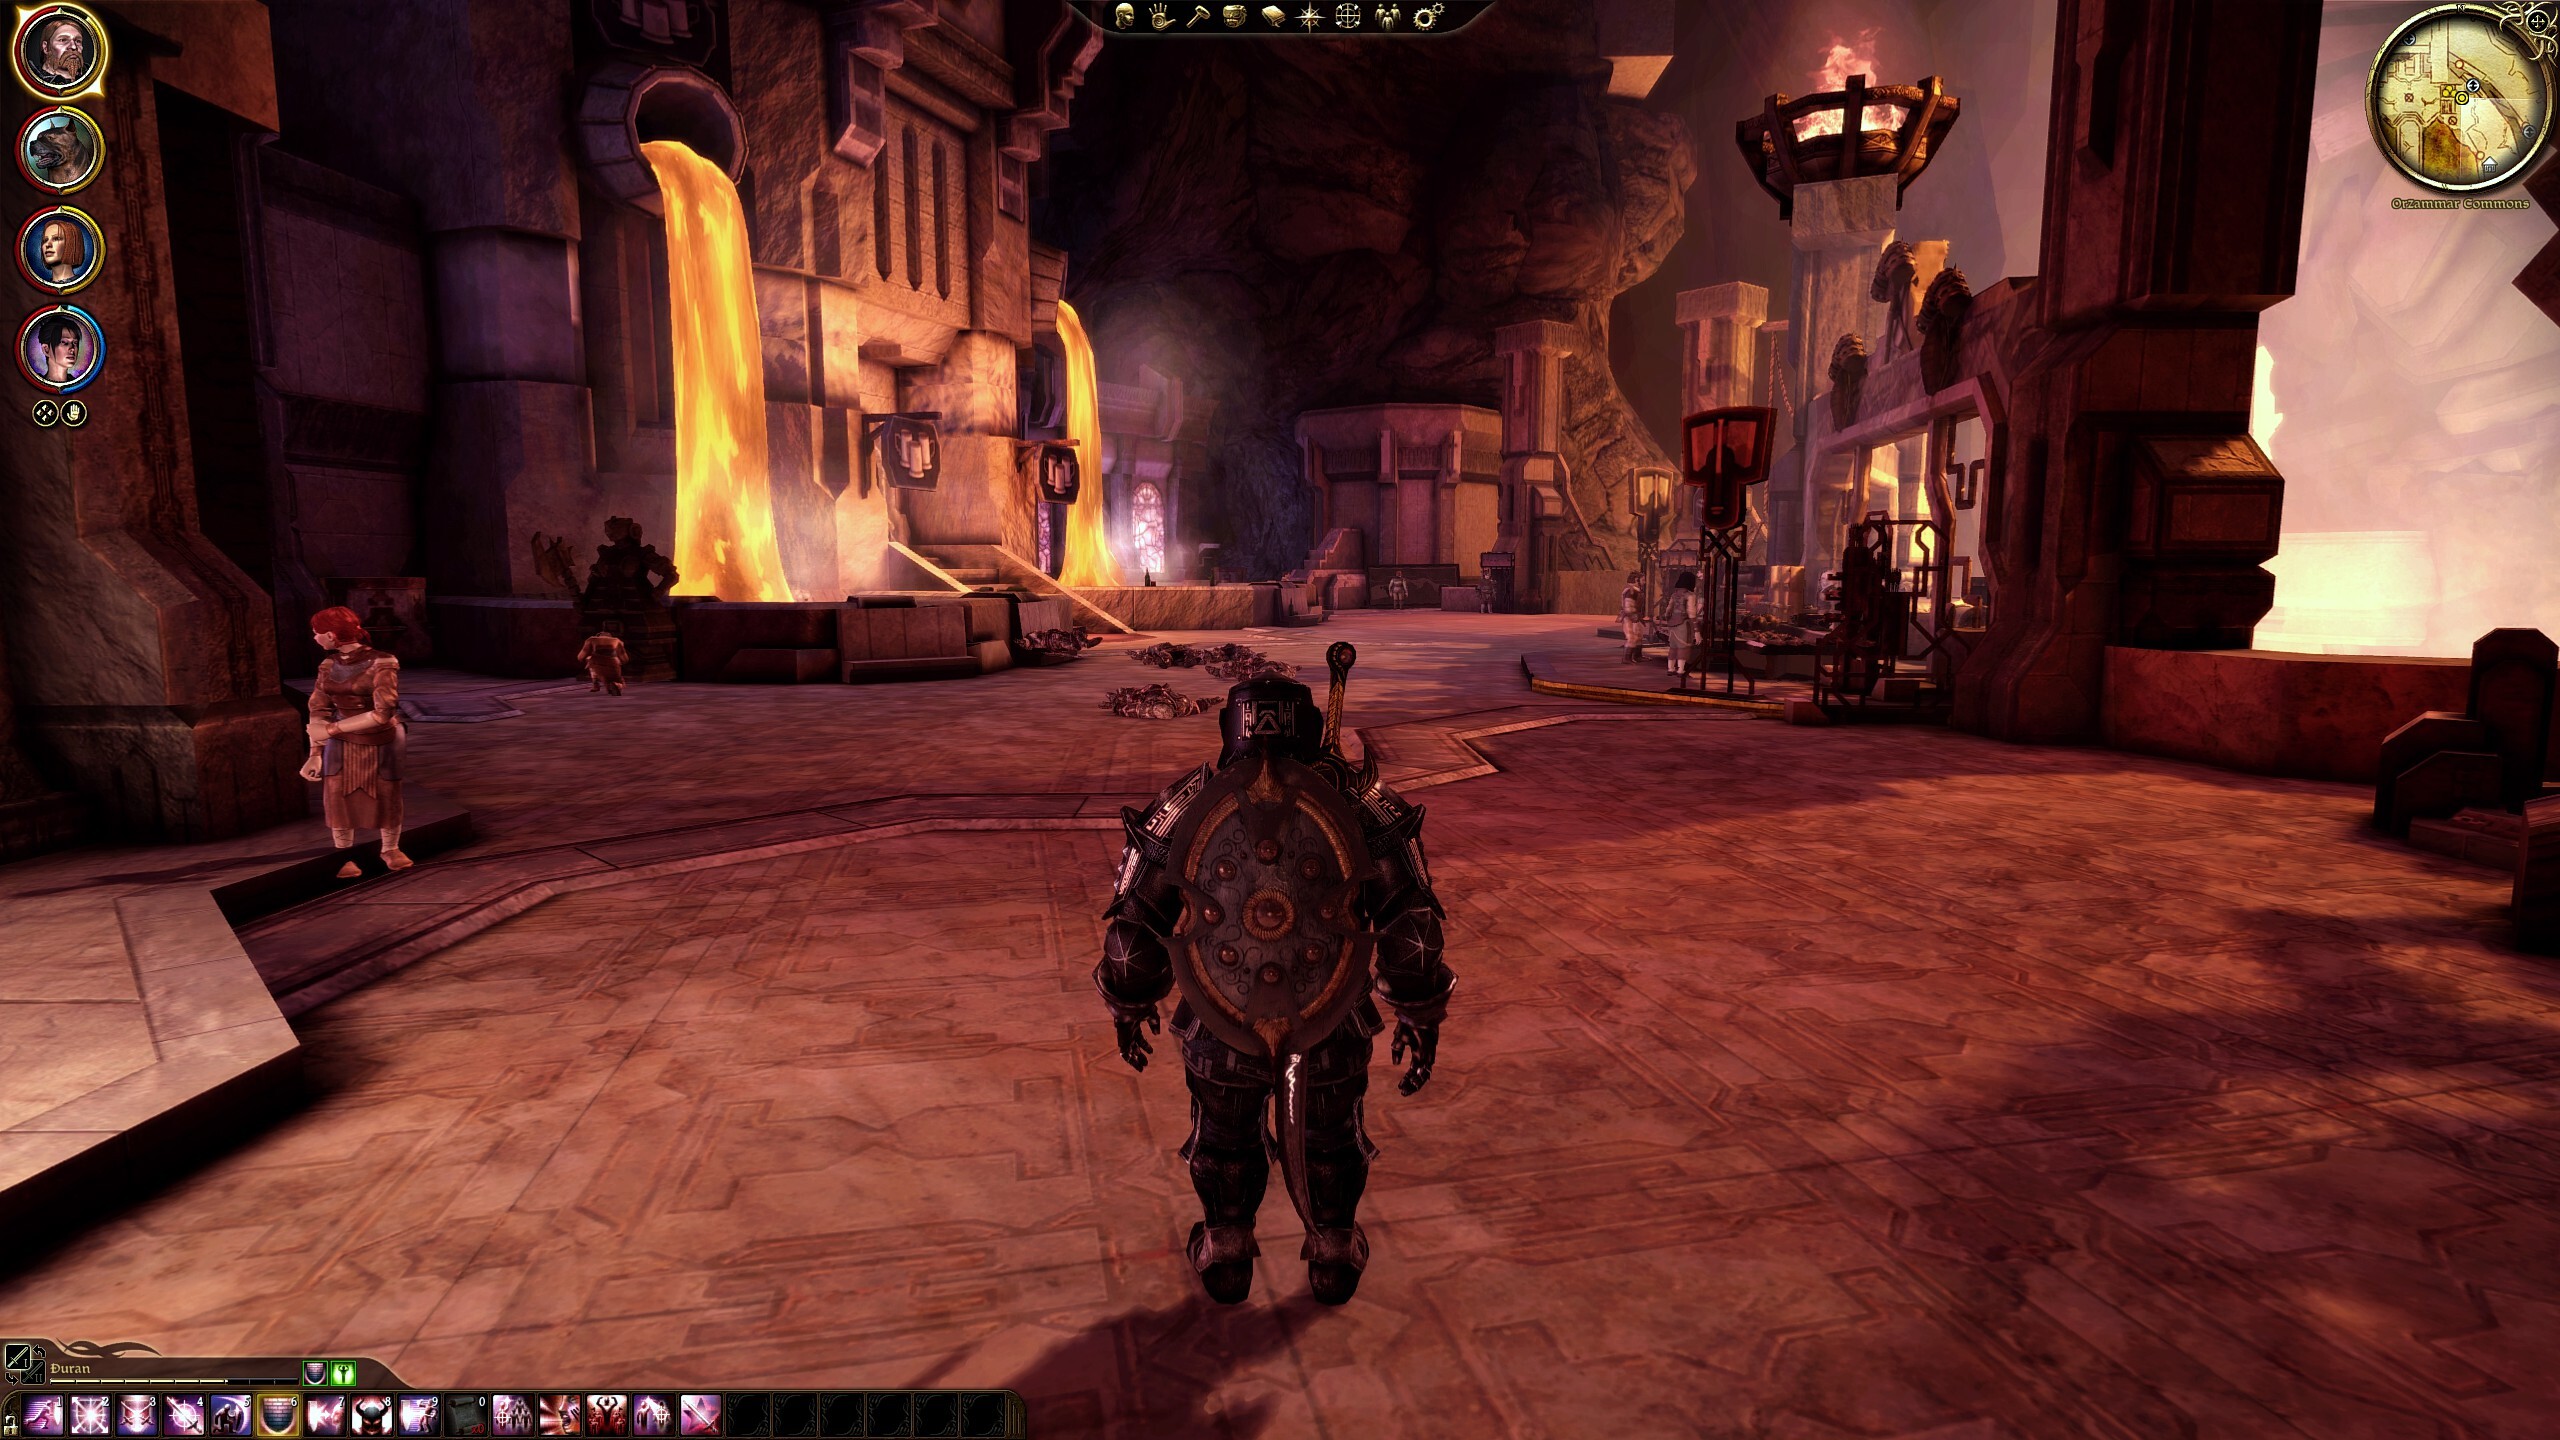
Other than performance, the possible downside to forcing supersampling is blur, which is caused by conflicting post-process shaders. This blur can be countered with post-sharpening injected by something like ReShade, SweetFX, or GeDoSaTo. Alternatively, it can be countered by using more than 2x supersampling. 4x and 8x will either blur a lot less or not have visible added blur at all because the blur is offset by the extra samples (rendering at 4x or 8x native resolution).
When forcing ambient occlusion, if you’re using compatibility bits not listed for a game on that Guru3D thread above, you may notice flickering (ambient occlusion turning on and off). Also, in some engines like UE3, forced ambient occlusion will appear to shine through fog and volumetric effects.


thanks very usefull topic
tnx
I know this article is old but in these older games ssaa might be the best method of AA but it’s definitely not for modern titles as even rendering at 4k and down sampled to 1080p which is a 4x increase in pixel count will have shimmering jaggies on any edge that is heavily effected by alpha effects and nothing you do aside from something like taa injection will eliminate them all and taa injection only works if the engine has built in but disabled support and even then it may be impossible due to its temporal nature. Also id… Read more »
Yeah the overall best AA for modern rendering is DLAA (DOOM Eternal’s TSSAA 8x matches it in that game). It’s both efficient and solves most aliasing even at 1080p.
For ReShade MXAO do you use the one called Quint’s MXAO? That’s the one I used and it doesn’t seem to do anything. Like ticking the box and nothing happens.
That’s the one. Are other ReShade effects working in that game? Have you tried increasing the strength of MXAO just to see if that does anything?
How did you set up AA for call of duty 2003? only ones working were fxaa and mfaa but i want supersampling and none seem to work. I’m using the MSAA.fx on reshade and looks good so far but would like a stronger effect
Seems like OGL compatibility has gotten worse over the years. It’s an OGL game so it used to just work with either SGSSAA or HSAA.
The AA compatibility bit sheet mentions using “OGL_OCGCONTROL_DIRECT_NVIR — FORCE_ENABLE” for SSAA, while setting it to FORCE_DISABLE for MSAA.
If all of that fails, you can try MSAA.fx + DLDSR.
google “rotated sparse grid super sampling profile inspector” then enjoy
Hello Jester, great article! I never bothered with Nvidia Inspector since I just use DLDSR for older games. If it’s a newer game, I use DLDSR + DLSS Quality and that’s the second best possible AA/image quality I’ve ever seen. The absolute best being DSR 4.00x + DLSS Quality(at least to my eyes) but it’s too expensive for now. I will give the MXAO from Reshade a try though!
it would be much better to just use DLAA via DLSS mod.. better image quality and performance and no effort needed
+1, if there’s ever a DLSS or FSR 2-3 or XeSS mod for a game, use that above all if it’s not terribly buggy.